MyWarm
home.co.uk
Solar is free energy just the initial setup costs
Thinking About Solar Panels? Start Here Before You Install
Solar panels are one of the most popular home energy upgrades in the UK. With electricity prices remaining high and homeowners looking to reduce their carbon footprint, generating your own electricity can be an attractive option.
However, not every roof is suitable for solar panels, and not every installation delivers the savings homeowners expect. Before signing a contract, it’s important to understand the investigation process, what makes a good solar installation, and the checks you should carry out after the system has been commissioned.
For more in depth on solar we have a part 2.
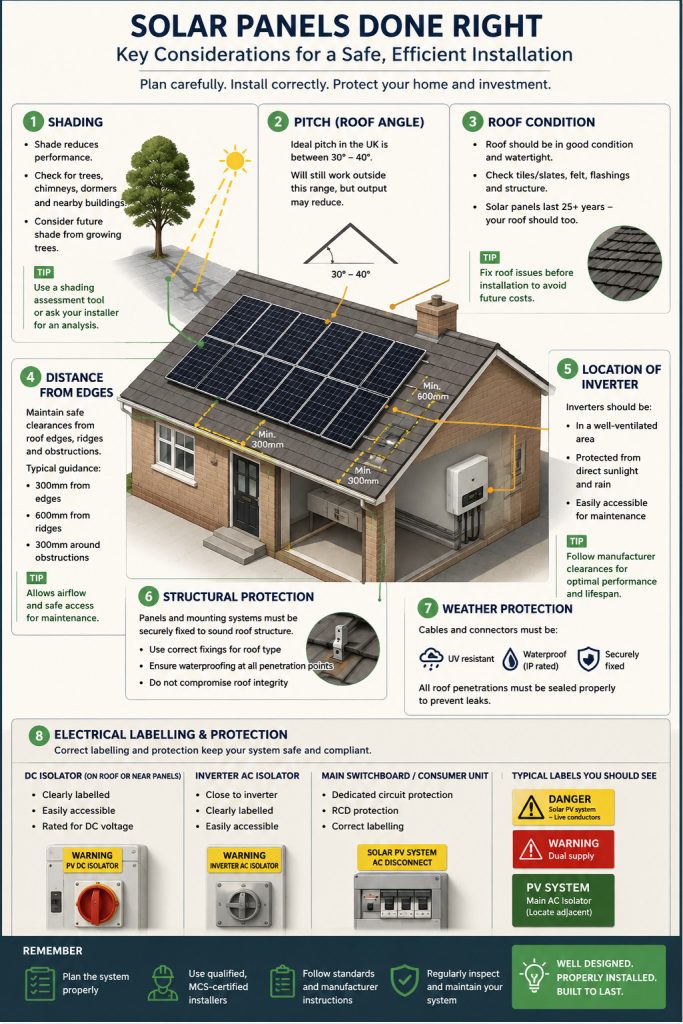
Step 1: Is Your Home Suitable for Solar Panels?
The first stage should always be assessing whether solar panels are appropriate for your property.
Roof Orientation
In the UK, south-facing roofs typically achieve the highest energy generation. East and west-facing roofs can still perform well, often producing around 80-90% of the output of a south-facing system.
North-facing roofs are generally less suitable, although advances in panel efficiency mean some installations may still be viable.
Roof Pitch
Most solar panels perform well on roof pitches between 30 and 40 degrees. Shallower or steeper roofs may produce slightly less electricity, but this does not automatically rule out an installation.
Shading Assessment
Trees, neighbouring buildings, chimneys, dormers, and roof-mounted equipment can all reduce performance.
A professional survey should identify:
- Existing shading
- Future shading risks
- Impact on annual generation
- Panel layout restrictions
Even small areas of shade can significantly affect output if not properly considered during system design.
Roof Condition
Solar panels are designed to remain in place for 25 years or more.
Before installation, consider:
- Age of roof covering
- Condition of tiles or slates
- Structural integrity
- Existing roof defects
Installing solar panels on a roof that requires replacement in the near future can result in additional costs when panels need to be removed and reinstalled.
Electrical Capacity
Your installer should assess:
- Consumer unit condition
- Earthing arrangements
- Existing electrical installation
- Available capacity for generation equipment
Older electrical installations may require upgrades before solar can be connected safely.
Step 2: Understanding Your Energy Usage
One of the biggest mistakes homeowners make is focusing solely on the size of the solar system.
The better question is: How much electricity does your home actually use?
Review your electricity bills and consider:
- Annual electricity consumption
- Daytime energy usage
- Future changes such as heat pumps or electric vehicles
- Battery storage requirements
A well-designed system should be based on your current and future energy demands rather than simply maximising the number of panels on the roof.
Step 3: Choosing an Installer
Not all installations are equal. When comparing installers, ask for:
- MCS certification
- Product warranties
- Workmanship warranties
- Detailed performance estimates
- Clear panel layout drawings
Be cautious of sales claims that guarantee savings without considering your actual energy consumption patterns.
A good installer should explain both the benefits and limitations of solar generation.
Step 4: The Installation Process
Once the design has been agreed, installation can usually be completed within one to two days for a typical domestic system.
Roof Mounting System
Mounting brackets are fixed securely to the roof structure.
The installer should ensure:
- Weatherproof penetrations
- Correct fixing methods
- Appropriate spacing
- Compliance with manufacturer requirements
Poor roof detailing can lead to water ingress and future maintenance issues.
Panel Installation
Panels are secured to the mounting rails and connected together using specialised DC cabling. The installer should ensure:
- Secure cable management
- Adequate ventilation beneath panels
- Correct panel spacing
- Protection against damage and abrasion
Inverter Installation
The inverter converts electricity generated by the panels into usable electricity for your home. It should be installed:
- In a suitable location
- With adequate ventilation
- Away from excessive heat sources
- In accordance with manufacturer guidance
Poor inverter positioning can reduce lifespan and performance.
Electrical Connection
The solar system is connected to your home’s electrical installation.
This work should include:
- Appropriate circuit protection
- Isolation switches
- Labelling
- Testing and certification
Step 5: Commissioning and Handover
Before the installer leaves, the system should be commissioned and tested. You should receive:
- Electrical certificates
- MCS certificate
- Product warranties
- User manuals
- Performance estimates
- Emergency shutdown information
Do not accept an installation without the appropriate documentation.
Step 6: Post-Installation Checks
Many homeowners never verify whether their system is performing as expected. After installation, check:
Generation Monitoring
Monitor generation through the inverter or monitoring app.
Compare actual generation against the installer’s estimates, allowing for seasonal variations.
Roof Inspection
Visually inspect:
- Panel alignment
- Roof condition
- Cable routing
- Flashings and penetrations
Any signs of damage or water ingress should be investigated promptly.
Electrical Safety
Ensure all labels remain visible and accessible.
Report any unusual noises, smells, or fault indicators immediately.
Should You Add Battery Storage?
Battery storage can help increase self-consumption by storing excess electricity generated during the day for use in the evening.
Battery systems may be particularly beneficial if:
- You are away during the day
- You have a heat pump
- You charge an electric vehicle
- You want greater energy independence
However, batteries increase installation costs and should be assessed based on your individual usage patterns.
For more in depth on solar we have a part 2.