
RENEWABLES / MY WARM HOME
Solar panels: a homeowner’s guide.
Check the roof, understand your electricity use and plan the complete installation before you commit.
01
Check your roof
Orientation, pitch, shading and roof condition.
02
Plan the system
Understand consumption, output and installer proposals.
03
Install safely
Mounting, panels, inverter and electrical work.
04
Check & maintain
Commissioning, handover and ongoing performance.
THE SHORT VERSION
A good solar installation starts before a panel goes on the roof.
Solar photovoltaic (PV) panels generate electricity for the home. Suitability, generation and savings depend on the property, the proposed system and when the household uses electricity.
Not every roof is suitable, and not every installation will deliver the savings a homeowner expects. Survey the roof, check your electrical installation, compare detailed estimates and understand the handover before signing.
This guide follows the practical journey from the first survey to monitoring the finished system. For a more detailed companion guide, see Solar — Part 2.
01 / PROPERTY SUITABILITY
Is your home suitable for solar panels?
The first stage is to understand the roof, its surroundings and the existing electrical installation. A solar proposal should be based on the site, not simply the number of panels that fit.
01
Roof orientation
South-facing roofs often generate strongly in the UK. East- and west-facing roofs can also be worthwhile; actual output depends on the site.
02
Roof pitch
Tilt affects generation, but there is no single angle that automatically makes or rules out a system.
03
Shading
Trees, neighbouring buildings, chimneys, dormers and equipment can reduce generation and affect panel layout.
04
Roof condition
Check the covering, fixings, structure and likely future repairs before installing equipment intended to remain in place for many years.
A professional survey should consider existing and future shade, annual-generation estimates, usable roof area, access and the impact of panel positioning.
01 / ELECTRICAL CHECKS
Assess the existing installation as well as the roof.
Your installer should review the consumer unit, earthing arrangements, existing wiring and the available capacity for generation equipment.
The pre-installation survey should cover
- Consumer unit condition and suitable circuit protection.
- Earthing and bonding arrangements.
- Cable routes, inverter location and isolation requirements.
- Whether remedial work or upgrades are needed before connection.
These are specialist electrical assessments. Do not assume that a physically suitable roof means that the electrical connection is ready.
SOLAR PV / THE ORIGINAL GUIDE
See how a homeowner solar project comes together.
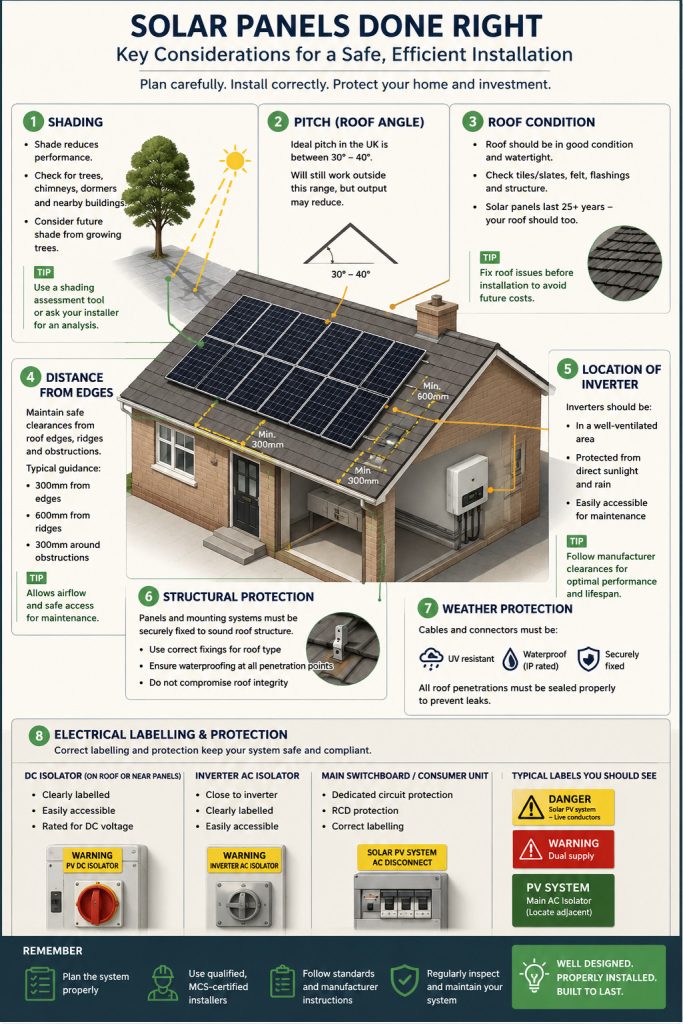
Panels generate direct-current (DC) electricity, an inverter converts it to alternating-current (AC) electricity, and the home can use that generation when available.
The system should be designed for the home
A meaningful quotation explains the expected annual generation, panel layout, system components, warranties and how your household’s use affects the financial case.
Think beyond today
A future heat pump, electric vehicle or battery may change how much electricity you use and when you use it.
MYWARMHOME / HOMEOWNER TOOL
Solar PV Planner
Explore how many panels could fit, estimate long-term average generation using location-specific weather data, and create a preliminary two-page PDF report.
Feasibility screening only. Your installer must confirm roof suitability, detailed shading, electrical design, MCS calculations and DNO connection route.
Your inputs are processed to create the estimate. Postcode lookup uses Postcodes.io, and approximate coordinates and system assumptions are sent to the European Commission PVGIS service. Postcode-derived coordinates may be cached temporarily; no completed plans or PDFs are stored by this module. Server/CDN access logs remain subject to your website privacy policy.
02 / ENERGY DEMAND
Size the proposal around real electricity use.
The number of panels is not the complete answer. A well-designed system should take account of your current and future energy demand, with estimated output specific to the roof and shading.
Annual consumption
Review your electricity bills and establish the home’s approximate annual electricity use.
Daytime pattern
Consider how much electricity you can use while the panels are generating.
Future changes
Allow for possible heat pumps, electric vehicles or changes in occupancy and routine.
Battery question
Assess storage against your usage profile, likely surplus generation and additional cost.
02 / THE INSTALLER
Compare evidence, not just promised savings.
Ask prospective installers to explain both the benefits and the limits of their proposed system. Be cautious of guaranteed savings that have not considered your actual electricity use.
Ask for clear documents
- Appropriate installer certification, including MCS where relevant to the proposal or scheme.
- A roof layout and estimated annual generation, with shading assumptions.
- Equipment specifications and product warranties.
- Workmanship warranty and what the installer will maintain or repair.
- A clear breakdown of the installation, any remedial works and handover documents.
The proposal should make it possible to compare different designs on the same basis, rather than simply comparing headline prices.
03 / THE INSTALLATION
The four main installation stages.
Once the design is agreed, the installation sequence should be coordinated around safe roof access, roof weatherproofing and electrical work. Timescales depend on property and project complexity.
01
Roof mounting
Brackets and rails need sound fixing methods, suitable spacing, weatherproof detailing and compliance with the specified system.
02
Panel installation
Panels are secured and connected by suitable DC cabling, with protection against abrasion and damage.
03
Inverter location
The inverter should have a suitable accessible position, appropriate ventilation and the clearances required by its manufacturer.
04
Electrical connection
The connection requires correct circuit protection, isolation, labelling, testing and certification by competent installers.
Poor roof detailing can lead to water ingress, while poor cable routing or equipment positioning can create safety and maintenance problems. These details should form part of the installation plan.
03 / WHAT TO CHECK ON SITE
Small details make a big difference.
The homeowner should understand what is being fitted and why, without carrying out electrical or roof work themselves.
Roof & weather
Check how rails and brackets are fixed, how penetrations are weatherproofed and whether roof defects are addressed.
Panels & cabling
Secure cable routes, correct fittings and adequate support help protect the installation over time.
Inverter & ventilation
Follow the manufacturer’s siting and clearance instructions; avoid inappropriate heat and restricted airflow.
Labels & testing
The final electrical installation needs the specified protection, isolation, warning labels and completed tests.
04 / COMMISSIONING & HANDOVER
Know what to receive before the installer leaves.
The finished system should be commissioned, tested and demonstrated to the homeowner. Keep the final paperwork together for future maintenance and property records.
- Appropriate electrical installation and test certificates.
- MCS certificate where applicable to the installation.
- System drawings, equipment details and manuals.
- Product and workmanship warranty information.
- Estimated system performance and access to generation monitoring.
- Isolation and emergency shutdown instructions.
- Any relevant grid-connection or network-operator documentation.
Ask the installer to demonstrate the monitoring system, identify the isolators and explain what to do if a fault is reported.
04 / AFTER THE INSTALLATION
Four simple checks to keep the system on track.
01
Monitor generation
Review the inverter or monitoring app and compare output with the estimate while allowing for season and weather.
02
Inspect from ground level
Look for unusual panel alignment, damaged roof finishes, loose visible cabling or signs of water ingress. Do not climb onto the roof.
03
Watch for faults
Keep safety labels and access points visible. Report fault indicators, unusual noises, smells or signs of electrical damage promptly.
04
Keep the records
Save warranties, certificates, system drawings and installer contact details for future servicing or property changes.
Performance monitoring helps identify faults, but normal seasonal variation should not be confused with a system defect.
BATTERY STORAGE
Should you store surplus solar electricity?
Storage can increase the amount of your own generation used at home, but it raises initial cost and is not automatically appropriate for every property.
Daytime surplus
A battery can store electricity generated during daylight for use later.
Evening demand
Storage may be relevant where electricity use is concentrated after solar generation falls.
Future loads
A heat pump or electric vehicle can change the amount and timing of household demand.
Cost & design
Battery cost, usable capacity, controls and the household’s actual profile should be assessed before adding one.
THE MY WARM HOME VIEW
A roof full of panels is not a complete plan.
Start with the property and its electrical system, then consider energy demand, the installer’s design, safe installation and reliable handover.
After commissioning, check actual performance over time and keep all documentation accessible. Solar generation, battery storage, heating and future electrical loads work best when considered together.
Continue to Solar — Part 2 for more in-depth reading.
1
complete solar project: roof, electrical design, installation and aftercare.
MY WARM HOME / SOLAR PV
Understand the proposal before signing.
Survey the roof, ask for a reasoned generation estimate and make sure the installation and handover are documented.
BEFORE YOU COMMIT
Design the whole system, not just the panel array.
Your roof, electricity use, future heating, storage and electrical installation all belong in the same conversation.