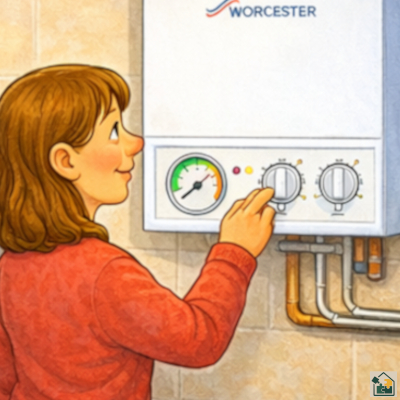
A combi boiler provides both central heating and hot water directly from the mains, functioning much like a powerful, on-demand kettle.
In contrast, a system or regular boiler works by heating a larger volume of water that is stored in a separate hot water cylinder. This stored hot water can then be supplied to multiple outlets at the same time, for example, when more than one shower or taps are running simultaneously. While this setup provides a consistent flow of hot water to larger households, it does require additional space for the cylinder (and, in the case of a regular boiler, a cold-water storage tank too). As a result, system and regular boilers are generally more suited to homes with higher hot water demand and ample storage space.
System and regular boiler.
Usually natural gas or LPG. (can be electric, oil or biomass)
System and regular (or conventional) boilers are both heating systems with key differences in how they supply hot water and work with heating systems.
Here’s a breakdown:
System Boiler.
Components. System boilers have most of the essential components built-in, like the pump, diverter valves and expansion vessel, meaning they don’t need a separate tank to maintain water pressure. They do, however, require a hot water storage cylinder. Operation. System boilers heat water and then store it in a hot water cylinder, making it ready for when you require it. The built-in components make them relatively easier and quicker to install compared to regular boilers. Space. This setup requires less space than a regular boiler because there’s no need for a cold water tank in the loft. Efficiency. System boilers are energy-efficient and can provide hot water at multiple taps simultaneously, ideal for homes with more than one bathroom.
Regular (Conventional) Boiler.
Components. Regular boilers have fewer components within the unit itself. They require both a hot water cylinder (usually stored in an airing cupboard) and a cold water storage tank, typically located in the loft. Pumps and diverter valves are located externally and need to be designed correctly to prevent circulation problems. Operation. Cold water is stored in the loft tank, fed to the boiler, and then heated to supply hot water to the cylinder. This design may be more complex to install but can be better suited to homes with an older heating system that already has a water tank setup. Space. Requires more space overall, due to the need for both a cold water storage tank and a hot water cylinder. Efficiency. Regular boilers are reliable and can handle large volumes of hot water, ideal for larger homes. However, they may not be as energy-efficient due to heat losses from the cylinder and pipework, which should be fully insulated to improve the efficiency.
Handy notes. The hot water delivery rate for regular boilers is down to the head of pressure, this means how high up your cold water tank is, as this forces pressure down into the hot water tank. When water is drawn from the taps or shower, this will dictate the hot water flow (this can also depend on pipe diameters). Usually if you require a good power shower then stored hot water can usually supply.
The KW of system and regular boilers is down to the heating demand. Rule of thumb in the trade is treating each radiator as average 1.5kw, so 10 radiators would need a 15KW boiler! Then add 3kw for water heating.
A means of safely removing condensation from the boiler (soak away, drain etc). Condensate is acidic but not really dangerous (as acidic as lemon juice) but it can damage cement etc over time so it should terminate away from property walls.
External condensate pipework to be insulated with a class 0 insulation and off ground. Condensate pipes can freeze in the winter. Protection using a class 0 insulation (usually black and can be UV protective) prevents the insulation soaking up water and becoming a block of ice! Ideally the manufacturer will state size of condensate pipe to be used, if outside keep off ground and best practice is to terminate indoors. Condensate regulations here.
Benchmark to be competed by installer. This is in the manufacturer’s supplied service book. It needs to be filled in by the installer showing installers address, contact number, name, and business. It’s a tick box exercise to show the installer has signed off the installation. Flues should be at least 300 mm from openings into property (windows, doors etc). This is to stop products of combustion entering the property. A high level flue kit can be used in some circumstances to mitigate distance. Flues should be over 2m from ground. If not, then a flue guard is needed to protect from damage.
All combustion appliances must be installed by a competent person. Flues must be clear of openings to prevent products of combustion entering our dwellings. Below is a basic diagram showing flue clearances. Boiler manufacturer installation instructions will show correct clearances for each specific boiler and flueing arrangements (horizontal, vertical). The regulations sections has more information. Here is a link to a some Worcester literature which goes into more depth on flues.
Flue regulations.
All combustion appliances must be installed by a competent person. Flues must be clear of openings to prevent products of combustion entering our dwellings. Below is a basic diagram showing flue clearances. Boiler manufacturer installation instructions will show correct clearances for each specific boiler and flueing arrangements (horizontal, vertical). The regulations sections has more information.
Selecting a trustworthy installer for your heating, insulation, or renewable energy project requires careful research and due diligence.
Hiring the right professional ensures your home is safe, efficient, and compliant with regulations, and helps protect warranties, insurance, and grant eligibility.
Reputable installers are often accredited by recognised trade bodies or professional organisations. Accreditation confirms that the installer:
Meets industry standards
Has undergone proper training
Is legally authorised to perform specific types of work
NAPIT – Covers electrical and heating installations.
NICEIC – Approved contractor scheme for electrical work.
MCS – Microgeneration Certification Scheme – Required for heat pumps, solar PV, and renewable energy installations. Using accredited installers is essential for compliance, safety, and accessing grants or incentives, such as the UK Boiler Upgrade Scheme (BUS) or ECO4 funding.
Find a Qualified Retrofit Installer
Select the work you want carried out on your home.
This guide shows the qualifications, certifications and governing bodies
a competent installer should hold.
▼
Being registered with the above does not always mean the work is checked by the certification company, It usually shows competence within the field of current health & safety practices and current regulations. Remember that if you have any work carried out at your property either on a grant scheme or self financed you should be covered by consumer rights. The citizen’s advice is always a good place for information.
Some of the below will help with your journey in finding trades.
If you feel you are vulnerable.
Try to get a family member or neighbour to sit in with you when getting quote visits, also maybe designate someone else to deal with the process.
Ask for Recommendations.
Seek recommendations from friends, family, or colleagues who have recently had similar work done. Personal recommendations can be invaluable in finding trustworthy installers.
Read Reviews and Testimonials.
Check online reviews and testimonials on platforms like Trustpilot, Checkatrade, or Which? Trusted traders and google reviews. These platforms often provide insights into the quality of work and customer satisfaction, But please be aware that not all reviews can be genuine!
Obtain Multiple Quotes.
Don’t settle for the first installation company you find. Obtain quotes from multiple companies for comparison. Be wary of quotes that are significantly lower than others, as they may indicate subpar workmanship or the use of inferior materials. If you are applying down a grant funded route, then be weary of being promised the earth or pushed into signing up. Any decent installation company should keep you at ease and answer all your questions honestly.
Verify Insurance and Guarantees.
Ensure that the installation company/individual has adequate insurance coverage, including public liability insurance, to protect you and your property in case of accidents or damage. Also, inquire about any guarantees or warranties offered for the work they perform.
Check for Compliance with Regulations.
Certain types of work, such as electrical or gas installations, require compliance with specific regulations and safety standards. Verify that the installers you choose are appropriately qualified and registered to carry out such work.
Communicate Clearly.
Communicate your expectations clearly, including timelines, budget constraints, and any specific requirements you may have. Reputable installers will be transparent and be responsive to your needs.
Trust Your Instincts.
If something feels off during your interactions with installers or if they seem unwilling to provide necessary information or documentation, trust your instincts and consider looking elsewhere.
Get Everything in Writing.
Once you’ve decided on an installation company, make sure to get all agreements, including costs, timelines, replacement of fixings (window sills, skirting etc) redecorating and scope of work, in writing. This helps protect both parties and ensures clarity and accountability throughout the project.
External Wall Insulation can significantly change the look and function of your property, so it’s important to understand the process in detail before work begins. Confirm what insulation system will be used, its thickness, and the finish type (e.g. render, brick-slip, or cladding). Ask how the installers will deal with fixtures and features such as satellite dishes, alarm boxes, lights, air vents, overflow pipes, and external taps—these should all be properly removed, extended, and reinstated, not simply covered over.
Openings and Details.
Discuss how the system will accommodate windows, doors, and sills, as these may need to be extended or replaced to ensure proper sealing and to prevent water ingress. Check that drip beads, stop beads, and corner trims will be installed neatly and to specification for a high-quality, durable finish.
Ventilation and Airflow.
Make sure that ventilation and airbricks are not blocked or removed. Ask how they will be extended through the insulation system to maintain airflow and prevent damp or condensation. Obtain a clear ventilation specification, and ensure the finish matches or complements your property’s appearance. For homes with fireplaces or open flues, ask about spillage testing and combustion ventilation to ensure safety and compliance.
Groundworks and Damp-Proof Course.
Confirm that the insulation will finish above the damp-proof course (DPC) and that appropriate base trims and drainage channels will be installed. The system should not bridge the DPC unless designed to do so, as this can lead to moisture problems. Ensure that any existing damp or drainage issues—including blocked gutters or damaged downpipes—are addressed before insulation begins.
Aesthetics and Boundaries.
If your home is part of a terrace, semi-detached, or adjoins another property, ask how the system will terminate at party walls, fences, or neighbouring structures. Ensure that detailing will be neat and watertight. For listed buildings or properties in conservation areas, confirm that planning permission or building consent is in place. Regulations change so what may of been permitted last year may not be now, and visa versa!.
Safety and Compliance.
For homes with chimneys, fireplaces, or combustion appliances, ask about spillage tests and combustion ventilation to ensure safety after the installation.
Documentation and Clean-Up.
Request written details of all materials, fixings, and finishes, including manufacturer names and warranty information. Confirm that all waste and debris will be removed and agree on a timeline for completion and clean-up.
Finally, ensure you have full contact information for everyone involved in the project, including the installation team, project or site manager, and—if installed through a UK grant scheme, the Retrofit Coordinator responsible for oversight and compliance.
Internal Wall Insulation (IWI) and Room-in-Roof Considerations.
Disruption and Reinstatement.
Internal Wall Insulation can be highly disruptive, often requiring the removal of features such as skirting boards, window sills, coving, door frames, electrical sockets, light fittings, and radiators. Confirm that your installer will reinstate all removed items and specify whether they will be restored or replaced. Ensure that qualified tradespeople—such as joiners for woodwork and plumbers for wet work—will carry out these tasks, and get this commitment in writing.
System and Detailing.
Ask which insulation system will be used and how the installer plans to treat complex areas such as coving, cupboards, or meter locations. For room-in-roof spaces, confirm that any loft or eaves hatches will be properly insulated and professionally fitted, not simply boarded over. If you use roof storage, ensure this area remains accessible and structurally suitable for use once insulated.
Check that all electrical, alarm, TV, satellite, and internet cables will be correctly routed through the insulation and fully reinstated afterwards.
Ventilation and Safety.
A ventilation system should be installed as part of the works. Obtain a detailed specification to confirm it meets high standards of performance and finish. For homes with fireplaces or open flues, ask about spillage testing and combustion ventilation to ensure safety and compliance.
Pre-Installation Checks and Documentation.
Before work begins, inspect the external walls, damp-proof course, gutters, and downpipes. Any existing issues must be identified and either rectified by the installer or formally agreed with you in writing, as they can compromise insulation performance and cause long-term problems.
Finally, confirm that all debris will be cleared and agree on a timeline for completion and cleanup. Request full contact details for everyone involved, including the office manager, installation team (noting if subcontractors are used), and—if the work is part of a UK grant scheme—the Retrofit Coordinator overseeing the project.
Cavity Wall Insulation considerations.
Scope and Drilling.
Confirm that all suitable wall areas will be insulated, which may involve internal drilling. Discuss in advance where drilling will occur and what materials will be used to fill and finish the holes afterwards to ensure a neat appearance.
Garages and External Finishes.
For attached but unheated garages, talk through insulation options—particularly if shelving, cupboards, or other fixtures will need to be removed or adjusted. When drilling into external walls, ask what colour of mortar will be used to fill the holes, especially on rendered or painted surfaces. Confirm whether installers will repaint or touch up the finish to match the existing façade.
Material and Clean-Up.
Find out exactly which insulation material is being used and take the time to research its properties and suitability for your home. Clarify whether the installation team will be responsible for cleaning up spills, dust, or debris, and have this commitment documented in writing. If you have outdoor features such as ponds or livestock areas, inform the installers so they can take precautions against overspill.
Ventilation and Safety.
If new ventilation is required, request a clear specification and ensure all installations are completed to a high standard of finish. For homes with fireplaces or open flues, ask about spillage tests and combustion ventilation to maintain safety and compliance.
Pre-Installation Checks and Aftercare.
Inspect external walls, damp-proof courses, gutters, and downpipes before work begins. Any existing damp or drainage issues must be resolved first, as they can undermine the effectiveness of the insulation and lead to long-term problems. Finally, confirm that all debris will be removed and agree on a clear timeline for completion and cleanup—especially important for removal and refill projects.
It can be challenging to assess conditions beneath the floor unless you have a basement. Confirm the type, thickness, and support method of insulation being installed, and ensure all accessible areas will be covered. If floorboards need to be lifted, be aware this can cause damage—ask whether replacements will match the original boards to maintain appearance and consistency. Take pre-installation photographs for reference.
Cross Ventilation.
Adequate underfloor ventilation is essential. Make sure any existing vents or decorative grilles are retained or replaced with alternatives that are both functional and visually appropriate. Request written confirmation of how cross-flow ventilation will be maintained or improved, including details of the units being installed. The system should allow sufficient airflow to prevent moisture buildup and stop water ingress.
Basement Insulation.
If a basement is being insulated, ask about fire safety compliance and verify that all work adheres to current building regulations. It’s worth doing your own research for added assurance.
Ventilation and Safety.
If a ventilation system is included, obtain a detailed specification and confirm it will be installed to a high standard. For properties with fireplaces, request information on spillage tests and combustion ventilation to ensure safety and compliance.
Pre-Installation Checks and Cleanup.
Inspect external walls, damp-proof courses, subfloor ventilation, and rainwater systems (gutters, downpipes, etc.) before work begins. Any existing damp or drainage issues must be resolved first, as they could compromise the insulation and cause long-term damage. Finally, confirm that all debris and waste materials will be removed and agree on a clear timeline for completion and cleanup.
Ask which insulation materials will be used—such as spray foam, mineral wool, or PIR boards—and make sure you understand their limitations and how they may affect your property’s insurance or mortgage eligibility.
Access and Storage.
Discuss how the installation will impact access to essential services in the loft, such as boilers or solar inverters, and whether storage areas will still be usable or need adjustment.
Electrical Safety.
If you have recessed down lights, these must be properly protected to prevent air leakage and potential overheating. Suitable covers or fire-rated caps should be used. For electric showers or other circuits with cables running through the loft, ensure proof is provided that the cables are not buried within insulation, as this can cause overheating.
Pipework and Loft Hatches.
All exposed water pipes should be fully insulated. The loft hatch should also be insulated and drought-proofed to a professional standard—avoid makeshift solutions like loosely stapled insulation.
Ventilation and Timber Protection.
Adequate airflow in the loft is essential to prevent condensation and protect the roof timbers. Confirm that ventilation will be maintained or improved as part of the work.
Whole-Home Ventilation and Safety.
If a new ventilation system is being installed, request a clear specification to ensure it meets high-quality standards and finishes. For homes with open fireplaces, ask about spillage tests and combustion ventilation to ensure safety and compliance.
Most combination boilers need a larger gas supply pipe than older systems, often requiring an upgrade from the meter. Before installation, confirm the planned gas pipe route to avoid unnecessary external runs if an internal route is possible. If the pipe must run outside, ensure it’s properly clipped and installed in line with regulations.
Heating Controls.
Discuss your heating controls and where the thermostat will be located. It should be positioned in a room without a thermostatic radiator valve (TRV) or any secondary heat source such as a fire or cooker, to ensure accurate temperature readings.
Condensate Drainage.
All condensing boilers produce condensate that must be drained safely. Ideally, this drainage point should be located indoors. If the condensate pipe must run externally, it needs to be insulated with Class 0 lagging. Confirm the type of insulation being used and how it will be secured and supported.
System Clean and Preparation.
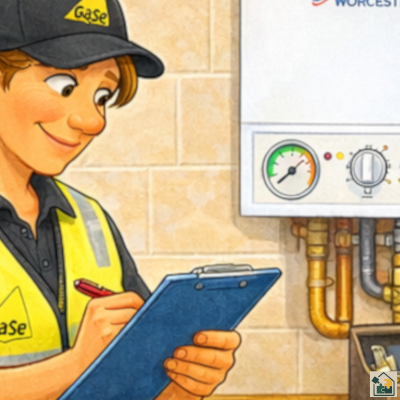
Ensure all debris will be removed during installation and clarify when this will happen. Most boiler manufacturers require a full system flush before fitting the new unit—this is essential. Make sure the installer carries it out, and ideally, observe the process. The correct use of cleaning and inhibitor chemicals is vital for system health, and their use should be recorded in the Benchmark log (the boiler’s installation and service record). Ask for a copy for your files.
Warranty and Guarantees.
Confirm both the manufacturer’s warranty and the installer’s guarantee, particularly regarding leaks and workmanship. Once the boiler is installed, it’s a good idea to call the manufacturer directly after a few weeks to confirm that your warranty is fully registered and active.
You may already know the direction your property faces, but installers might suggest positioning the panels differently. This could be due to access issues, roof condition, or other practical constraints. However, the optimum orientation delivers the best performance, so make sure your installer prioritises efficiency over convenience.
Inverter Location.
The inverter should be installed somewhere easy to access for inspection, servicing, and maintenance, while also being protected from the elements. Some models are suitable for outdoor installation, provided they’re shielded from direct sunlight and rain. If you live near the coast, ask about corrosion resistance and whether additional protection is needed.
Monitoring Meter.
The generation meter (monitoring meter) should be positioned where it can be easily read and checked regularly. Make sure it’s visible enough to monitor energy production and detect early signs of faults (for example, if it isn’t blinking in daylight). Some installers may say it has to go in loft if inverter is also installed there, but dont allow, have it somewhere you can read and check.
Paperwork and Certification.
Confirm the expected timescales for all necessary documentation, including MCS certification, DNO approval, and any paperwork your energy supplier may require.
Warranties and Guarantees.
Clarify the warranty terms and guarantee lengths for all equipment. Make sure you know who to contact in case of faults or system failure.
Get Everything in Writing.
Once you’ve decided on a installation company, make sure to get all agreements, including costs, timelines, and scope of works, in writing. This helps protect both parties and ensures clarity and accountability throughout the project.
Ask your installer to explain which make, model of heat pump is being fitted and why it’s suitable for your property. Confirm that the system has been properly sized for your home, an undersized or oversized unit can reduce efficiency and increase running costs. Request a full design calculation (MCS or equivalent) showing heat loss per room, flow temperatures, and emitter sizing. Ask what refrigirant is used within the pump (R32, R290 etc). Ask about hybrid systems to help in the winter months.
Outdoor Unit Location.
The external unit should be positioned where airflow is unrestricted, but noise and vibration will not affect you or neighbours. It must sit on a stable, level base (often a concrete pad with anti-vibration plinth) and be clear of obstructions such as fences or foliage. If located near boundaries, confirm it meets local noise regulations and planning guidance. It should meet manufactures clearances for optimum airflow. For coastal or exposed locations, ask about corrosion-resistant finishes and protective coatings. (if within 2000m from the coast this is a must)
Internal Components.
Confirm where the indoor cylinder, buffer tank, and controls will be located. These should be easily accessible for servicing and maintenance, with pipework neatly installed and insulated. Discuss how existing systems—such as radiators or underfloor heating will be adapted or replaced, and ensure the flow and return pipe sizes are appropriate for the new system.
Condensate and Drainage.
Heat pumps produce condensate water, particularly in colder weather. This must be drained safely away from the base unit, ideally into a proper soakaway or drain. The pipework must not freeze, so confirm that suitable insulation and gradients are in place. The condensate produced is not the same a a combustion boiler so it is not acidic.
Electrical and Controls.
Ensure the electrical supply is adequate and compliant with regulations, with a dedicated isolator switch. Ask about the control system whether it will use smart thermostats, weather compensation, or load compensation and how to use these features for maximum efficiency.
Groundworks and Protection.
If installing a ground source heat pump, confirm the ground loop layout (horizontal trenches or boreholes), and request documentation of where pipes are buried for future reference. For air source units, confirm that rainwater runoff from roofs won’t drip onto the unit and that the area around the base remains well-drained and clear of standing water.
Warranties, Maintenance, and Support.
Ask for details of warranties and service agreements for both the equipment and installation. Heat pumps require annual servicing to maintain performance and warranty validity, so ensure you receive a maintenance schedule and the installer’s or manufacturer’s contact details.
Paperwork and Certification.
Ensure you receive all necessary documentation, including MCS certificates,DNO notifications, and user manuals. These are essential for warranty registration, grant schemes (such as the Boiler Upgrade Scheme), and resale value.
Cleanup and Completion.
Confirm that all debris and packaging will be removed and agree on a clear completion timeline. Obtain written contact details for the installation company, lead installer, and if installed through a UK grant scheme the Retrofit Coordinator responsible for the project.
When we insulate or upgrade a property, the original construction is just as important as the finished result.
Trying to achieve the unachievable often leads to failure and when it comes to improving our homes, that’s especially true if we ignore how they were originally built.
When we insulate or upgrade a property, the original construction is just as important as the finished result. Over the years, insulation has been added to homes that should never have been insulated, or where the wrong type of insulation was used entirely.
Old Homes Were Built to Breathe.
A typical Victorian house built around 1900 was designed very differently to the homes we build today.
Foundations were modest, often sitting on clay or mixed ground.
Damp courses were made from slate, bitumen, or engineering brick.
Mortars, plasters, and paints were lime-based, fully breathable.
Windows were single glazed timber-framed, and floors were usually suspended timber.
Each room had a fireplace, creating natural airflow through the chimneys.
And there were gaps, many gaps around windows, doors, floors etc.
Back then, heating revolved around open fireplaces burning solid fuels like coal and wood. Fireplaces not only warmed the room but also provided essential ventilation, drawing moisture and stale air out of the house.
Many homes even shared a single heat source, cooking in the kitchen typically provided much of the warmth and recreation. These homes were designed to breathe naturally, to dry out during warmer months and absorb some moisture during winter.
When we insulate or upgrade a property, the original construction is just as important as the finished result. Over the years, I’ve seen insulation added to homes that should never have been insulated, or where the wrong type of insulation was used entirely.
Today, the market is flooded with products, installers, and most of all funding. It’s easy to get swept up in the promise of “free” home upgrades, especially when companies that once specialised in one trade now offer everything from solar panels to external wall insulation. But not every measure suits every home.
Modern Living, Modern Heating.
Fast-forward over a century, and everything has changed. We’ve sealed, insulated, and upgraded our homes with new materials, plastic membranes, synthetic renders, dense boards, foams, and chemical coatings. We’ve replaced original windows with double/triple glazing, blocked up chimneys, and paved over soak aways (front gardens) for parking.
All of these change how our homes manage the movement of heat and moisture. We’ve also changed how we heat our homes:
Gas boilers became the norm through the mid to late 20th century, offering central heating at the touch of a thermostat.
Electric heating followed, from storage heaters to modern infrared panels.
Renewable systems are now taking the stage — air source and ground source heat pumps, solar PV, and hybrid systems.
Each of these heating methods interacts differently with the building fabric. For older homes, especially those built before 1930, installing insulation or modern heating without considering breathability can lead to damp, mould, and even structural damage.
Why Every Home Needs a Tailored Approach.
Before adding insulation or changing your heating system, it’s essential to understand how your home was meant to perform. A Victorian solid wall house behaves very differently from a modern cavity wall home, and what works brilliantly for one can cause real problems for the other.
The Key to a Warm, Healthy, Efficient Home.
When upgrading, the goal isn’t just efficiency, it’s balance. We need to make homes warmer and greener without disrupting how they naturally manage moisture and airflow.
By respecting your home’s original design, using the right materials, and combining insulation with proper ventilation, you can achieve comfort, efficiency, and longevity.
For someone used to a simple dial thermostat, navigating icons, settings, and scheduling interfaces can feel unnecessarily complex.
Controls for modern heating systems are often designed with flexibility in mind—but that flexibility can come at the cost of usability, particularly for older homeowners. Many systems now rely on layered menus, small touchscreens, or app-based controls that assume a level of digital confidence that not everyone has. For someone used to a simple dial thermostat, navigating icons, settings, and scheduling interfaces can feel unnecessarily complex. Even basic adjustments like increasing the temperature can become frustrating if they’re buried behind multiple steps.
There’s also a strong reliance on smartphones and apps, which doesn’t always reflect reality. A significant number of older people either don’t use smartphones at all or use them in a very limited way. Small screen sizes, poor contrast, and fiddly controls can make apps difficult to read and operate—especially for those with reduced eyesight or dexterity. On top of that, concepts like Wi-Fi connectivity, accounts, and software updates can create barriers that simply don’t exist with traditional controls. When heating becomes dependent on an app, it can leave some users feeling locked out of their own system.
Technology awareness plays a big role too. Many modern interfaces assume familiarity with common digital behaviours, swiping, tapping icons, navigating menus, but these aren’t universal skills. For older users, there can be a lack of confidence in “trying things,” especially when there’s a fear of pressing the wrong button and causing a problem. This often leads to systems being left on default settings, or worse, used incorrectly, impacting both comfort and efficiency.
Always ask installers what controls will be fitted. Ask for a easy to manage and NON app connected if technology will cause a problem. Don’t settle for “thats the only one we can fit!”
So what’s available? Encouragingly, there are still more accessible options. Some manufacturers offer simplified thermostats with large buttons, clear displays, and minimal menus, focusing only on core functions like temperature up/down and on/off. Others provide wired controls that stay in a fixed location, avoiding the need for apps altogether. There are also programmable thermostats with physical buttons and high-contrast screens, designed specifically with readability in mind. In more advanced systems, it’s sometimes possible to pair a smart setup with a basic user interface for day-to-day use, leaving the more complex controls to installers or family members if needed.
Ultimately, good design should work for the person using it, not the other way around. When specifying heating controls, it’s just as important to consider usability as it is efficiency. A system that’s easy to understand and operate will always perform better in real life than one packed with features that never get used.
Fabric First Approach, What It Is and Why It Matters!
The fabric first approach is built on a simple principle: reduce heat loss from the building before upgrading heating systems or adding renewables.
“Fabric” is just another term for walls, roof, floors and windows.
Instead of installing a high-tech heating system in a leaky home, fabric first aims to fix the building first, then optimise how it’s heated.
Why Fabric First Became the Gold Standard.
For years, fabric first has been the backbone of UK retrofit policy (including PAS 2035), and for good reason.
1. It Reduces Energy Demand at Source.
By improving insulation and airtightness, the home simply needs less heat to stay comfortable.
Lower energy bills.
Less reliance on heating systems.
Reduced carbon emissions.
This is fundamental—you can’t efficiently heat a home that constantly loses heat.
2. It Improves Comfort and Health
Fabric improvements don’t just save energy, they change how a home feels.
Warmer surfaces (no cold walls).
Fewer draughts.
Reduced risk of damp and mould.
More stable indoor temperatures.
These benefits are well documented, including improved physical and mental wellbeing.
3. It Futureproofs the Home.
A well-insulated building works better with any heating system.
Heat pumps perform more efficiently.
Smaller systems can be used.
Lower running costs long-term.
In other words, fabric first makes every future upgrade more effective.
4. It Supports a “Whole House” Approach
Fabric first encourages thinking about the home as a system:
Insulation.
Airtightness.
Ventilation.
Heating.
All designed together, not as bolt-on measures.
So Why Is It No Longer the “Only” Answer?
Despite its benefits, fabric first is no longer seen as the universal gold standard, especially when viewed through the lens of net zero.
This shift is strongly influenced by research such as the “Every Home Counts” review (which highlighted quality, whole-house thinking, and unintended consequences) and more recent academic work like “Fabric first: is it still the right approach?”.
The Key Challenges.
1. Net Zero Has Changed the Priority.
Fabric first was developed when all heating was fossil fuel-based.
Today, we can decarbonise heat directly using technologies like heat pumps.
Research shows that:
In some homes, switching to low-carbon heating alone can achieve major carbon reductions.
Fabric upgrades, while beneficial, are not always essential for decarbonisation.
2. Time and Scale Constraints.
Deep fabric retrofit (e.g. solid wall insulation, floors, airtightness upgrades):
Is expensive.
Is disruptive.
Requires skilled labour.
At current rates, rolling this out across all UK homes would take decades.
This creates a real issue: If you wait for “perfect fabric,” you may delay urgent carbon reduction.
3. Diminishing Returns.
Many homes have already had:
Loft insulation.
Cavity wall insulation.
What’s left is:
Harder.
More expensive.
More invasive.
The cost-benefit balance becomes less attractive at scale.
Balancing a central heating system properly is what separates a working” system from an efficient, comfortable, and compliant one
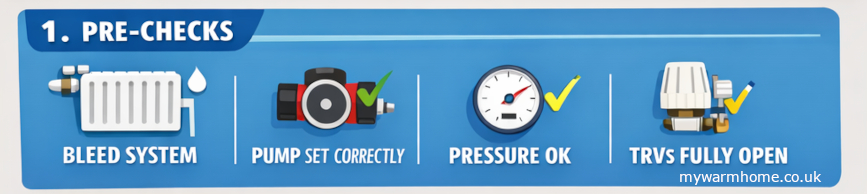
1. Pre-checks are critical.
Before touching lockshield valves:
System fully bled (no air)
Correct system pressure.
Pump operational and correctly set.
All TRVs fully open.
Room thermostat calling for heat.
Boiler at normal operating temperature (flow ~70°C typical).
If these aren’t right, balancing will be inaccurate.
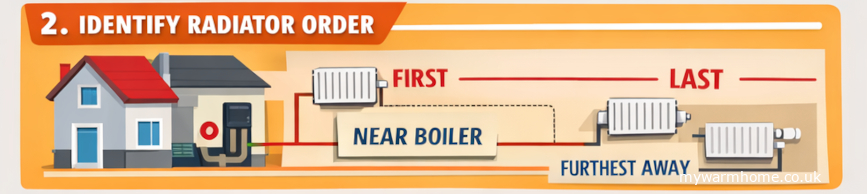
2. Identify radiator order
You need to know flow sequence:
First radiators = closest to boiler
Last radiators = furthest away
This matters because closer radiators naturally take more flow.
3. Fully open all lockshield valves
Remove caps (if still on!).
Open all lockshields fully (anti-clockwise).
4. Measuring temperatures.
Measuring temperatures when balancing radiators can feel a bit daunting at first, but a digital thermometer is inexpensive and easy to use. Most are simple point-and-click devices, allowing you to quickly take readings from the flow and return pipes.
For greater accuracy, clamp thermometers can be used, although they tend to be more expensive.
The flow and return pipes can be installed either way, but typically the TRV is fitted on the flow side. If you’re unsure, it’s worth checking while the system is heating up one side will warm up faster, helping you identify the flow
The Act for the Rebuilding of the City of London was passed in February 1667. It proposed that all new buildings had to be constructed of brick or stone against the future perils of fire. It also imposed a maximum number of storeys per house for a fixed number of abodes to eliminate overcrowding. This was probably the first set of England’s building regulations, the devolved nations have their own regulations.
Regulations and guidance changes all the time. Please always check the most current with HSE, local gov or if in doubt seek proffessional advice. the following is guidance only.
If work is being carried out on UK funded schemes (like warmhomes), then the current PAS works alongside the current building regulations. This sets out how the processes and standards will hopefully prevent failure to the homeowner/tenant. Below are the approved documents for England.
In most cases the regulations are the same for each part of the UK, but variations may exist, and you should reference the specific nation for current standards.
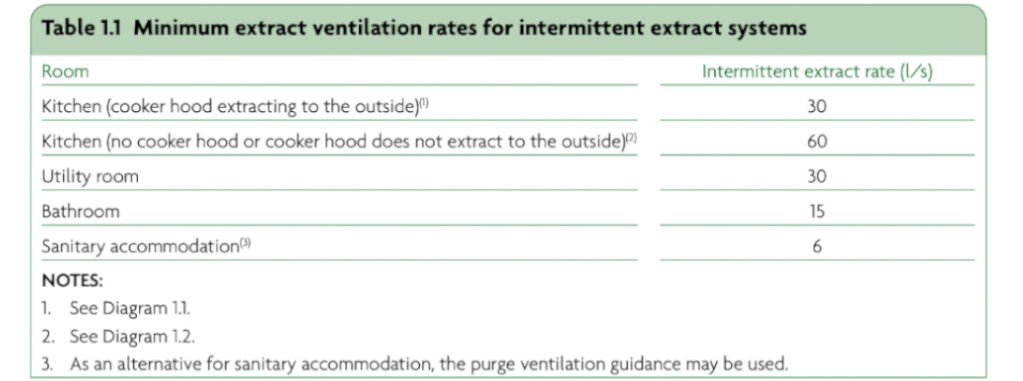
Information and images below from Part F. Extract ventilation to the outside should be provided in all the following spaces.
Kitchens.
Utility rooms.
Bathrooms.
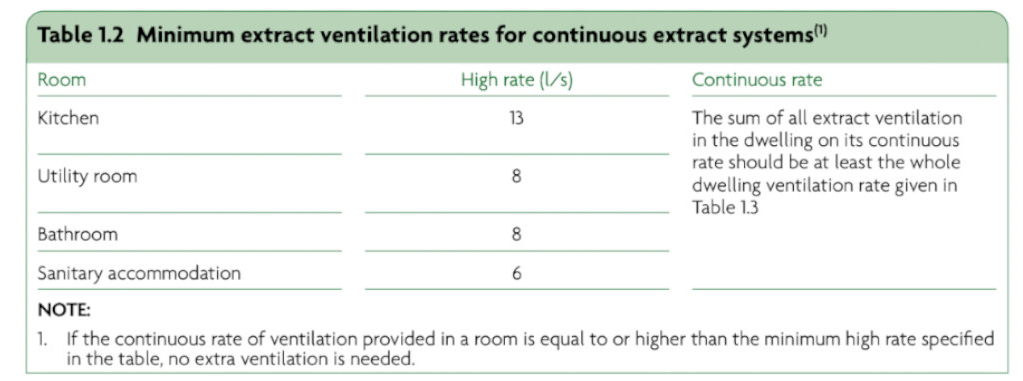
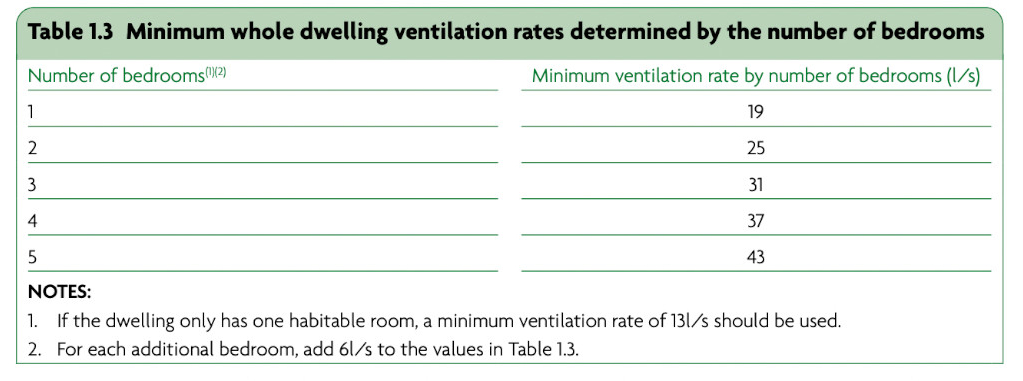
Sanitary accommodation. Extract ventilation can be intermittent or continuous. Minimum extract ventilation rates are in litres per second (l/s) for intermittent operation. Minimum extract ventilation rates for intermittent systems are given in below table 1.1. Minimum extract ventilation rates for continuous operation extract systems are given in below table 1.2. Minimum extract ventilation rates for the whole dwelling are given in below table 1.3. Extract ventilation terminals and fans, not including cooker extract hoods, should be installed to comply with both of the following conditions.
Table 1.1Table 1.2Table 1.3
As high as is practicable in the room.
No more than 400mm below the ceiling.
Where a cooker hood is used to extract to the outside, the height of the extract hood above the hob surface should be either as specified in the manufacturer’s instructions or, if no specification is available, between 650mm and 750mm (gas regulations also apply for gas hobs). Continuously running fans should be set up to operate without occupant intervention, but may have manual or automatic controls for selecting the high rate of operation. Any manual high rate controls should be provided locally to the spaces being served, e.g. bathrooms and kitchens. Automatic controls might include sensors for humidity, occupancy/usage and pollutant release. Controls based on humidity sensors may be installed in moisture-generating rooms (e.g. kitchen or bathroom) but should not be used for sanitary accommodation, where odour is the main pollutant. Other types of automatic controls might be suitable. Where present, automatic controls should operate according to the need for ventilation in the space.
Vents should be at least 1700mm (to reduce draughts) from floor level and should be controllable. The occupants should be able to reach ventilators.
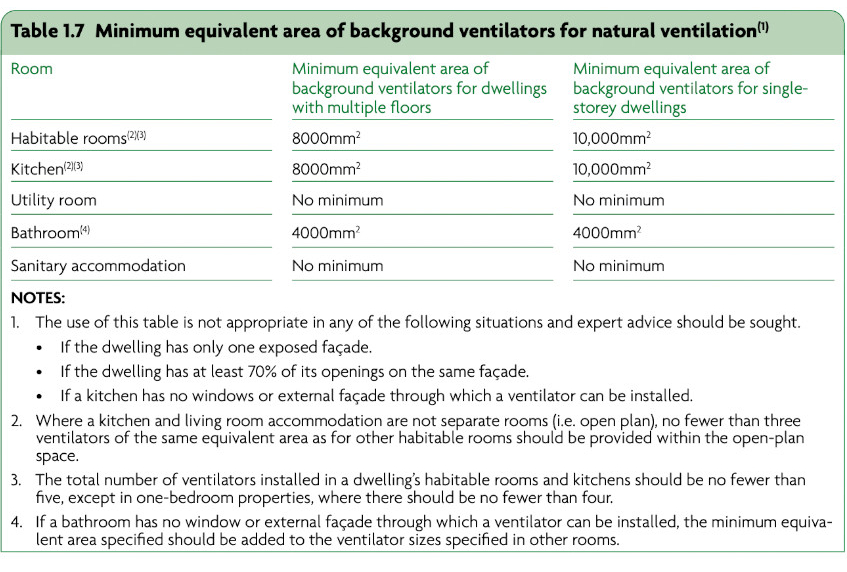
Ventilation should be controllable. Controls may be either manual (i.e. operated by the occupant) or automatic. Background ventilators should be at least 1700mm above floor level, to reduce cold draughts, but still be easy for the occupant to reach. Background ventilators with automatic controls should also have manual override. Where a combustion appliance is installed, any automatic controls must also ensure that the ventilation provided meets the requirements of Part J of the Building Regulations. If ventilators are installed on a funded scheme, then they should meet equivalent area to current PAS.
Background ventilators are intended to be left open during normal circumstances.
Table 1.7
U-Value Regulations at a glance.
U-values for existing dwellings.
Roofs: 0.16 W/m²K
Walls: 0.30 W/m²K
Floors: 0.25 W/m²K
U-values for windows and doors.
Doors with over 60% glazing: 1.2 W/m²K
Other doors: 1.0 W/m²K, with a limiting value of 1.6 W/m²K
Replacement windows: 1.4 W/m²K or a B for its window energy rating (WER)
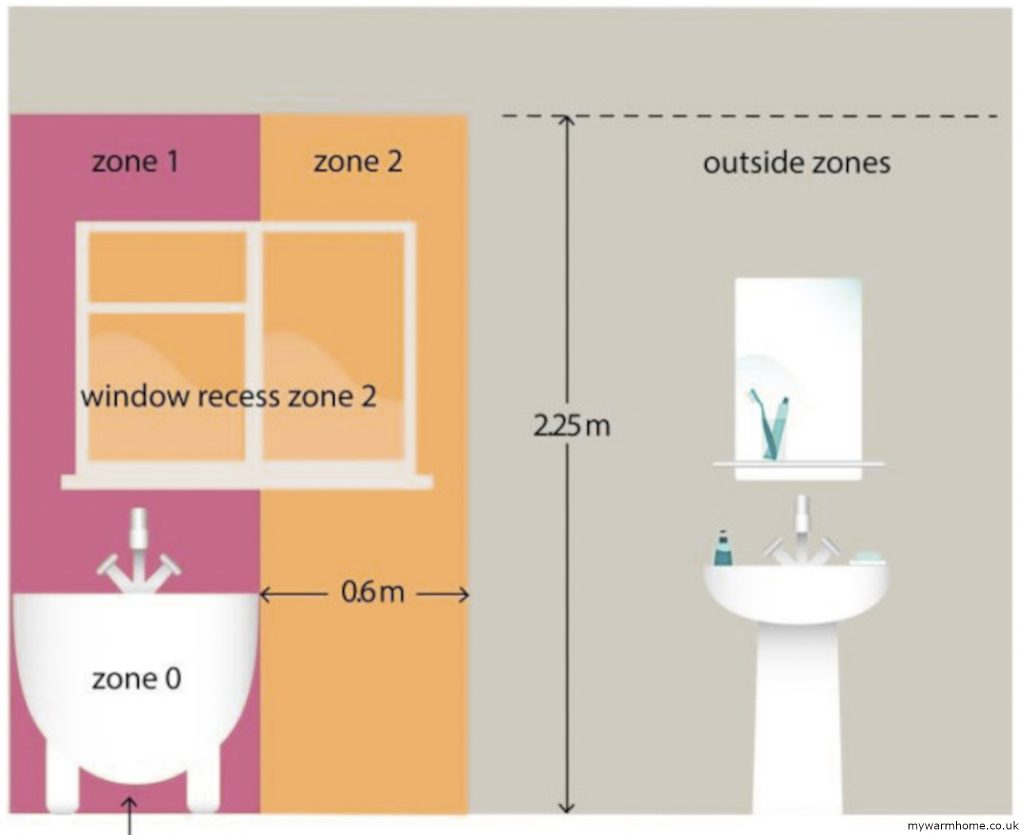
Bathroom Zones.
For electrical installations in bathrooms certain electrical regulations exist. Zones are divided to allow appliances with electrical connections to be installed in each zone. link here.
Zones
Boiler Flues.
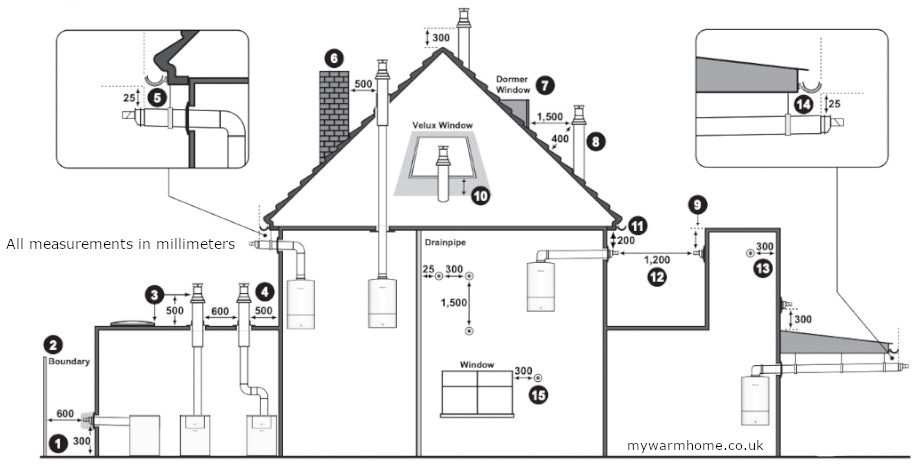
All boiler flues have to be installed with clearances set out by building regulations (Part J) and manufacturer instructions. Some minimum basics are.
300mm from an opening window
300mm from ground level (boiler may be in basement)
600mm from facing wall
List of BS EN standards.
BS EN 13162 to BS EN 13171: Thermal Insulation Products for Buildings. These standards specify the requirements for factory-made thermal insulation products used in buildings. They cover a range of materials, including mineral wool (BS EN 13162), expanded polystyrene (BS EN 13163), extruded polystyrene (BS EN 13164), and cellular glass (BS EN 13167). Each standard details the material properties, performance criteria, and testing methods to ensure the insulation meets the required specifications.
BS EN 13164: Extruded Polystyrene (XPS) Products This standard applies to extruded polystyrene (XPS) products, which are known for their high compressive strength and low water absorption. BS EN 13164 outlines the necessary thermal and mechanical properties, making XPS suitable for applications like perimeter insulation and inverted roofs.
BS EN 13165: Rigid Polyurethane (PUR) and Polyisocyanurate (PIR) Foam Products. This standard applies to rigid polyurethane (PUR) and polyisocyanurate (PIR) foam products. It sets out requirements for thermal performance, dimensional stability, and fire resistance. Due to their excellent thermal properties, these materials are commonly used in wall, floor, and roof insulation.
BS EN 13166: Phenolic Foam Products. This standard covers phenolic foam products, which are known for their high thermal performance and fire resistance. BS EN 13166 specifies the necessary properties to ensure that phenolic foam provides effective insulation in various applications.
BS EN 13167: Cellular Glass Products. This standard applies to cellular glass products with exceptional moisture resistance and compressive strength. This standard ensures that cellular glass meets the required thermal and mechanical performance criteria for insulation applications.
BS EN 13168: Wood Wool Products. Specifies requirements for wood wool products used for thermal insulation. It covers properties like thermal resistance, density, and moisture absorption, ensuring that wood wool provides effective insulation and acoustic performance.
BS EN 13169: Expanded Perlite Products. This standard is for expanded perlite products, which are lightweight and have good thermal and acoustic insulation properties. Outlines the necessary performance characteristics for these products to ensure their effectiveness in building applications.
BS EN 13170: Expanded Cork Products. This standard covers expanded cork products, which are known for their natural insulation properties and sustainability. It ensures that the expanded cork meets the required thermal and mechanical performance criteria for building use.
PAS 2035: Retrofitting Dwellings for Improved Energy Efficiency.
PAS 2035 is a specification for retrofitting domestic buildings to improve energy efficiency. It covers the assessment, design, and installation of retrofit measures, including insulation. The standard aims to ensure a holistic approach to retrofitting, addressing potential issues such as ventilation, moisture control, and thermal bridging.
Reputable installers are often accredited by recognised trade bodies or professional organisations.
Selecting a trustworthy installer for your heating, insulation, or renewable energy project requires careful research and due diligence. Hiring the right professional ensures your home is safe, efficient, and compliant with regulations, and helps protect warranties, insurance, and grant eligibility.
Reputable installers are often accredited by recognised trade bodies or professional organisations. Accreditation confirms that the installer:
Meets industry standards
Has undergone proper training
Is legally authorised to perform specific types of work
NAPIT – Covers electrical and heating installations.
NICEIC – Approved contractor scheme for electrical work.
MCS – Microgeneration Certification Scheme – Required for heat pumps, solar PV, and renewable energy installations. Using accredited installers is essential for compliance, safety, and accessing grants or incentives, such as the UK Boiler Upgrade Scheme (BUS) or Warmhomes funding.
Being registered with the above does not always mean the work is checked by the certification company, It usually shows competence within the field of current health & safety practices and current regulations. Remember that if you have any work carried out at your property either on a funded scheme or self financed you should be covered by consumer rights. The citizen’s advice is always a good place for information.
Some of the below will help with your journey in finding trades.
If you feel you are vulnerable.
Try to get a family member or neighbour to sit in with you when getting quote visits, also maybe designate someone else to deal with the process.
Ask for Recommendations.
Seek recommendations from friends, family, or colleagues who have recently had similar work done. Personal recommendations can be invaluable in finding trustworthy installers.
Read Reviews and Testimonials.
Check online reviews and testimonials on platforms like Trustpilot, Checkatrade, or Which? Trusted traders and google reviews. These platforms often provide insights into the quality of work and customer satisfaction, But please be aware that not all reviews can be genuine!
Obtain Multiple Quotes.
Don’t settle for the first installation company you find. Obtain quotes from multiple companies for comparison. Be wary of quotes that are significantly lower than others, as they may indicate subpar workmanship or the use of inferior materials. If you are applying for funding, then be weary of being promised the earth or pushed into signing up. Any decent installation company should keep you at ease and answer all your questions honestly.
Verify Insurance and Guarantees.
Ensure that the installation company/individual has adequate insurance coverage, including public liability insurance, to protect you and your property in case of accidents or damage. Also, inquire about any guarantees or warranties offered for the work they perform.
Check for Compliance with Regulations.
Certain types of work, such as electrical or gas installations, require compliance with specific regulations and safety standards. Verify that the installers you choose are appropriately qualified and registered to carry out such work.
Communicate Clearly.
Communicate your expectations clearly, including timelines, budget constraints, and any specific requirements you may have. Reputable installers will be transparent and be responsive to your needs.
Trust Your Instincts.
If something feels off during your interactions with installers or if they seem unwilling to provide necessary information or documentation, trust your instincts and consider looking elsewhere.
Get Everything in Writing.
Once you’ve decided on an installation company, make sure to get all agreements, including costs, timelines, replacement of fixings (window sills, skirting etc) redecorating and scope of work, in writing. This helps protect both parties and ensures clarity and accountability throughout the project.
Below are some questions you need to be asking.
External Wall Insulation.
Preparation and Property Impact.
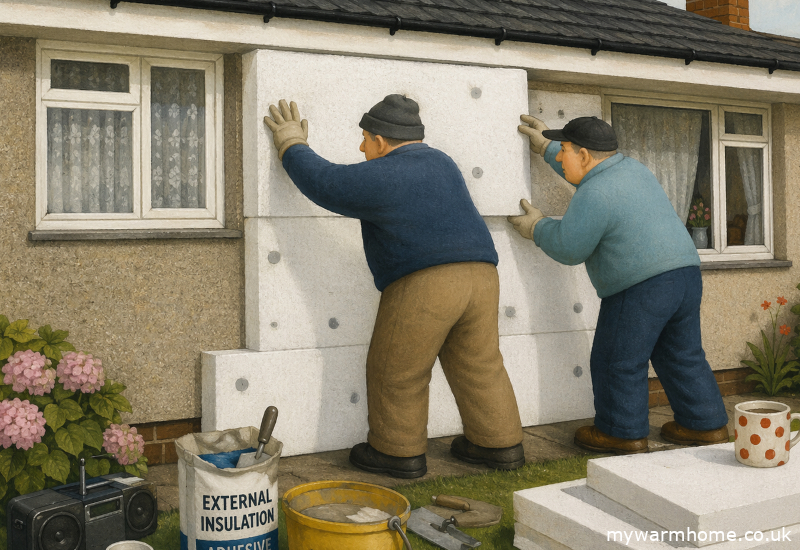
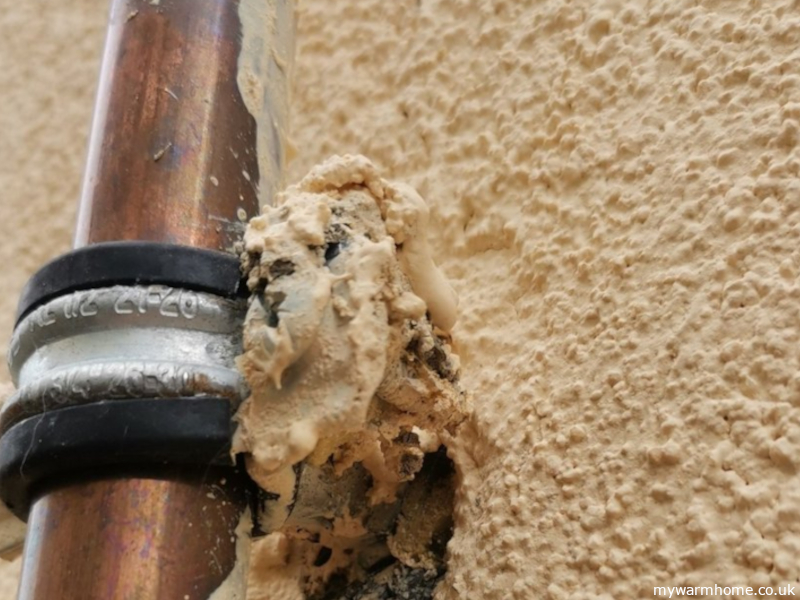
External Wall Insulation can significantly change the look and function of your property, so it’s important to understand the process in detail before work begins. Confirm what insulation system will be used, its thickness, and the finish type (e.g. render, brick-slip, or cladding). Ask how the installers will deal with fixtures and features such as satellite dishes, alarm systems, lights, air vents, overflow pipes, and external taps—these should all be properly removed, extended, and reinstated, not simply covered over or worked around.
Work around detailingGas pipe renderedPoor Fixings
Openings and Details.
Discuss how the system will accommodate windows, doors, and sills, as these may need to be extended or replaced to ensure proper sealing and to prevent water ingress. Check that drip beads, stop beads, and corner trims will be installed neatly and to specification for a high-quality, durable finish.
Ventilation and Airflow.
Make sure that ventilation and airbricks are not blocked or removed. Ask how they will be extended through the insulation system to maintain airflow and prevent damp or condensation. Obtain a clear ventilation specification, and ensure the finish matches or complements your property’s appearance. For homes with fireplaces or open flues, ask about spillage testing and combustion ventilation to ensure safety and compliance.
Groundworks and Damp-Proof Course.
Confirm that the insulation will finish above the damp-proof course (DPC) and that appropriate base trims and drainage channels will be installed. The system should not bridge the DPC unless designed to do so, as this can lead to moisture problems. Ensure that any existing damp or drainage issues—including blocked gutters or damaged downpipes—are addressed before insulation begins.
Aesthetics and Boundaries.
If your home is part of a terrace, semi-detached, or adjoins another property, ask how the system will terminate at party walls, fences, or neighbouring structures. Ensure that detailing will be neat and watertight. For listed buildings or properties in conservation areas, confirm that planning permission or building consent is in place. Regulations change so what may of been permitted last year may not be now, and visa versa!.
Safety and Compliance.
For homes with chimneys, fireplaces, or combustion appliances, ask about spillage tests and combustion ventilation to ensure safety after the installation.
Documentation and Clean-Up.
Request written details of all materials, fixings, and finishes, including manufacturer names and warranty information. Confirm that all waste and debris will be removed and agree on a timeline for completion and clean-up.
Finally, ensure you have full contact information for everyone involved in the project, including the installation team, project or site manager, and—if installed through a UK grant scheme, the Retrofit Coordinator responsible for oversight and compliance.
Internal Wall Insulation and Room-in-Roof Considerations.
Disruption and Reinstatement.
Internal Wall Insulation can be highly disruptive, often requiring the removal of features such as skirting boards, window sills, coving, door frames, electrical sockets, light fittings, and radiators. Confirm that your installer will reinstate all removed items and specify whether they will be restored or replaced. Ensure that qualified tradespeople—such as joiners for woodwork and plumbers for wet work—will carry out these tasks, and get this commitment in writing.
System and Detailing.
Ask which insulation system will be used and how the installer plans to treat complex areas such as coving, cupboards, or meter locations. For room-in-roof spaces, confirm that any loft or eaves hatches will be properly insulated and professionally fitted, not simply boarded over. If you use roof storage, ensure this area remains accessible and structurally suitable for use once insulated.
Check that all electrical, alarm, TV, satellite, and internet cables will be correctly routed through the insulation and fully reinstated afterwards.
Ventilation and Safety.
A ventilation system should be installed as part of the works. Obtain a detailed specification to confirm it meets high standards of performance and finish. For homes with fireplaces or open flues, ask about spillage testing and combustion ventilation to ensure safety and compliance.
Pre-Installation Checks and Documentation.
Before work begins, inspect the external walls, damp-proof course, gutters, and downpipes. Any existing issues must be identified and either rectified by the installer or formally agreed with you in writing, as they can compromise insulation performance and cause long-term problems.
Finally, confirm that all debris will be cleared and agree on a timeline for completion and cleanup. Request full contact details for everyone involved, including the office manager, installation team (noting if subcontractors are used), and—if the work is part of a UK grant scheme—the Retrofit Coordinator overseeing the project.
Cavity Wall Insulation considerations.
Scope and Drilling.
Confirm that all suitable wall areas will be insulated, which may involve internal drilling. Discuss in advance where drilling will occur and what materials will be used to fill and finish the holes afterwards to ensure a neat appearance.
Garages and External Finishes.
For attached but unheated garages, talk through insulation options—particularly if shelving, cupboards, or other fixtures will need to be removed or adjusted. When drilling into external walls, ask what colour of mortar will be used to fill the holes, especially on rendered or painted surfaces. Confirm whether installers will repaint or touch up the finish to match the existing façade.
Material and Clean-Up.
Find out exactly which insulation material is being used and take the time to research its properties and suitability for your home. Clarify whether the installation team will be responsible for cleaning up spills, dust, or debris, and have this commitment documented in writing. If you have outdoor features such as ponds or livestock areas, inform the installers so they can take precautions against overspill.
Ventilation and Safety.
If new ventilation is required, request a clear specification and ensure all installations are completed to a high standard of finish. For homes with fireplaces or open flues, ask about spillage tests and combustion ventilation to maintain safety and compliance.
Pre-Installation Checks and Aftercare.
Inspect external walls, damp-proof courses, gutters, and downpipes before work begins. Any existing damp or drainage issues must be resolved first, as they can undermine the effectiveness of the insulation and lead to long-term problems. Finally, confirm that all debris will be removed and agree on a clear timeline for completion and cleanup—especially important for removal and refill projects.
Underfloor Insulation considerations.
Materials and Installation.
It can be challenging to assess conditions beneath the floor unless you have a basement. Confirm the type, thickness, and support method of insulation being installed, and ensure all accessible areas will be covered. If floorboards need to be lifted, be aware this can cause damage—ask whether replacements will match the original boards to maintain appearance and consistency. Take pre-installation photographs for reference.
Cross Ventilation.
Adequate underfloor ventilation is essential. Make sure any existing vents or decorative grilles are retained or replaced with alternatives that are both functional and visually appropriate. Request written confirmation of how cross-flow ventilation will be maintained or improved, including details of the units being installed. The system should allow sufficient airflow to prevent moisture buildup and stop water ingress.
Basement Insulation.
If a basement is being insulated, ask about fire safety compliance and verify that all work adheres to current building regulations. It’s worth doing your own research for added assurance.
Ventilation and Safety.
If a ventilation system is included, obtain a detailed specification and confirm it will be installed to a high standard. For properties with fireplaces, request information on spillage tests and combustion ventilation to ensure safety and compliance.
Pre-Installation Checks and Cleanup.
Inspect external walls, damp-proof courses, subfloor ventilation, and rainwater systems (gutters, downpipes, etc.) before work begins. Any existing damp or drainage issues must be resolved first, as they could compromise the insulation and cause long-term damage. Finally, confirm that all debris and waste materials will be removed and agree on a clear timeline for completion and cleanup.
Loft Insulation considerations.
Materials and Impact.
Ask which insulation materials will be used, such as spray foam, mineral wool, or PIR boards—and make sure you understand their limitations and how they may affect your property’s insurance or mortgage eligibility.
Access and Storage.
Discuss how the installation will impact access to essential services in the loft, such as boilers or solar inverters, and whether storage areas will still be usable or need adjustment.
Electrical Safety.
If you have recessed down lights, these must be properly protected to prevent air leakage and potential overheating. Suitable covers or fire-rated caps should be used. For electric showers or other circuits with cables running through the loft, ensure proof is provided that the cables are not buried within insulation, as this can cause overheating.
Pipework and Loft Hatches.
All exposed water pipes should be fully insulated. The loft hatch should also be insulated and drought-proofed to a professional standard avoid makeshift solutions like loosely stapled insulation.
Ventilation and Timber Protection.
Adequate airflow in the loft is essential to prevent condensation and protect the roof timbers. Confirm that ventilation will be maintained or improved as part of the work.
Whole-Home Ventilation and Safety.
If a new ventilation system is being installed, request a clear specification to ensure it meets high-quality standards and finishes. For homes with open fireplaces, ask about spillage tests and combustion ventilation to ensure safety and compliance.
Gas Boiler considerations.
Gas Supply.
Most combination boilers need a larger gas supply pipe than older systems, often requiring an upgrade from the meter. Before installation, confirm the planned gas pipe route to avoid unnecessary external runs if an internal route is possible. If the pipe must run outside, ensure it’s properly clipped and installed in line with regulations.
Heating Controls.
Discuss your heating controls and where the thermostat will be located. It should be positioned in a room without a thermostatic radiator valve (TRV) or any secondary heat source such as a fire or cooker, to ensure accurate temperature readings.
Condensate Drainage.
All condensing boilers produce condensate that must be drained safely. Ideally, this drainage point should be located indoors. If the condensate pipe must run externally, it needs to be insulated with Class 0 lagging. Confirm the type of insulation being used and how it will be secured and supported.
System Clean and Preparation.
Ensure all debris will be removed during installation and clarify when this will happen. Most boiler manufacturers require a full system flush before fitting the new unit—this is essential. Make sure the installer carries it out, and ideally, observe the process. The correct use of cleaning and inhibitor chemicals is vital for system health, and their use should be recorded in the Benchmark log (the boiler’s installation and service record). Ask for a copy for your files.
Warranty and Guarantees.
Confirm both the manufacturer’s warranty and the installer’s guarantee, particularly regarding leaks and workmanship. Once the boiler is installed, it’s a good idea to call the manufacturer directly after a few weeks to confirm that your warranty is fully registered and active.
Solar PV Considerations.
Panel Direction.
You may already know the direction your property faces, but installers might suggest positioning the panels differently. This could be due to access issues, roof condition, or other practical constraints. However, the optimum orientation delivers the best performance, so make sure your installer prioritises efficiency over convenience.
Inverter Location.
The inverter should be installed somewhere easy to access for inspection, servicing, and maintenance, while also being protected from the elements. Some models are suitable for outdoor installation, provided they’re shielded from direct sunlight and rain. If you live near the coast, ask about corrosion resistance and whether additional protection is needed.
Monitoring Meter.
The generation meter (monitoring meter) should be positioned where it can be easily read and checked regularly. Make sure it’s visible enough to monitor energy production and detect early signs of faults (for example, if it isn’t blinking in daylight). Some installers may say it has to go in loft if inverter is also installed there, but dont allow, have it somewhere you can read and check.
Paperwork and Certification.
Confirm the expected timescales for all necessary documentation, including MCS certification, DNO approval, and any paperwork your energy supplier may require.
Warranties and Guarantees.
Clarify the warranty terms and guarantee lengths for all equipment. Make sure you know who to contact in case of faults or system failure.
Get Everything in Writing.
Once you’ve decided on a installation company, make sure to get all agreements, including costs, timelines, and scope of works, in writing. This helps protect both parties and ensures clarity and accountability throughout the project.
Air source Heat Pumps.
System Type and Design.
Ask your installer to explain which make, model of heat pump is being fitted and why it’s suitable for your property. Confirm that the system has been properly sized for your home, an undersized or oversized unit can reduce efficiency and increase running costs. Request a full design calculation (MCS or equivalent) showing heat loss per room, flow temperatures, and emitter sizing. Ask what refrigirant is used within the pump (R32, R290 etc). Ask about hybrid systems to help in the winter months.
Outdoor Unit Location.
The external unit should be positioned where airflow is unrestricted, but noise and vibration will not affect you or neighbours. It must sit on a stable, level base (often a concrete pad with anti-vibration plinth) and be clear of obstructions such as fences or foliage. If located near boundaries, confirm it meets local noise regulations and planning guidance. It should meet manufactures clearances for optimum airflow. For coastal or exposed locations, ask about corrosion-resistant finishes and protective coatings. (if within 2000m from the coast this is a must)
Internal Components.
Confirm where the indoor cylinder, buffer tank, and controls will be located. These should be easily accessible for servicing and maintenance, with pipework neatly installed and insulated. Discuss how existing systems—such as radiators or underfloor heating will be adapted or replaced, and ensure the flow and return pipe sizes are appropriate for the new system.
Condensate and Drainage.
Heat pumps produce condensate water, particularly in colder weather. This must be drained safely away from the base unit, ideally into a proper soakaway or drain. The pipework must not freeze, so confirm that suitable insulation and gradients are in place. The condensate produced is not the same a a combustion boiler so it is not acidic.
Electrical and Controls.
Ensure the electrical supply is adequate and compliant with regulations, with a dedicated isolator switch. Ask about the control system whether it will use smart thermostats, weather compensation, or load compensation and how to use these features for maximum efficiency.
Groundworks and Protection.
If installing a ground source heat pump, confirm the ground loop layout (horizontal trenches or boreholes), and request documentation of where pipes are buried for future reference. For air source units, confirm that rainwater runoff from roofs won’t drip onto the unit and that the area around the base remains well-drained and clear of standing water.
Warranties, Maintenance, and Support.
Ask for details of warranties and service agreements for both the equipment and installation. Heat pumps require annual servicing to maintain performance and warranty validity, so ensure you receive a maintenance schedule and the installer’s or manufacturer’s contact details.
Paperwork and Certification.
Ensure you receive all necessary documentation, including MCS certificates,DNO notifications, and user manuals. These are essential for warranty registration, grant schemes (such as the Boiler Upgrade Scheme), and resale value.
Cleanup and Completion.
Confirm that all debris and packaging will be removed and agree on a clear completion timeline. Obtain written contact details for the installation company, lead installer, and if installed through a UK grant scheme the Retrofit Coordinator responsible for the project.