Awaab’s Law: What Social Housing Tenants & Landlords Need to Know (And Why It Matters for Damp, Mould & Energy Efficiency)
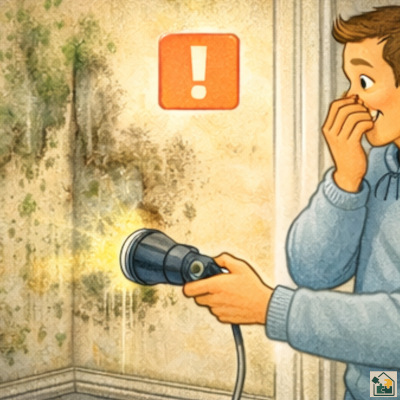
From October 2025, a major new rule comes into force for social housing in England: Awaab’s Law. It’s one of the biggest changes to tenant safety and housing quality in years, and it was introduced after the tragic death of two year old Awaab Ishak, who died in 2020 from prolonged exposure to mould in his home.
This Law is designed to make sure this never happens again.
In this post, we cover what the new law means, how it affects landlords, what tenants can expect, and why it directly links to issues we discuss regularly.
What Is Awaab’s Law?
Awaab’s Law is a legal requirement for social landlords (housing associations and councils) to respond quickly when tenants report damp, mould, or other serious hazards. It Should be rolled out to private landlords in the near future.
It introduces strict, legally enforceable timeframes for.
Investigating reported hazards,
Making the property safe,
Providing written updates to tenants,
Offering alternative accommodation if necessary,
For decades, damp and mould issues were too often dismissed as “lifestyle problems”. Awaab’s Law formally ends that.
The Key issues social Landlords Must adhere to are.
1. Damp & Mould Hazards.
2. Emergency Hazards.
These key issues will be automatically written into all social housing tenancy agreements. If a landlord doesn’t comply, tenants can take legal action or escalate complaints to the Housing Ombudsman.
Why Awaab’s Law Matters for Energy-Efficiency & Retrofit.
condensation
ventilation problems
cold bridging
poor insulation
underheating
moisture build-up
Awaab’s Law is a game-changer because damp and mould aren’t just health hazards, they’re signs of a home that isn’t performing properly.
This is why the law matters beyond repairs, it encourages better maintenance, better design, and higher standards across insulation and ventilation systems.
Selecting a trustworthy installer for your heating, insulation, or renewable energy project requires careful research and due diligence.
Hiring the right professional ensures your home is safe, efficient, and compliant with regulations, and helps protect warranties, insurance, and grant eligibility.
Reputable installers are often accredited by recognised trade bodies or professional organisations. Accreditation confirms that the installer:
Meets industry standards
Has undergone proper training
Is legally authorised to perform specific types of work
NAPIT – Covers electrical and heating installations.
NICEIC – Approved contractor scheme for electrical work.
MCS – Microgeneration Certification Scheme – Required for heat pumps, solar PV, and renewable energy installations. Using accredited installers is essential for compliance, safety, and accessing grants or incentives, such as the UK Boiler Upgrade Scheme (BUS) or ECO4 funding.
Find a Qualified Retrofit Installer
Select the work you want carried out on your home.
This guide shows the qualifications, certifications and governing bodies
a competent installer should hold.
▼
Being registered with the above does not always mean the work is checked by the certification company, It usually shows competence within the field of current health & safety practices and current regulations. Remember that if you have any work carried out at your property either on a grant scheme or self financed you should be covered by consumer rights. The citizen’s advice is always a good place for information.
Some of the below will help with your journey in finding trades.
If you feel you are vulnerable.
Try to get a family member or neighbour to sit in with you when getting quote visits, also maybe designate someone else to deal with the process.
Ask for Recommendations.
Seek recommendations from friends, family, or colleagues who have recently had similar work done. Personal recommendations can be invaluable in finding trustworthy installers.
Read Reviews and Testimonials.
Check online reviews and testimonials on platforms like Trustpilot, Checkatrade, or Which? Trusted traders and google reviews. These platforms often provide insights into the quality of work and customer satisfaction, But please be aware that not all reviews can be genuine!
Obtain Multiple Quotes.
Don’t settle for the first installation company you find. Obtain quotes from multiple companies for comparison. Be wary of quotes that are significantly lower than others, as they may indicate subpar workmanship or the use of inferior materials. If you are applying down a grant funded route, then be weary of being promised the earth or pushed into signing up. Any decent installation company should keep you at ease and answer all your questions honestly.
Verify Insurance and Guarantees.
Ensure that the installation company/individual has adequate insurance coverage, including public liability insurance, to protect you and your property in case of accidents or damage. Also, inquire about any guarantees or warranties offered for the work they perform.
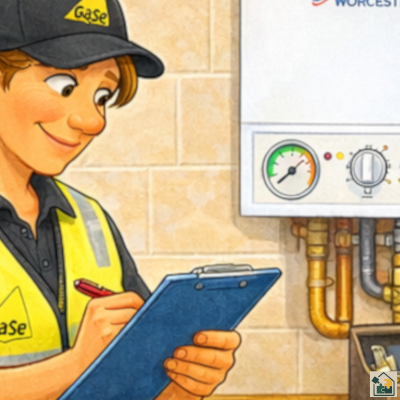
Check for Compliance with Regulations.
Certain types of work, such as electrical or gas installations, require compliance with specific regulations and safety standards. Verify that the installers you choose are appropriately qualified and registered to carry out such work.
Communicate Clearly.
Communicate your expectations clearly, including timelines, budget constraints, and any specific requirements you may have. Reputable installers will be transparent and be responsive to your needs.
Trust Your Instincts.
If something feels off during your interactions with installers or if they seem unwilling to provide necessary information or documentation, trust your instincts and consider looking elsewhere.
Get Everything in Writing.
Once you’ve decided on an installation company, make sure to get all agreements, including costs, timelines, replacement of fixings (window sills, skirting etc) redecorating and scope of work, in writing. This helps protect both parties and ensures clarity and accountability throughout the project.
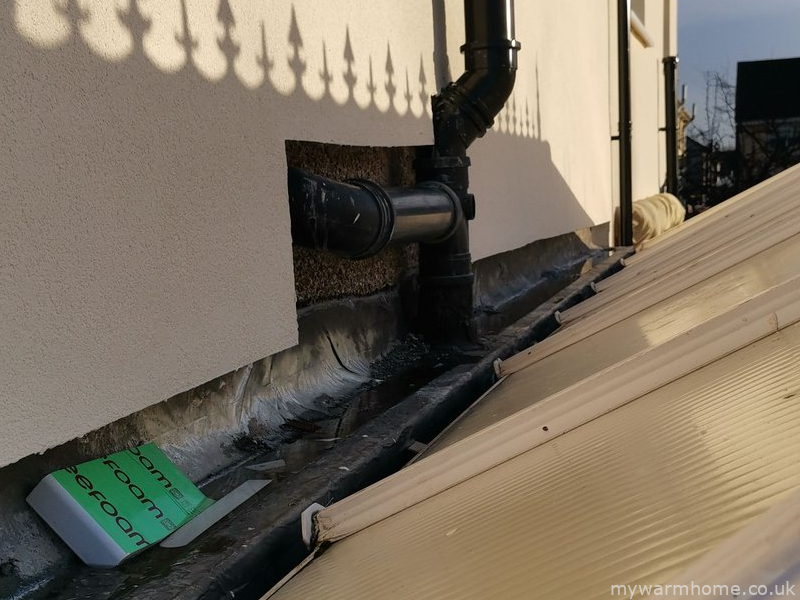
External Wall Insulation can significantly change the look and function of your property, so it’s important to understand the process in detail before work begins. Confirm what insulation system will be used, its thickness, and the finish type (e.g. render, brick-slip, or cladding). Ask how the installers will deal with fixtures and features such as satellite dishes, alarm boxes, lights, air vents, overflow pipes, and external taps—these should all be properly removed, extended, and reinstated, not simply covered over.
Openings and Details.
Discuss how the system will accommodate windows, doors, and sills, as these may need to be extended or replaced to ensure proper sealing and to prevent water ingress. Check that drip beads, stop beads, and corner trims will be installed neatly and to specification for a high-quality, durable finish.
Ventilation and Airflow.
Make sure that ventilation and airbricks are not blocked or removed. Ask how they will be extended through the insulation system to maintain airflow and prevent damp or condensation. Obtain a clear ventilation specification, and ensure the finish matches or complements your property’s appearance. For homes with fireplaces or open flues, ask about spillage testing and combustion ventilation to ensure safety and compliance.
Groundworks and Damp-Proof Course.
Confirm that the insulation will finish above the damp-proof course (DPC) and that appropriate base trims and drainage channels will be installed. The system should not bridge the DPC unless designed to do so, as this can lead to moisture problems. Ensure that any existing damp or drainage issues—including blocked gutters or damaged downpipes—are addressed before insulation begins.
Aesthetics and Boundaries.
If your home is part of a terrace, semi-detached, or adjoins another property, ask how the system will terminate at party walls, fences, or neighbouring structures. Ensure that detailing will be neat and watertight. For listed buildings or properties in conservation areas, confirm that planning permission or building consent is in place. Regulations change so what may of been permitted last year may not be now, and visa versa!.
Safety and Compliance.
For homes with chimneys, fireplaces, or combustion appliances, ask about spillage tests and combustion ventilation to ensure safety after the installation.
Documentation and Clean-Up.
Request written details of all materials, fixings, and finishes, including manufacturer names and warranty information. Confirm that all waste and debris will be removed and agree on a timeline for completion and clean-up.
Finally, ensure you have full contact information for everyone involved in the project, including the installation team, project or site manager, and—if installed through a UK grant scheme, the Retrofit Coordinator responsible for oversight and compliance.
Internal Wall Insulation (IWI) and Room-in-Roof Considerations.
Disruption and Reinstatement.
Internal Wall Insulation can be highly disruptive, often requiring the removal of features such as skirting boards, window sills, coving, door frames, electrical sockets, light fittings, and radiators. Confirm that your installer will reinstate all removed items and specify whether they will be restored or replaced. Ensure that qualified tradespeople—such as joiners for woodwork and plumbers for wet work—will carry out these tasks, and get this commitment in writing.
System and Detailing.
Ask which insulation system will be used and how the installer plans to treat complex areas such as coving, cupboards, or meter locations. For room-in-roof spaces, confirm that any loft or eaves hatches will be properly insulated and professionally fitted, not simply boarded over. If you use roof storage, ensure this area remains accessible and structurally suitable for use once insulated.
Check that all electrical, alarm, TV, satellite, and internet cables will be correctly routed through the insulation and fully reinstated afterwards.
Ventilation and Safety.
A ventilation system should be installed as part of the works. Obtain a detailed specification to confirm it meets high standards of performance and finish. For homes with fireplaces or open flues, ask about spillage testing and combustion ventilation to ensure safety and compliance.
Pre-Installation Checks and Documentation.
Before work begins, inspect the external walls, damp-proof course, gutters, and downpipes. Any existing issues must be identified and either rectified by the installer or formally agreed with you in writing, as they can compromise insulation performance and cause long-term problems.
Finally, confirm that all debris will be cleared and agree on a timeline for completion and cleanup. Request full contact details for everyone involved, including the office manager, installation team (noting if subcontractors are used), and—if the work is part of a UK grant scheme—the Retrofit Coordinator overseeing the project.
Cavity Wall Insulation considerations.
Scope and Drilling.
Confirm that all suitable wall areas will be insulated, which may involve internal drilling. Discuss in advance where drilling will occur and what materials will be used to fill and finish the holes afterwards to ensure a neat appearance.
Garages and External Finishes.
For attached but unheated garages, talk through insulation options—particularly if shelving, cupboards, or other fixtures will need to be removed or adjusted. When drilling into external walls, ask what colour of mortar will be used to fill the holes, especially on rendered or painted surfaces. Confirm whether installers will repaint or touch up the finish to match the existing façade.
Material and Clean-Up.
Find out exactly which insulation material is being used and take the time to research its properties and suitability for your home. Clarify whether the installation team will be responsible for cleaning up spills, dust, or debris, and have this commitment documented in writing. If you have outdoor features such as ponds or livestock areas, inform the installers so they can take precautions against overspill.
Ventilation and Safety.
If new ventilation is required, request a clear specification and ensure all installations are completed to a high standard of finish. For homes with fireplaces or open flues, ask about spillage tests and combustion ventilation to maintain safety and compliance.
Pre-Installation Checks and Aftercare.
Inspect external walls, damp-proof courses, gutters, and downpipes before work begins. Any existing damp or drainage issues must be resolved first, as they can undermine the effectiveness of the insulation and lead to long-term problems. Finally, confirm that all debris will be removed and agree on a clear timeline for completion and cleanup—especially important for removal and refill projects.
It can be challenging to assess conditions beneath the floor unless you have a basement. Confirm the type, thickness, and support method of insulation being installed, and ensure all accessible areas will be covered. If floorboards need to be lifted, be aware this can cause damage—ask whether replacements will match the original boards to maintain appearance and consistency. Take pre-installation photographs for reference.
Cross Ventilation.
Adequate underfloor ventilation is essential. Make sure any existing vents or decorative grilles are retained or replaced with alternatives that are both functional and visually appropriate. Request written confirmation of how cross-flow ventilation will be maintained or improved, including details of the units being installed. The system should allow sufficient airflow to prevent moisture buildup and stop water ingress.
Basement Insulation.
If a basement is being insulated, ask about fire safety compliance and verify that all work adheres to current building regulations. It’s worth doing your own research for added assurance.
Ventilation and Safety.
If a ventilation system is included, obtain a detailed specification and confirm it will be installed to a high standard. For properties with fireplaces, request information on spillage tests and combustion ventilation to ensure safety and compliance.
Pre-Installation Checks and Cleanup.
Inspect external walls, damp-proof courses, subfloor ventilation, and rainwater systems (gutters, downpipes, etc.) before work begins. Any existing damp or drainage issues must be resolved first, as they could compromise the insulation and cause long-term damage. Finally, confirm that all debris and waste materials will be removed and agree on a clear timeline for completion and cleanup.
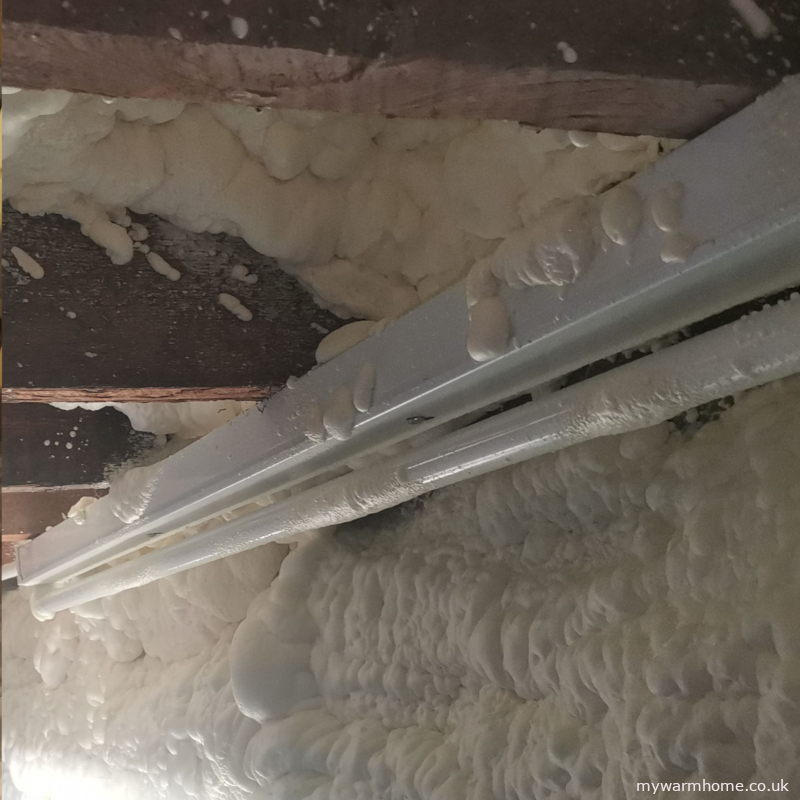
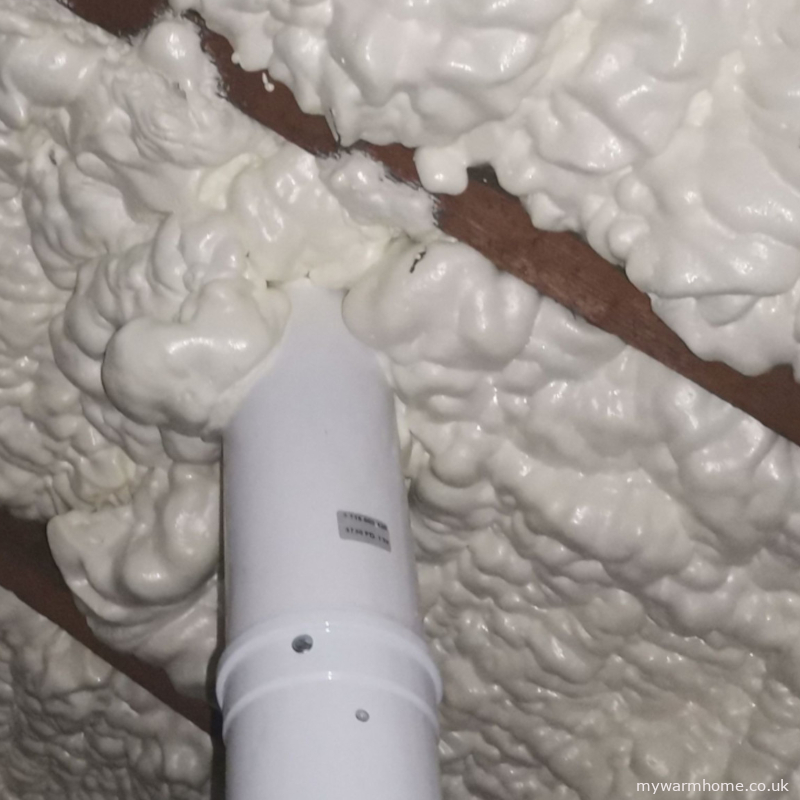
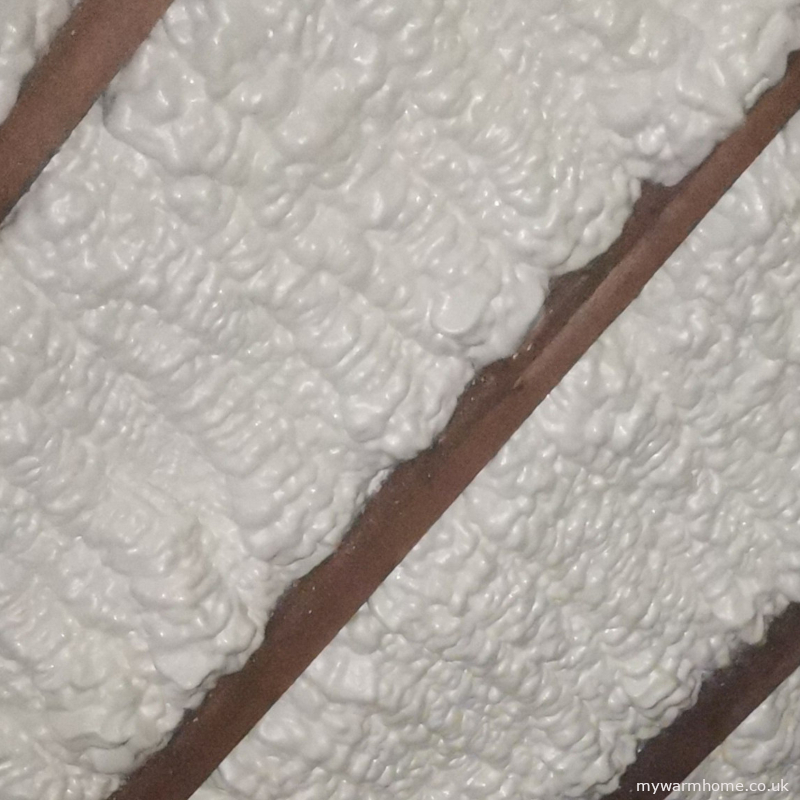
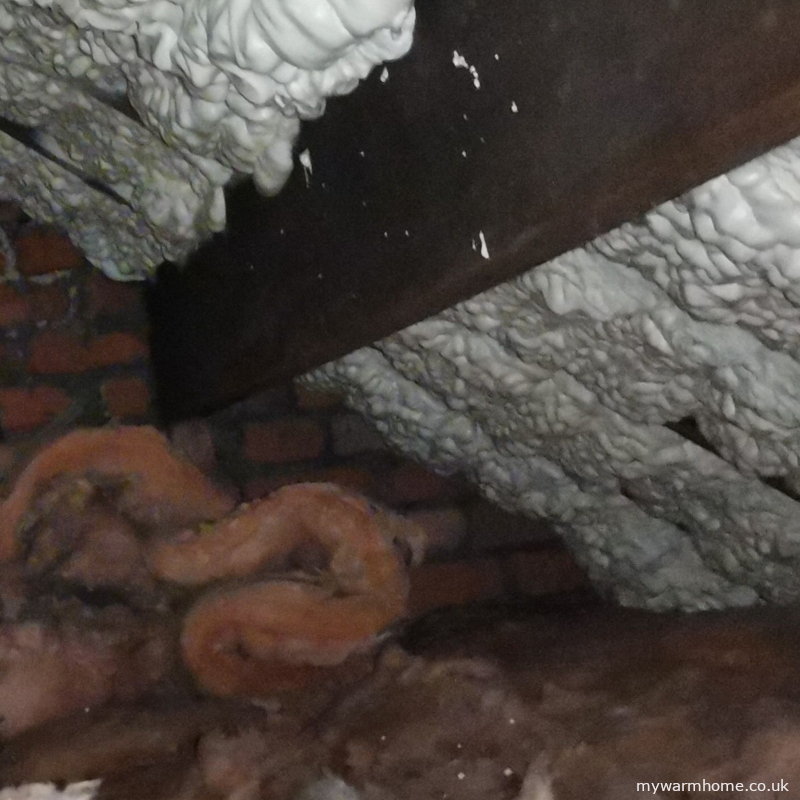
Ask which insulation materials will be used—such as spray foam, mineral wool, or PIR boards—and make sure you understand their limitations and how they may affect your property’s insurance or mortgage eligibility.
Access and Storage.
Discuss how the installation will impact access to essential services in the loft, such as boilers or solar inverters, and whether storage areas will still be usable or need adjustment.
Electrical Safety.
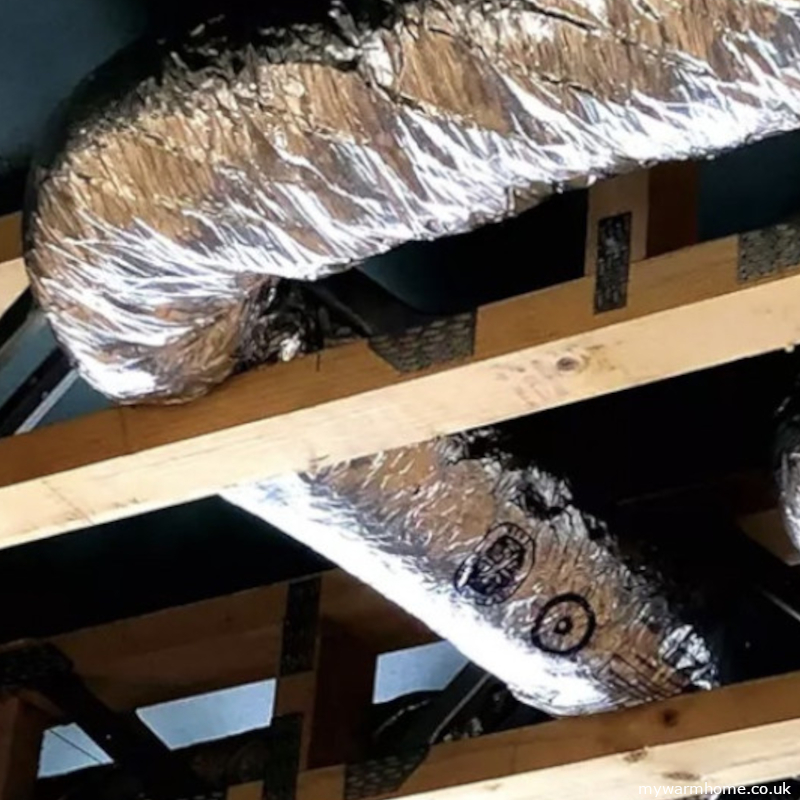
If you have recessed down lights, these must be properly protected to prevent air leakage and potential overheating. Suitable covers or fire-rated caps should be used. For electric showers or other circuits with cables running through the loft, ensure proof is provided that the cables are not buried within insulation, as this can cause overheating.
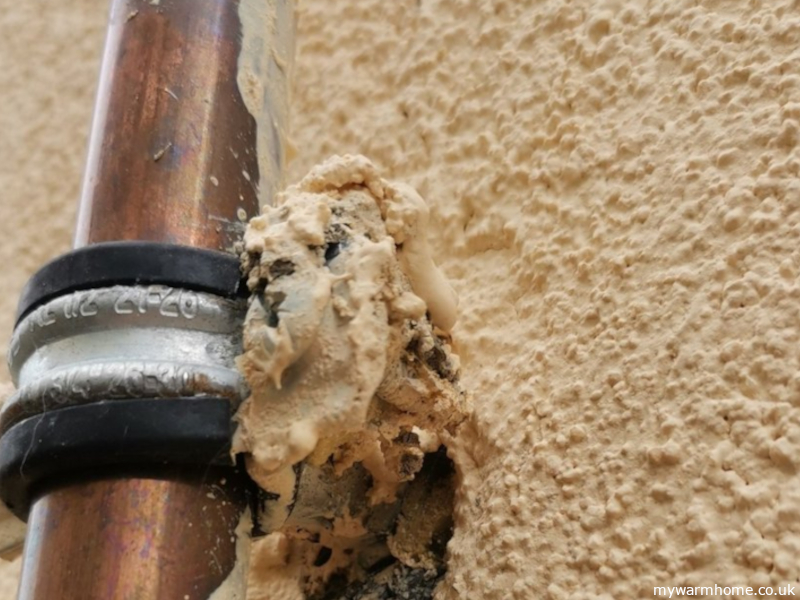
Pipework and Loft Hatches.
All exposed water pipes should be fully insulated. The loft hatch should also be insulated and drought-proofed to a professional standard—avoid makeshift solutions like loosely stapled insulation.
Ventilation and Timber Protection.
Adequate airflow in the loft is essential to prevent condensation and protect the roof timbers. Confirm that ventilation will be maintained or improved as part of the work.
Whole-Home Ventilation and Safety.
If a new ventilation system is being installed, request a clear specification to ensure it meets high-quality standards and finishes. For homes with open fireplaces, ask about spillage tests and combustion ventilation to ensure safety and compliance.
Most combination boilers need a larger gas supply pipe than older systems, often requiring an upgrade from the meter. Before installation, confirm the planned gas pipe route to avoid unnecessary external runs if an internal route is possible. If the pipe must run outside, ensure it’s properly clipped and installed in line with regulations.
Heating Controls.
Discuss your heating controls and where the thermostat will be located. It should be positioned in a room without a thermostatic radiator valve (TRV) or any secondary heat source such as a fire or cooker, to ensure accurate temperature readings.
Condensate Drainage.
All condensing boilers produce condensate that must be drained safely. Ideally, this drainage point should be located indoors. If the condensate pipe must run externally, it needs to be insulated with Class 0 lagging. Confirm the type of insulation being used and how it will be secured and supported.
System Clean and Preparation.
Ensure all debris will be removed during installation and clarify when this will happen. Most boiler manufacturers require a full system flush before fitting the new unit—this is essential. Make sure the installer carries it out, and ideally, observe the process. The correct use of cleaning and inhibitor chemicals is vital for system health, and their use should be recorded in the Benchmark log (the boiler’s installation and service record). Ask for a copy for your files.
Warranty and Guarantees.
Confirm both the manufacturer’s warranty and the installer’s guarantee, particularly regarding leaks and workmanship. Once the boiler is installed, it’s a good idea to call the manufacturer directly after a few weeks to confirm that your warranty is fully registered and active.
You may already know the direction your property faces, but installers might suggest positioning the panels differently. This could be due to access issues, roof condition, or other practical constraints. However, the optimum orientation delivers the best performance, so make sure your installer prioritises efficiency over convenience.
Inverter Location.
The inverter should be installed somewhere easy to access for inspection, servicing, and maintenance, while also being protected from the elements. Some models are suitable for outdoor installation, provided they’re shielded from direct sunlight and rain. If you live near the coast, ask about corrosion resistance and whether additional protection is needed.
Monitoring Meter.
The generation meter (monitoring meter) should be positioned where it can be easily read and checked regularly. Make sure it’s visible enough to monitor energy production and detect early signs of faults (for example, if it isn’t blinking in daylight). Some installers may say it has to go in loft if inverter is also installed there, but dont allow, have it somewhere you can read and check.
Paperwork and Certification.
Confirm the expected timescales for all necessary documentation, including MCS certification, DNO approval, and any paperwork your energy supplier may require.
Warranties and Guarantees.
Clarify the warranty terms and guarantee lengths for all equipment. Make sure you know who to contact in case of faults or system failure.
Get Everything in Writing.
Once you’ve decided on a installation company, make sure to get all agreements, including costs, timelines, and scope of works, in writing. This helps protect both parties and ensures clarity and accountability throughout the project.
Ask your installer to explain which make, model of heat pump is being fitted and why it’s suitable for your property. Confirm that the system has been properly sized for your home, an undersized or oversized unit can reduce efficiency and increase running costs. Request a full design calculation (MCS or equivalent) showing heat loss per room, flow temperatures, and emitter sizing. Ask what refrigirant is used within the pump (R32, R290 etc). Ask about hybrid systems to help in the winter months.
Outdoor Unit Location.
The external unit should be positioned where airflow is unrestricted, but noise and vibration will not affect you or neighbours. It must sit on a stable, level base (often a concrete pad with anti-vibration plinth) and be clear of obstructions such as fences or foliage. If located near boundaries, confirm it meets local noise regulations and planning guidance. It should meet manufactures clearances for optimum airflow. For coastal or exposed locations, ask about corrosion-resistant finishes and protective coatings. (if within 2000m from the coast this is a must)
Internal Components.
Confirm where the indoor cylinder, buffer tank, and controls will be located. These should be easily accessible for servicing and maintenance, with pipework neatly installed and insulated. Discuss how existing systems—such as radiators or underfloor heating will be adapted or replaced, and ensure the flow and return pipe sizes are appropriate for the new system.
Condensate and Drainage.
Heat pumps produce condensate water, particularly in colder weather. This must be drained safely away from the base unit, ideally into a proper soakaway or drain. The pipework must not freeze, so confirm that suitable insulation and gradients are in place. The condensate produced is not the same a a combustion boiler so it is not acidic.
Electrical and Controls.
Ensure the electrical supply is adequate and compliant with regulations, with a dedicated isolator switch. Ask about the control system whether it will use smart thermostats, weather compensation, or load compensation and how to use these features for maximum efficiency.
Groundworks and Protection.
If installing a ground source heat pump, confirm the ground loop layout (horizontal trenches or boreholes), and request documentation of where pipes are buried for future reference. For air source units, confirm that rainwater runoff from roofs won’t drip onto the unit and that the area around the base remains well-drained and clear of standing water.
Warranties, Maintenance, and Support.
Ask for details of warranties and service agreements for both the equipment and installation. Heat pumps require annual servicing to maintain performance and warranty validity, so ensure you receive a maintenance schedule and the installer’s or manufacturer’s contact details.
Paperwork and Certification.
Ensure you receive all necessary documentation, including MCS certificates,DNO notifications, and user manuals. These are essential for warranty registration, grant schemes (such as the Boiler Upgrade Scheme), and resale value.
Cleanup and Completion.
Confirm that all debris and packaging will be removed and agree on a clear completion timeline. Obtain written contact details for the installation company, lead installer, and if installed through a UK grant scheme the Retrofit Coordinator responsible for the project.
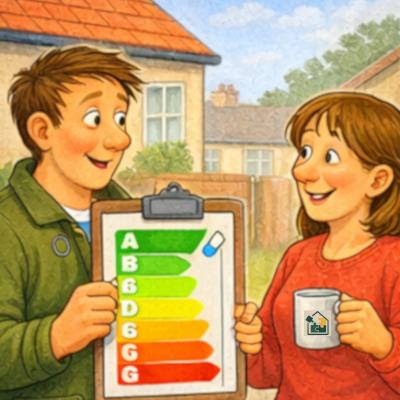
Improving your EPC rating isn’t just a “box-ticking exercise” it brings real financial, comfort, legal, and long-term benefits.
Improving your EPC rating isn’t just a “box-ticking exercise” — it brings real financial, comfort, legal, and long-term benefits. It matters because, as we progress through life, our habits, and priorities tend to shift. The carefree 20-year-old who stayed up all night and partied eventually becomes someone more conscious of energy use, the environment, and personal finances. Taking small steps to look after both the planet and our own future becomes part of that natural transition. Its not only landlords and developers who are being targeted to improve energy performance of where we live but it surly come to all of us as regulations tighten.
Improving an EPC (Energy Performance Certificate) rating usually means reducing heat loss, increasing efficiency of heating systems, and incorporating low-carbon technologies. Here’s a clear, practical list of the most effective ways to improve an EPC rating in UK homes: If you NEED to improve the EPC for rental or other purposes then I would always suggest getting a qualified and experienced DEA or Retrofit assessor to perform a Pre EPC to highlight the improvements (modelling).
1. Improve Insulation (Biggest, most cost-effective wins)
Can be applied to suspended timber floors and solid floors
Reduces draughts and cold spots. Sometimes the installation method can be in a very small crawlspace.
Draught-proofing.
Low-cost, fast EPC improvement that can easily be done on a DIY level.
2. Upgrade Heating Systems.
Replace the old gas boiler with a modern condensing boiler.
Increases efficiency to 90%+. This will be getting phased out as the UK moves away from gas boilers. Each elected government always changes the goal posts, so it’s always checking current legislation if replacing a fossil fuel heating source.
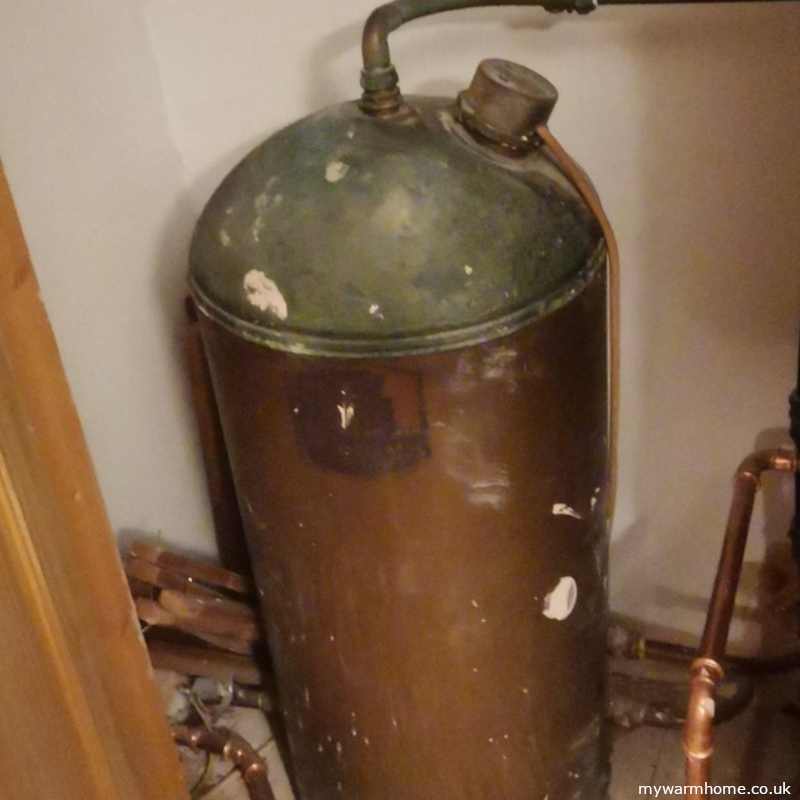
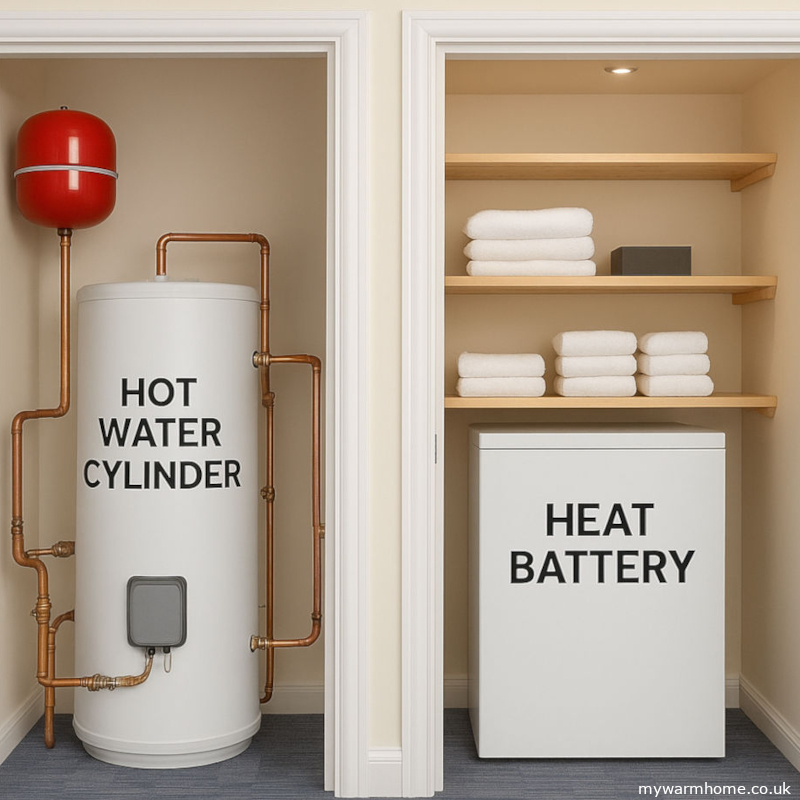
Modern cylinders have better insulation and can hold the temperature of stored water for longer periods.
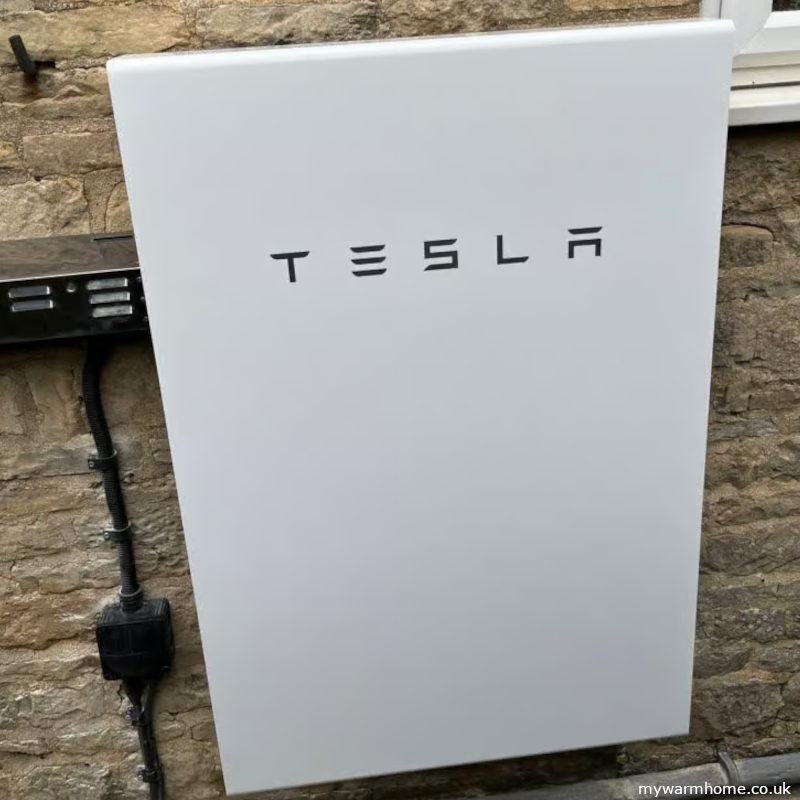
Replace with a heat battery, which removes standby losses and improves SAP scores (great with heat pumps and Solar)
4. Replace Windows & Doors.
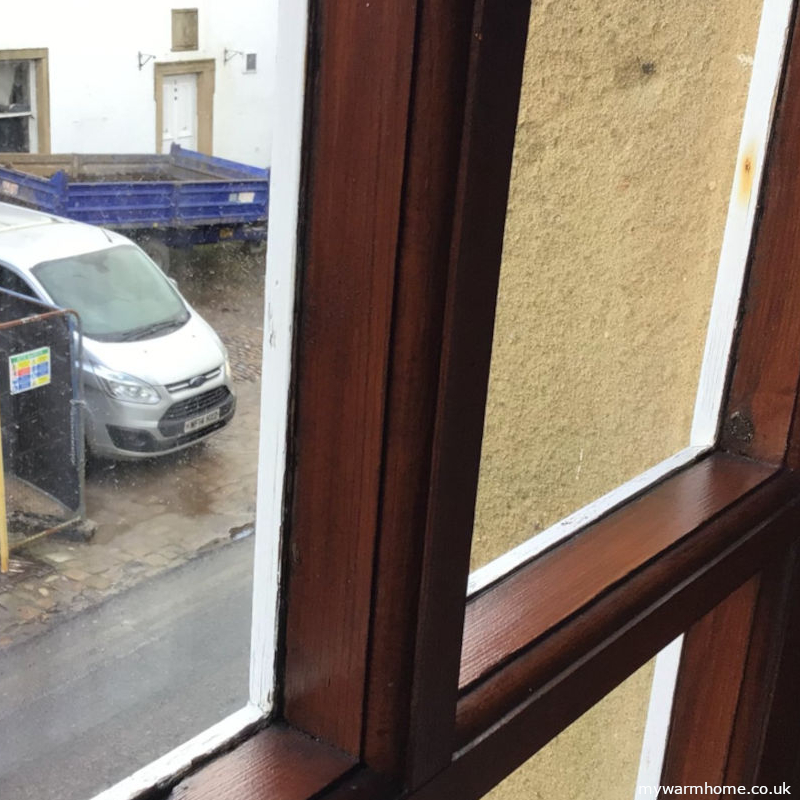
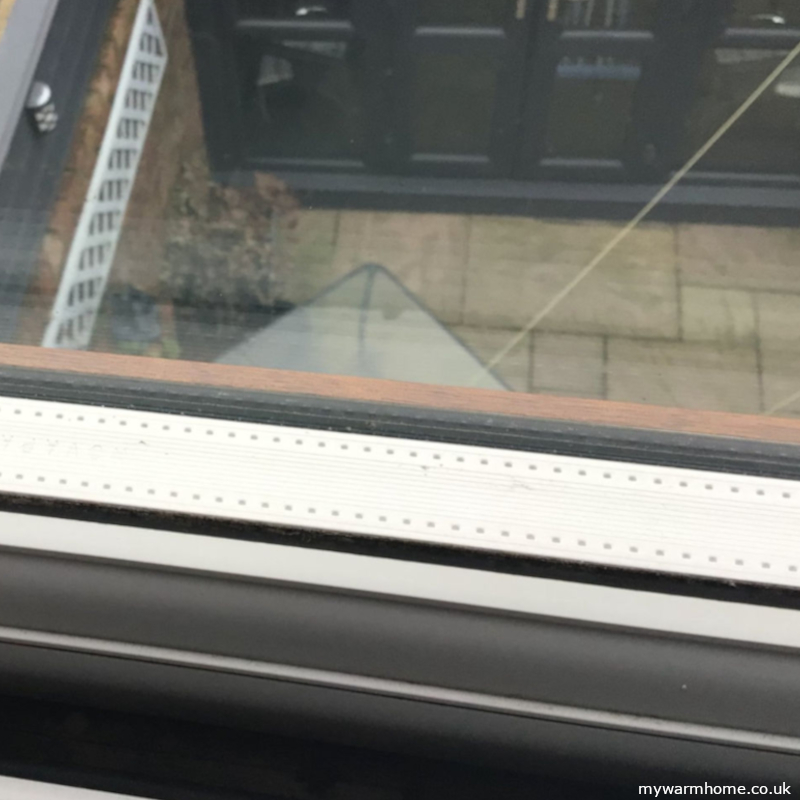
Replacing old windows, especially wooden single glazed, to a more modern double/triple glazed unit can improve the EPC and also add value to the property through aesthetics and performance. Double and triple glazing can be very little difference on a EPC. You can usually tell the age of your glazing by looking for a date in the double-glazed gap or by the gap its self. Typically, the larger the gap, the newer the glazing. A good quality unit will typically have date stamped in the gap!
A Publicly Available Specification (PAS) is a document that defines good practice standards for a product, service, or process. PAS 2035/2030 are linked frameworks that outline best practices for retrofitting homes in the UK to enhance energy efficiency. While PAS 2030 focuses on the quality of the installation processes, PAS 2035 ensures that the retrofit is appropriate for the building as a whole. Current PAS documents can be downloaded here. It’s a crucial component of the UK government’s strategy to boost building efficiency and reduce carbon emissions. Adopting a “whole house” approach, PAS 2035 considers the home’s environment, occupancy, and the homeowner’s objectives, ensuring that retrofit projects address key aspects such as insulation, ventilation, occupancy, and building fabric to support long-term sustainability. Although not a regulation, PAS 2035 is a publicly available specification (PAS), developed to address shortcomings of previous schemes following the Each Home Counts Review.
PAS 2035 compliance is mandatory for all publicly funded projects, including those supported by the Energy Company Obligation (ECO), and Warm Home Fund. We also have a route called licence plus which is run by Trustmark which does not need coordination as part of its process!. This is mainly aimed at self funding retrofit but using installers that are roughly following the current PAS process. Whichever mechanism is to be used, the property occupier should request details of which route the process follows pre-install.
PAS 2035 has its strengths, but also notable limitations. If everyone in the supply chain, assessors, coordinators, designers, and installers adheres strictly to the process, the framework should work effectively. However, lapses in monitoring and inspection can lead to issues. Unfortunately, “technical monitoring” for most UK schemes is minimal, and no longer performed by Ofgem, meaning that failings can go unnoticed, leaving property occupiers unaware of potential problems. Hopefully this will change with future consultations.
The retrofit process involves a range of participants, including canvassers, lead generators, social marketeers, assessors, designers, coordinators, installers, and a limited number of technical monitoring agents. This complexity, along with regulations, updates to rules and red tape, can create confusion and drive up costs.
The standard will transition from PAS 2035:2019 to PAS 2035:2023 in March 2025.
Protecting the Property Occupier?
PAS 2035 outlines several requirements for both pre- and post-installation stages. One of its most valuable aspects is the involvement of a retrofit coordinator throughout the process. The coordinator’s primary role is to safeguard the interests of the property and its occupants, ensuring the retrofit is carried out effectively and sustainably. In an ideal scenario, the retrofit coordinator would operate independently, free from any conflicts of interest. However, this level of impartiality is often difficult to achieve in practice.
By understanding the processes outlined below, you’ll hopefully gain the knowledge needed to ask informed questions and engage with some confidence at various stages of your retrofit journey.
Successful retrofit process.
Social housing and councils may have their own ways of engagement, with separate routes for ECO funding. Within this sector, retrofit is usually done en-mass and with consultation with tenants and housing officers. The below is assuming you are not a social housing or council tenant, but the PAS should still be followed within these organisations to protect the property and the occupiers.
It will all start with a knock on the door, a social media campaign, a referral, or housing provider intervention (landlord). You may be offered funded insulation or heating upgrades, sometimes windows and doors. You may fill a form in from an advertised link you have followed, or you may enquire to see if you qualify from a canvasser.
This information is typically passed on to the installation companies (lead generation) or the installation companies are involved in the marketing campaign directly.
It’s always exciting to get something for free! However, while promises may seem grand, it’s important to remember that you are entering into a works contract with the installation company. To ensure you get what was offered, make sure everything aligns with current regulations, OFGEM guidance, and the latest PAS standards.
In practice.
If the property / occupants have met the requirements of a funded scheme, then the installation or funding company will arrange for a retrofit coordinator to instruct a visit from a retrofit assessor. The coordinator is the first in the process as this is the stage that the property classification is usually identified (traditional, non-traditional etc.)
The assessor should try to get a picture of what the typical energy use entails and also what is expected by improving the property. Lots of photographs will be taken as an EPR (energy performance report) will be produced at the end. This is basically a reference EPC (energy performance certificate) but does not get published on the central register. (when EEM work is completed, a new EPC should be produced, ideally the original assessor as they will have the original data)
Some quick guidance on what the assessment entails and why!
First things are age and condition. This is to allow a retrofit coordinator to classify the property and create a plan that allows a fabric first approach that works with the natural balance of the property and highlights all potential issues.
Existing Ventilation in wet rooms photographed and noted. This is because all insulation packages require moisture to be controlled post installation. Some insulation situations require upgrades due to the design and current regulations.
Existing background ventilation photographed and noted. This is because all insulation packages require the replenishment of air post installation. Some insulation situations require upgrades due to the design and current regulations. Installers may use a pulse or blower test may be performed to validate if upgrades to background ventilation are necessary.
Fuel burning appliances noted. This is especially relevant with open flued appliances like gas, wood/coal burning fires etc. Ventilation requirements for combustion may need to be installed or verified adequate.
Whole footprint of property measured, including all windows/glazed doors. This allows to distinguish what is a “heat loss area” in more detail, and also potential solar gains.
Plenty of images of outside. This is to show the condition of building elements, including damp course and drainage services (gutters, downpipes, soil pipes).
Access to all rooms are required as is the loft space, basements and visual inspections of all external walls and areas. All ventilation present will be recorded and door undercut measurements should be taken. The assessment can take longer if more than one installation is being carried out, i.e. wall insulation, loft, and heating.
A report is then generated to give a rating of the properties’ energy performance from “A (very good) to a (G) very poor”. Information is then made available to the retrofit coordinator. All data is uploaded to the *Trustmark data warehouse, which forms a property plan and can be accessed by involved parties.
The coordinator will then look at all the data to see if improvements need any special design attention and intervention due to condition, age of property and location. If all looks OK then a ventilation strategy will be put in place depending on installation requirements. Some other documents are required, like a medium term improvement plan, which will create future scenario’s for improvements.
A retrofit designer will need to be consulted to design the proposed installation measure(s) if deemed necessary. We can take designers of certain measures as being members of a trade body. For example, a Gas Safe engineer installing a gas boiler, a SWIP trained installer performing IWI to a traditional non-heritage building, MCS accredited installer for solar and heat pumps.
A professional member of a Chartered Institute will be required, especially on buildings with heritage values or interacting insulation systems (wall and floor insulation being installed together, for example). It is up to the retrofit coordinator to validate that the designers and installers are all suitably qualified.
* The TrustMark Data Warehouse was created to address several recommendations in the Each Home Counts review commissioned by the Government in 2015.
The retrofit plan is executed. This is what the installers are expected to perform to meet the current PAS. Each measure (installation or improvement) will have its own route and requirements, and brief information be found on each section within this site. The plan will provide steps for the current and potentially future improvements. A fabric first approach is always used, this means insulation before any heating works need to be carried out. Soft touches should also be part of the fabric first approach like heating controls, draught proofing and low energy lighting.
The occupants should be informed of all work. It should be the co-ordinator and installers who contact the occupiers to inform them of the process that the retrofit project will follow. Dates, times, and conditions required will need to be discussed and agreed upon. This may include removal of furniture to prevent damage or the arrangement of alternative living arrangements throughout the works (especially on internal wall insulation). It may include preinstall remedial works to the property structure or minor repairs like broken windows, failing of rainwater removal (poor guttering) and wall pointing.
Get all this information in writing or in an email to reference at a later date if required. Make notes of Installers contact details, coordinators, and assessors names and numbers. This can be invaluable if you need to contact anyone involved in the process. You can do research on installers, co-ordinators, assessors and designers here as they all need to be Trustmark registered.
The Installation.
Once agreed and a plan has been discussed, the installation will begin. If an insulation measure is being installed, then validation is required that either the current ventilation is sufficient or insufficient. The assessment would have highlighted any shortfalls, and the installers may ask to perform an air tightness test. This can be carried out using a pulse test, this may be performed to allow installers a way of emitting undercuts and background ventilation from the installation, but controlled ventilation is always a good way to control moisture. The ventilation should always be installed or upgraded first, or at least core vents and wiring set in place if wall insulation being installed. The *retrofit coordinator should make a site visit if the measure is deemed high risk which includes IWI, EWI, UFI, FRI, PHI and RIR. (*this will be a mandatory requirement from early 2025) The next stage will be the installation phase of the main improvements.
*Due to time and location factors, the retrofit co-ordinator may employ a remote coordinator to feedback information after or during site visit.
The Handover.
Depending on the complexity of the installation, the duration can range from a single day to several weeks. This timeline should have been discussed and documented during the early planning stages. Before signing off on the work completed by the installation company, ensure you are fully satisfied that all agreed tasks have been completed to your expectations. Additionally, verify that any damages have been repaired or compensated. Make sure you have received all necessary handover documents, including warranties, guarantees, compliance certificates, insurance policies, gas certificates, and electrical certificates. Some certificates and warranties may come via post or email after the installation, if this is the case then ask for written clarification that they will be provided. All these documents are part of the works and may be needed if selling the property or for insurance purposes.
Insurance Backed.
To be PAS 2030 certified, installers must have an Insurance Backed Guarantee provider to ensure their customers are protected. They must also have adequate insurance coverage, including liability insurance, to protect homeowners.
What is an insurance backed guarantee? Installers will provide their own written workmanship guarantee (this is very important to get a copy of in case of any poor installations). This will outline a guarantee period, during which the installer will return and fix any faults resulting from faulty workmanship. The insurance backed guarantee only comes into effect if the original installation company ceases trading through lets say bankruptcy!. Ask for details of the company providing the guarantee, and then do your research.
All Insulation installed under PAS.
Each insulation installation will follow the same route as regards with ventilation on PAS. This should be explained by the retrofit coordinator and the installers. The basics are that background ventilation (usually trickle vents) will be provided unless an air permeability test is performed and validates the need to omit from the installation. Wet room ventilation is always required, but can vary with different insulation situations. (see below) If PIV (positive input ventilation) is being installed, then request details of why this choice is being taken, installers or retrofit coordinator will be able to guide you. (PIV will need maintenance, and it is placed in your loft space).
Some insulation situations like the property not being 100% insulated (bathrooms and kitchens being omitted due to fixture removal difficulty) then the extract ventilation may need to be a dMEV system to mitigate risks of condensation.
Pre-installation building inspection (PIBI)
The Retrofit Installer should undertake a pre-installation inspection using a competent person, this means a person or persons who have relevant industry qualifications. The inspection shall be undertaken at a level of detail sufficient to confirm that the specified energy efficient measure can be safely and effectively installed at the designated location. Particular attention shall be given to potential moisture build up as a result of the installation and taking into account the fire safety of the dwelling and the functionality and/or safety of installed services (gas, electricity, water, telecommunications, etc.)
Technical Monitoring.
Technical monitoring is a form of auditing that highlights a set of given questions on compliance. This is not performed by the installation company, but they may have their own regime of quality control. The funders (energy companies) will use these reports to highlight and hopefully rectify failing. Sadly, this shows that even with all the rules and hierarchy within the process of PAS, failing still arise. More on technical monitoring here.
When we insulate or upgrade a property, the original construction is just as important as the finished result.
Trying to achieve the unachievable often leads to failure and when it comes to improving our homes, that’s especially true if we ignore how they were originally built.
When we insulate or upgrade a property, the original construction is just as important as the finished result. Over the years, insulation has been added to homes that should never have been insulated, or where the wrong type of insulation was used entirely.
Old Homes Were Built to Breathe.
A typical Victorian house built around 1900 was designed very differently to the homes we build today.
Foundations were modest, often sitting on clay or mixed ground.
Damp courses were made from slate, bitumen, or engineering brick.
Mortars, plasters, and paints were lime-based, fully breathable.
Windows were single glazed timber-framed, and floors were usually suspended timber.
Each room had a fireplace, creating natural airflow through the chimneys.
And there were gaps, many gaps around windows, doors, floors etc.
Back then, heating revolved around open fireplaces burning solid fuels like coal and wood. Fireplaces not only warmed the room but also provided essential ventilation, drawing moisture and stale air out of the house.
Many homes even shared a single heat source, cooking in the kitchen typically provided much of the warmth and recreation. These homes were designed to breathe naturally, to dry out during warmer months and absorb some moisture during winter.
When we insulate or upgrade a property, the original construction is just as important as the finished result. Over the years, I’ve seen insulation added to homes that should never have been insulated, or where the wrong type of insulation was used entirely.
Today, the market is flooded with products, installers, and most of all funding. It’s easy to get swept up in the promise of “free” home upgrades, especially when companies that once specialised in one trade now offer everything from solar panels to external wall insulation. But not every measure suits every home.
Modern Living, Modern Heating.
Fast-forward over a century, and everything has changed. We’ve sealed, insulated, and upgraded our homes with new materials, plastic membranes, synthetic renders, dense boards, foams, and chemical coatings. We’ve replaced original windows with double/triple glazing, blocked up chimneys, and paved over soak aways (front gardens) for parking.
All of these change how our homes manage the movement of heat and moisture. We’ve also changed how we heat our homes:
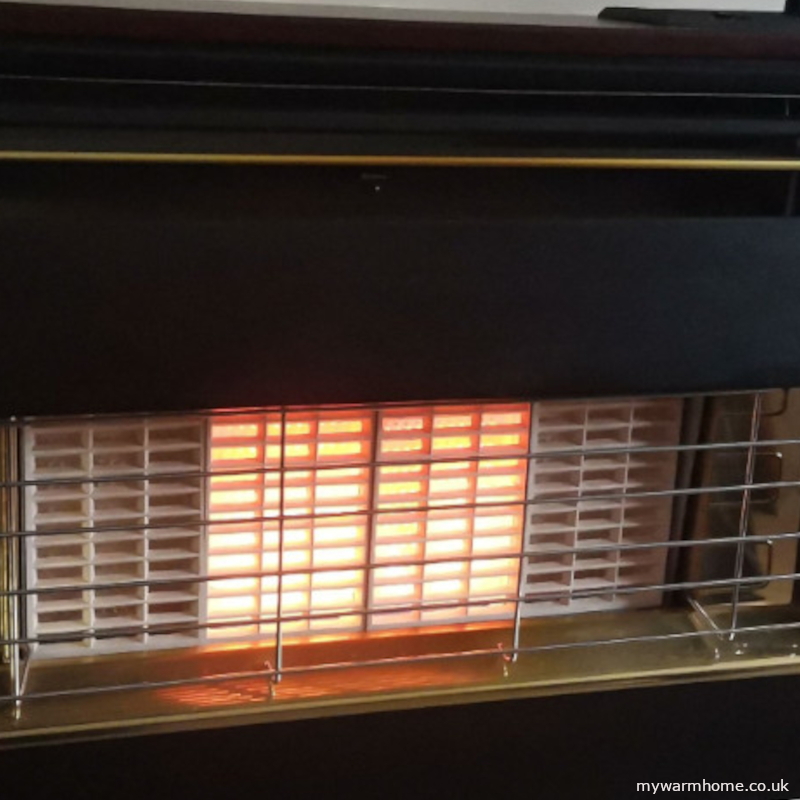
Gas boilers became the norm through the mid to late 20th century, offering central heating at the touch of a thermostat.
Electric heating followed, from storage heaters to modern infrared panels.
Renewable systems are now taking the stage — air source and ground source heat pumps, solar PV, and hybrid systems.
Each of these heating methods interacts differently with the building fabric. For older homes, especially those built before 1930, installing insulation or modern heating without considering breathability can lead to damp, mould, and even structural damage.
Why Every Home Needs a Tailored Approach.
Before adding insulation or changing your heating system, it’s essential to understand how your home was meant to perform. A Victorian solid wall house behaves very differently from a modern cavity wall home, and what works brilliantly for one can cause real problems for the other.
The Key to a Warm, Healthy, Efficient Home.
When upgrading, the goal isn’t just efficiency, it’s balance. We need to make homes warmer and greener without disrupting how they naturally manage moisture and airflow.
By respecting your home’s original design, using the right materials, and combining insulation with proper ventilation, you can achieve comfort, efficiency, and longevity.
A warm, energy-efficient home only works properly when: insulation + heating + ventilation all work together.
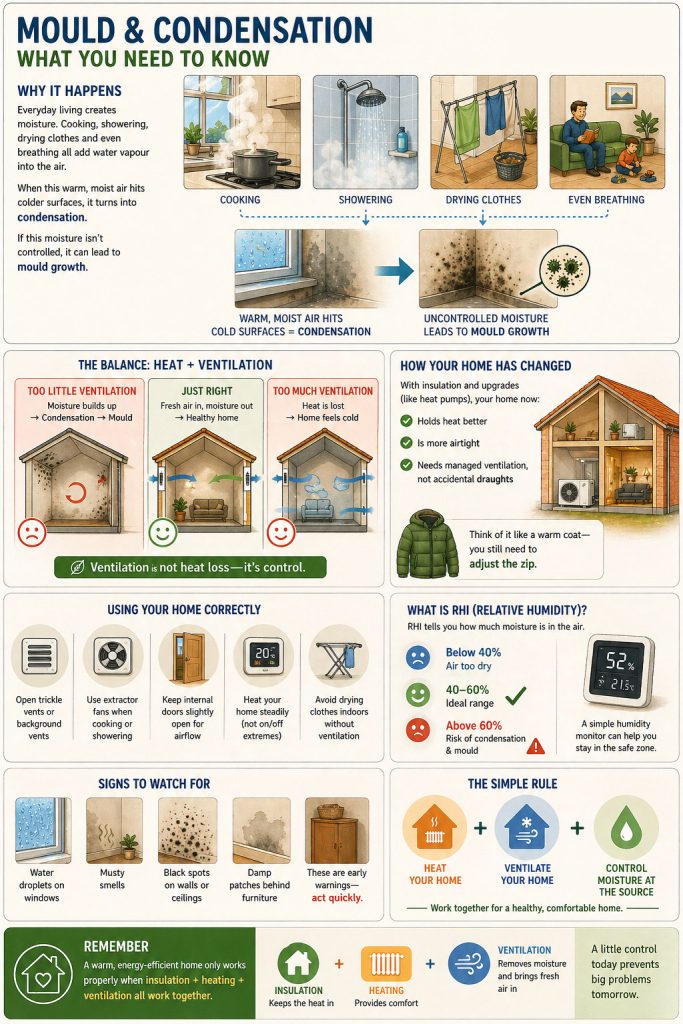
Cooking, showering, drying clothes and even breathing all add water vapour into the air. When this warm, moist air hits colder surfaces, it turns into condensation.
If this moisture isn’t controlled, it can lead to mould growth.
The Balance!
Too little ventilation = Moisture builds up → Condensation → Mould.
Too much ventilation = Heat is lost → Home feels cold.
Just right, Fresh air in = moisture out → Healthy home.
Ventilation is not heat loss, it’s control.
How retrofit changes our home..
With insulation and heating upgrades, your home now:
Holds heat better.
Is more airtight.
Needs managed and controlled ventilation, not accidental draughts.
Think of it like wearing a warm coat, you still need to adjust the zip if you gret too warm..
USING YOUR HOME CORRECTLY
✔ Open trickle vents or background vents. ✔ Use extractor fans when cooking or showering. ✔ Keep internal doors slightly open for airflow. ✔ Heat your home steadily (not on/off extremes). ✔ Avoid drying clothes indoors without ventilation.
Understanding what goes on behind the scenes!
Interstitial condensation is the formation of liquid water inside the hidden, internal layers of a building’s structure (walls, roofs, or floors) rather than on the visible surface. It occurs when warm, moist air penetrates the building envelope and reaches a cold surface (dew point) within insulation, brickwork, or behind cladding, often causing structural damage, rot, and reduced insulation performance. This is extremely important when internal wall insulation is installed as any failures in design will cause weak points, This allows moisture to venture behind and out of sight. This is why ventilation and attention to design and detail is paramount.
What is Relative Humidity (RH)?
RH tells you how much moisture is in the air. Take a look at the video below to show you what 100% humidity is like.
Below 40% → Air too dry.
40–60% → Ideal range .
Above 60% → Risk of condensation & mould .
A simple humidity monitor can help you stay in the safe zone.
Signs to watch out for.
Water droplets on windows.
Musty smells.
Black spots on walls or ceilings.
Damp patches behind furniture.
What is the Dew Point?
The dew point is the temperature to which air must cool down to become fully saturated with water vapor and start producing dew, fog, or condensation. A higher dew point means more moisture in the air, making it feel stickier and more uncomfortable outside.
Dew point and Relative Humidity (RH) are linked because they both measure moisture in the air, but they do so in different ways: dew point measures the actual amount of moisture, while RH measures how “full” the air is with moisture compared to its capacity at a specific temperature.
REMEMBER. A warm, energy-efficient home only works properly when: insulation + heating + ventilation all work together.
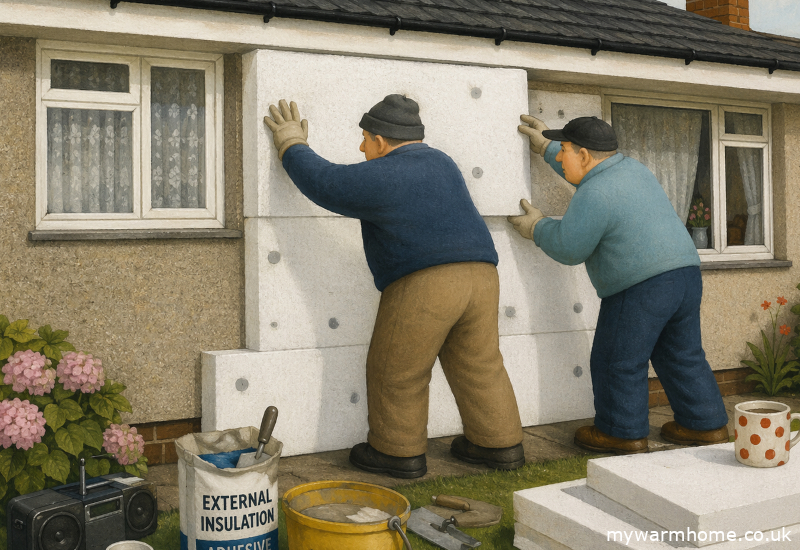
While heat naturally rises, a large amount is also lost through poorly insulated external walls,
External wall insulation plays a crucial role in reducing how quickly heat escapes from our homes. While heat naturally rises, a large amount is also lost through poorly insulated external walls, especially in older properties. In fact, without adequate wall insulation, a significant proportion of a home’s heat can be lost through the building fabric itself, making it harder and more expensive to keep warm.
By installing external wall insulation (EWI), we effectively wrap the home in a thermal layer, helping to retain heat inside for longer. When designed and installed correctly, this can dramatically improve energy efficiency, enhance comfort, and reduce heating bills.
Standards and materials have evolved considerably over the years. Back in the mid-1980s, minimal insulation levels were common, with basic materials considered sufficient at the time. Today, expectations are much higher.
Modern external wall insulation systems use advanced, more environmentally conscious materials and are installed to far more demanding performance standards, ensuring homes are better protected against heat loss while also supporting long-term sustainability Have a look at the installer page for some handy questions to ask.
Health and safety.
You may need specialist advice from trades people and professionals regarding things like, High amperage cables. Solar installations, overground electrical supplies to property. Nesting. Bees, wasps, bats. Vermin. Rats, mice, squirrels Asbestos. Vermiculite, flues, drainage, roofing. Your installers should pick up most of the above items on the initial pre-installation survey.
As a general rule, high-amperage cables should always be positioned outside the insulation, rather than beneath it. Special care must be taken if there are any nesting bats, as well as bees or wasp nests. If vermin around or under property, installing insulation can create a warm environment that attracts them. Making sure any vermin problem is erradicated will allow the insulation to remain sealed.
EWI insulation.
Correct background ventilation. *All rooms with the installation of trickle vents or wall vents if required Correct door undercuts. *Undercuts to internal doors allow the free movement of air around the property.
*Testing of the background ventilation pre-installation may allow the installed measure(s) to move forward without the need for door undercuts or trickle vents installed.
Correct extract ventilation in wet rooms. Kitchens, bathrooms,
WC’s, and utility rooms are all classed as wet rooms.
If extraction exists, then checks need to be carried out by referencing the manufacture’s data or performing an anemometer (testing apparatus) test to confirm extraction rates are being met.
Mitigation of cold spots/thermal bridges.
External wall insulation also helps deal with cold spots, often referred to as thermal bridges. These are areas where heat can escape more easily, typically around features like window reveals, door frames, corners, and where different building elements meet.
To reduce this, insulation should be applied as a continuous layer around the outside of the home, rather than in sections. This helps “wrap” the building evenly and prevents breaks in the insulation where heat could leak out. Particular care should be taken around openings like windows and doors, ensuring these areas are properly detailed and insulated to avoid cold patches forming internally.
Where possible, the goal is to achieve full coverage of the external walls so there are no gaps or weak points. Any existing features attached to the walls, such as pipework or fixtures, should be carefully adjusted or extended so the insulation can sit neatly behind them.
By addressing these thermal bridges during installation, you not only improve energy efficiency but also reduce the risk of condensation and mould forming on colder internal surfaces, making the home more comfortable and healthier to live in.
Poor DetailingPoor DetailingGood Detailing
Types of External Wall Insulation and How They’re Installed.
External wall insulation (EWI) isn’t a one-size-fits-all solution. There are different systems and finishes available, but they all follow the same basic idea—fixing an insulating layer to the outside of the property, then protecting it with a durable, weatherproof finish such as render or cladding.
Common insulation materials include expanded polystyrene (EPS), mineral wool, and more advanced breathable boards. The choice depends on the type of property and how it manages heat and moisture. Once the insulation boards are fixed to the wall (usually with adhesive and mechanical fixings), they are reinforced with a mesh layer and finished with render or another outer coating to protect against the elements and give the home a clean, updated appearance.
Insulation Approach, Getting the Design Right.
External wall insulation has come a long way over the years. It’s no longer just about “covering the walls to make the home warmer.” Today, there’s a much better understanding of how buildings handle heat, air, and moisture—and getting this right is essential.
Every property behaves differently. Factors like how it was built, its age, how it’s used, and its exposure to weather all play a part. For example, a small 1970s flat with two occupants will perform very differently to a large early-1900s family home. If the insulation system doesn’t take these differences into account, it can lead to problems such as trapped moisture, damp, or poor performance.
That’s why a proper assessment should always come first. Once the property has been fully understood, the most suitable insulation system and finish can be selected.
Key Things to Consider Before Installing EWI.
A good design will take into account:
Age of the property – when it was built and whether it has been upgraded over time.
Neighbours and surroundings – Permissions may be required.
Conservation restrictions – Listed buildings and restricions of what can and cannot be performed on our buildings.
Type of property – flat, house, bungalow, etc.
Wall construction – solid walls, cavity walls, timber frame, system-built, or solid brick.
Existing insulation – such as cavity wall fill, internal wall insulation, or specialist plasters. If a cavity wall then look at best practices for advice on dew points.
Access requirements – whether scaffolding is needed and how easy the site is to work on.
Storage on site – Insulation materials should be kept dry before installation.
Condition of services – including gutters and downpipes, which may need adjusting or replacing.
Telecoms and fixtures – such as cables, satellite dishes, and phone lines that may need repositioning.
Security systems – alarms and external sensors.
Heating appliances – boiler flues, vents, and chimneys must be correctly extended or adapted.
Damp-proof course (DPC) – its condition and height relative to the new insulation.
Existing damp issues – these should always be addressed before installation.
Ventilation – ensuring the home can still “breathe” properly after insulation.
Windows and doors – their condition and how they integrate with the new insulation layer
Taking the time to get these details right ensures the insulation performs as intended—keeping the home warmer, reducing energy bills, and avoiding issues down the line.
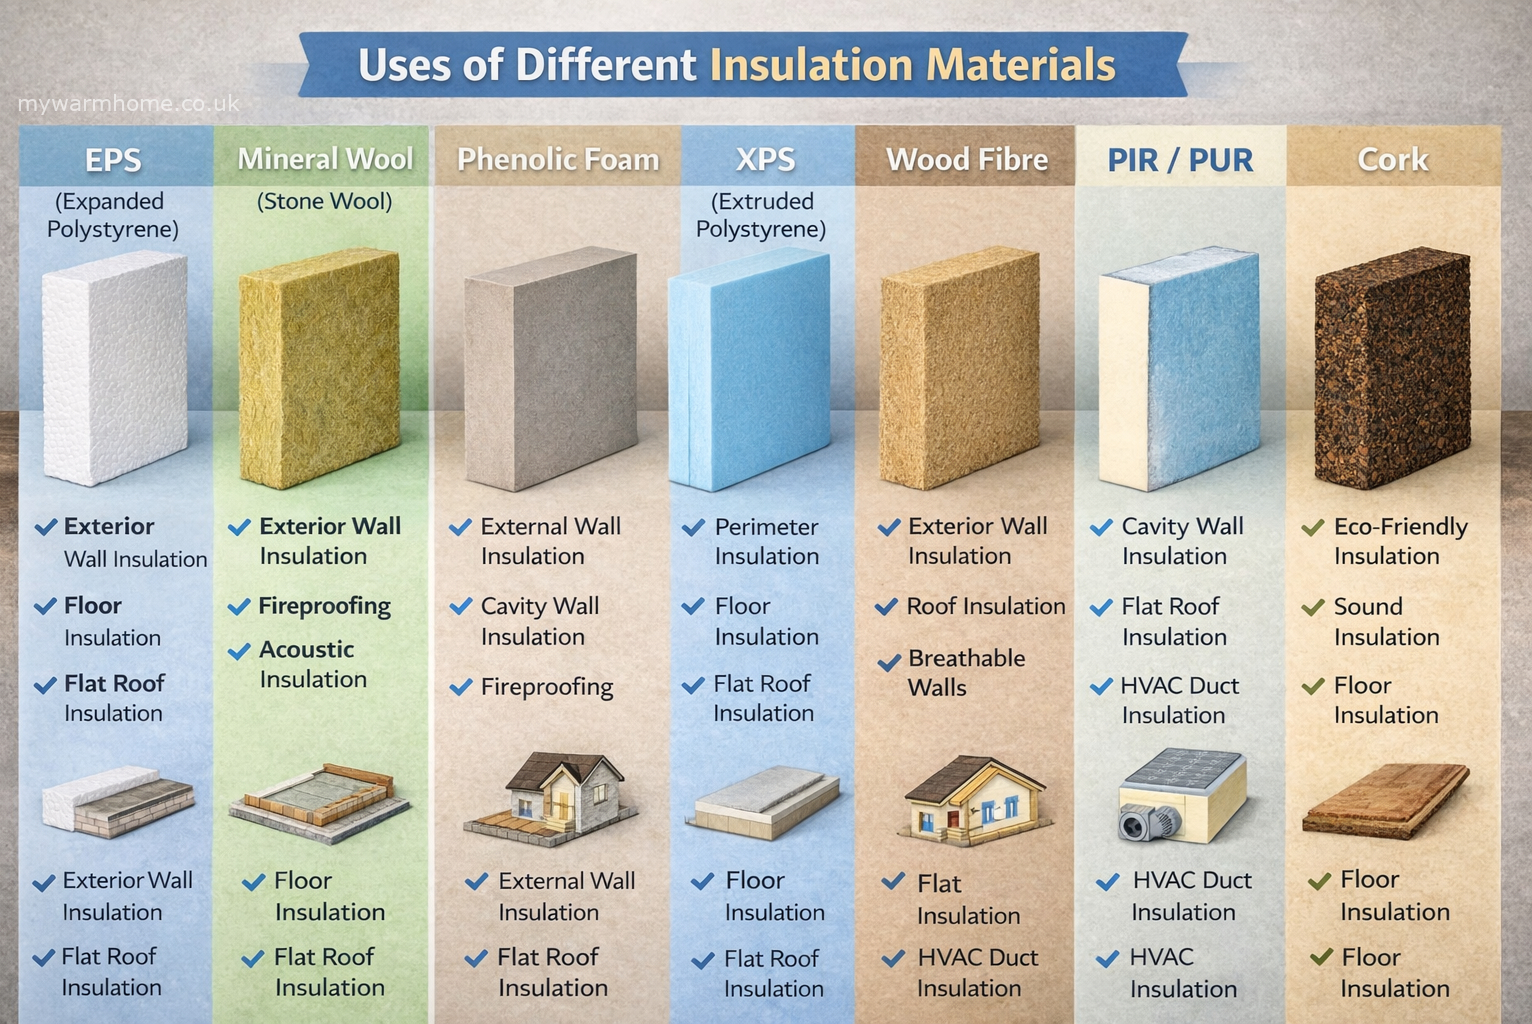
External Wall Insulation (EWI) Board Types.
Choosing the right External Wall Insulation (EWI) system is critical to ensuring energy efficiency, moisture control, fire safety, and long-term performance. Different insulation boards suit different property types, wall constructions, and site constraints.
This guide explains the main EWI insulation types used in the UK, when to use them, and which buildings they are best suited for.
EPS (Expanded Polystyrene).
EPS insulation boards are the go-to choice for most UK retrofit projects due to their affordability, ease of installation, and solid thermal performance.
Best for: Solid wall homes, post-war housing, and standard residential retrofits.
Typical properties: 1930s–1980s houses, system-built homes.
Why use it: Cost-effective, lightweight, widely approved.
Key consideration: EPS has lower fire resistance than mineral-based systems, so suitability depends on building height and regulations.
Made from raw materials like stone or silica that are heated until molten, then spun into a fibrous matt. Properties. Mineral wool is known for its thermal, fire, and acoustic properties. It’s a poor conductor of heat, which helps maintain a consistent temperature in buildings. It’s also resistant to fire and doesn’t release toxic gases when heated.
The primary and most widely used are.
Mineral wool. Sheep’s wool. Glass wool. PIR (Polyisocyanurate) and phenolic foam.
Excellent thermal and acoustic insulation.
Easy to install.
Relatively cheap.
Breathable (can prevent dampness from damaging wooden timbers).
Can sometimes irritate bare skin.
Will compress if you put weight on it.
Sheep’s wool.
Sheep wool insulation is a natural, sustainable, and versatile material that can be used for thermal and sound insulation in buildings. Sheep wool is a natural insulator that can be used in walls, floors, lofts, roofs, and underlays. It’s crimped, which traps air in millions of tiny air pockets.
Excellent thermal and acoustic insulation.
Easy to install.
Safe to touch.
Eco-friendly.
Breathable (can prevent dampness from damaging wooden timbers).
Expensive.
Glass wool.
Glass wool insulation, also known as fibreglass insulation, is a common material used to insulate homes and commercial buildings. It’s made from glass fibres that are bonded together to create a wool-like texture. The glass fibres trap air pockets, which act as barriers to prevent heat loss.
Fire-resistant.
Insect repent.
Eco-friendly (mostly made from recycled glass).
Most glass wool irritates the skin (protective clothing must be worn when handled).
Becomes less effective when wet.
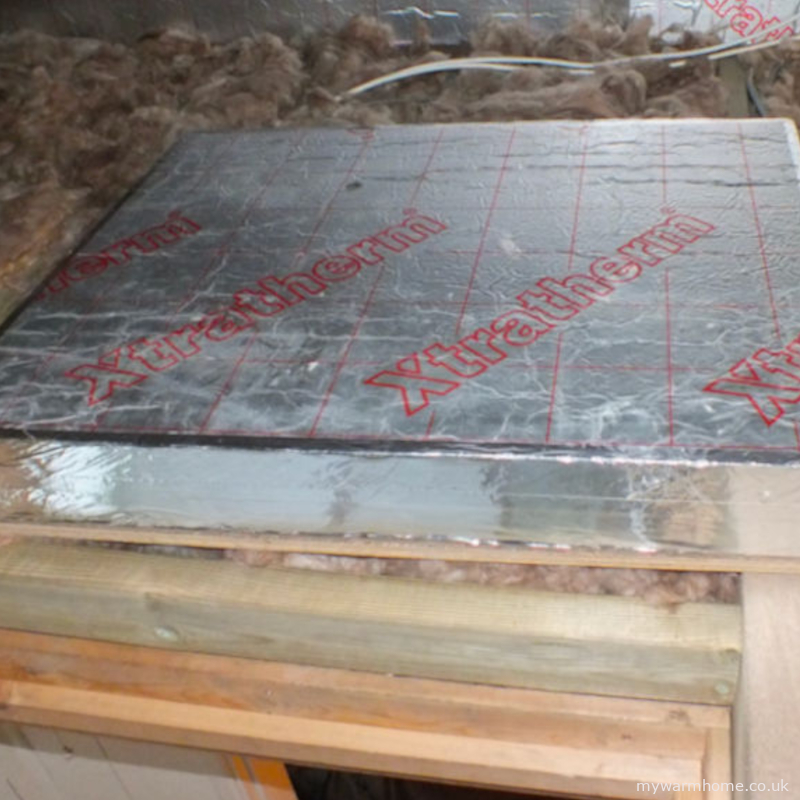
PIR (Polyisocyanurate) and phenolic foam.
Polyisocyanurate (PIR) and phenolic foam are both types of plastic-based foam insulation boards used in construction: PIR. A rigid foam board made from a thermoset plastic that’s known for its high thermal resistance, low water absorption, and structural strength. PIR is often used for flat roofs because of its durability and compatibility with waterproofing methods. Phenolic foam. A popular choice for domestic floors that combines thermal efficiency with an economical price point. Phenolic foam may have slightly better thermal performance than PIR, but PIR is more economical.
Fire-resistant Can be cut to fit snugly between joists. Higher R-value, so can be thinner to achieve building regulations.
Takes longer to fit than rolled insulation.
Comes in large sheets.
Good to know.
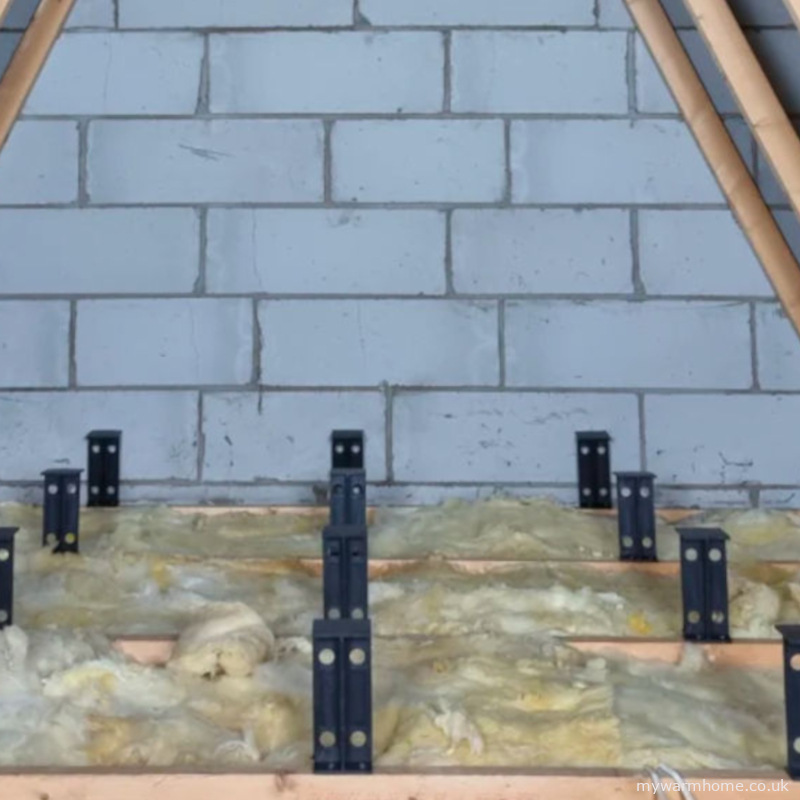
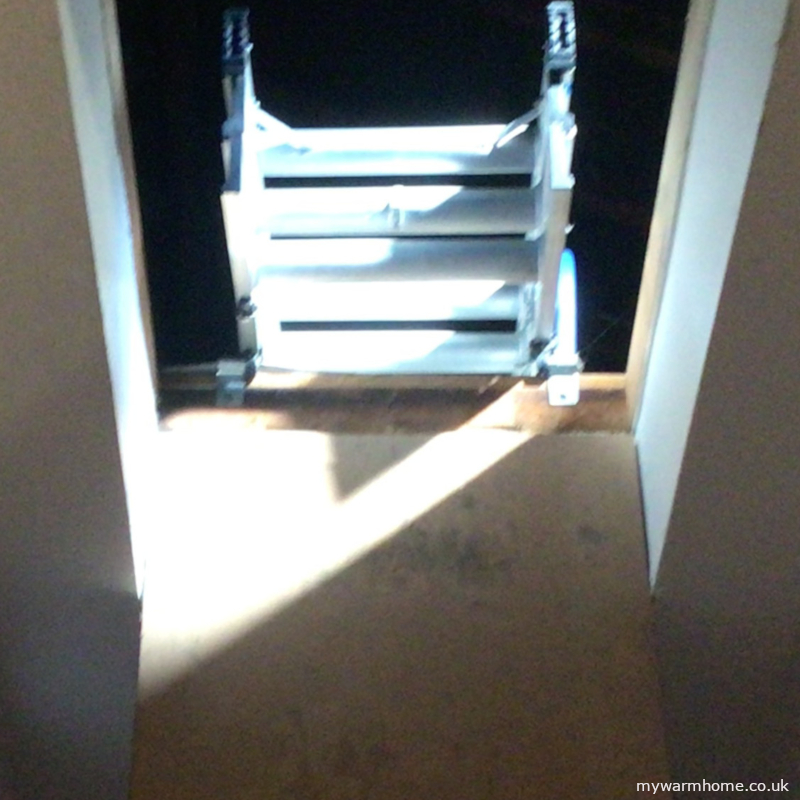
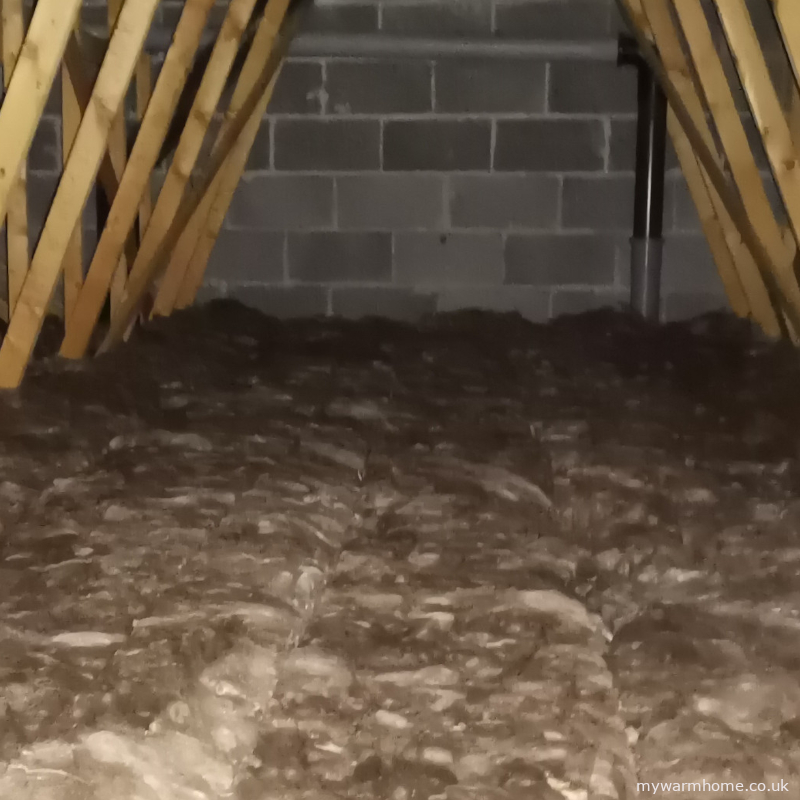
When insulating a loft at joist level, it’s important to consider both storage options and access control. Various hatches and ladder systems are available, and while some may look stylish, you should prioritize practicality and ease of use, especially as we age. If you want to create a storage space, avoid compressing the insulation, as this reduces its effectiveness. There are products available that raise the loft floor to provide storage space and create access walkways to essential items like boilers, water tanks, and solar inverters. Pay special attention to the hatch area, which needs to be draught-proofed and insulated. This is one of the weakest points in the insulation system because hot air rises and can escape quickly through a poorly insulated hatch, defeating the purpose of insulating in the first place.
Boarded Service AreaLoft Hatch PIRLoft Legs
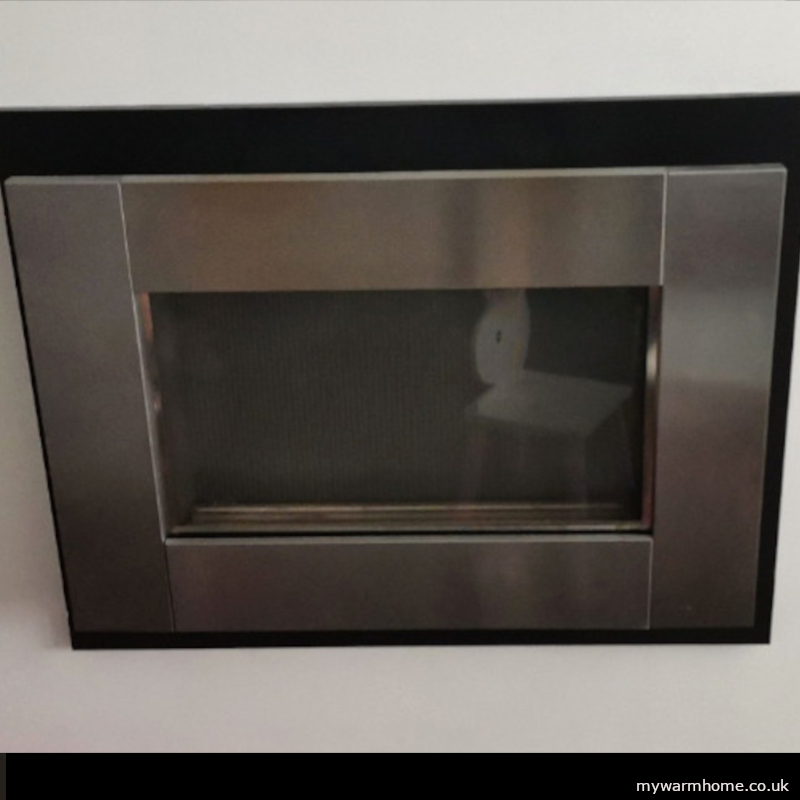
Gas and open flued appliances.
If the fabric of the property is being improved and open-flued gas appliances exist, then a gas spillage test should be carried out on each appliance by a suitably competent operative. Rules exist that give an average unimproved property a certain amount of leakiness (adventitious air) to allow open-flued appliances to operate safely. This all depends on how much fuel burns over a period of time, for example: 7.5kw/hr, 9kw/hr, 6.9kw/hr. You will see this on the data badge of the appliance (gas rating of an appliance here.). The more fuel used, the more leakiness is needed. Multifuel appliances are treated in roughly the same way but do not come under gas safe legislations. HETAS and building regulations govern multifuel installations and ventilation.
This is the reason combustion ventilation is sometimes needed. This allows the air to be replenished (with an open flued appliance we are burning the oxygen in the room that we use to breathe)
Data BadgeFlueless FireOpen Flue Fire
With the introduction of insulation, extraction ventilation should be installed as part of the process, we now have a different factor to add in with gas safety. Extraction fans either pulling or pushing air (PIV) can now effect the performance of the appliance.
Open flued gas appliances should be checked to prove they are not spilling products of combustion into the property. This is verified by performing a spillage test.
Part J states. “Extract fans lower the pressure in a building, which can cause the spillage of combustion products from open-flued appliances. This can occur even if the appliance and the fan are in different rooms”. Any funded insulation work now includes ventilation upgrades as part of the current PAS, so extract ventilation will be installed. This should have been factored in as part of any ventilation work carried out. A competent person is required to perform spillage tests.
Part B, 8(1) of the Gas Safety (Installation and Use) Regulations 1998 states that no person can make any changes to a premises that contains a gas fitting or storage vessel if the changes would compromise the safety of the fitting or vessel. This basically means if the fabric of the building (walls, floors, roofs) are being insulated then appliances need to be checked by a suitably competent and qualified person.
Below you will find links to UK regulations and other useful information. These links are to third party websites, and we cannot guarantee the validity or safety of the following sites. If you find any broken links or issues, we would love to know. Please read our disclaimer.
The Act for the Rebuilding of the City of London was passed in February 1667. It proposed that all new buildings had to be constructed of brick or stone against the future perils of fire. It also imposed a maximum number of storeys per house for a fixed number of abodes to eliminate overcrowding. This was probably the first set of England’s building regulations, the devolved nations have their own regulations.
Regulations and guidance changes all the time. Please always check the most current with HSE, local gov or if in doubt seek proffessional advice. the following is guidance only.
If work is being carried out on UK funded schemes (like warmhomes), then the current PAS works alongside the current building regulations. This sets out how the processes and standards will hopefully prevent failure to the homeowner/tenant. Below are the approved documents for England.
In most cases the regulations are the same for each part of the UK, but variations may exist, and you should reference the specific nation for current standards.
Information and images below from Part F. Extract ventilation to the outside should be provided in all the following spaces.
Kitchens.
Utility rooms.
Bathrooms.
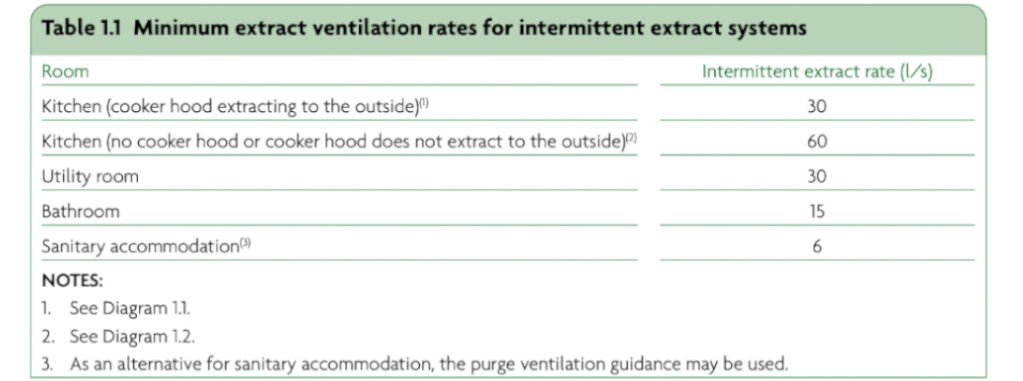
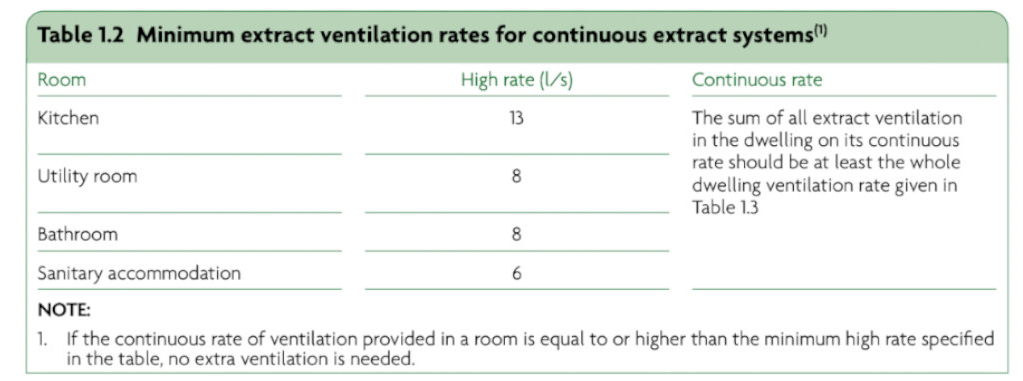
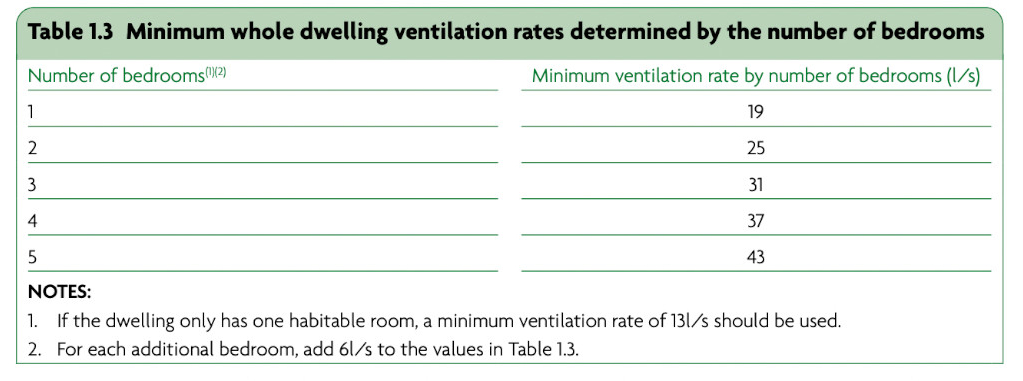
Sanitary accommodation. Extract ventilation can be intermittent or continuous. Minimum extract ventilation rates are in litres per second (l/s) for intermittent operation. Minimum extract ventilation rates for intermittent systems are given in below table 1.1. Minimum extract ventilation rates for continuous operation extract systems are given in below table 1.2. Minimum extract ventilation rates for the whole dwelling are given in below table 1.3. Extract ventilation terminals and fans, not including cooker extract hoods, should be installed to comply with both of the following conditions.
Table 1.1Table 1.2Table 1.3
As high as is practicable in the room.
No more than 400mm below the ceiling.
Where a cooker hood is used to extract to the outside, the height of the extract hood above the hob surface should be either as specified in the manufacturer’s instructions or, if no specification is available, between 650mm and 750mm (gas regulations also apply for gas hobs). Continuously running fans should be set up to operate without occupant intervention, but may have manual or automatic controls for selecting the high rate of operation. Any manual high rate controls should be provided locally to the spaces being served, e.g. bathrooms and kitchens. Automatic controls might include sensors for humidity, occupancy/usage and pollutant release. Controls based on humidity sensors may be installed in moisture-generating rooms (e.g. kitchen or bathroom) but should not be used for sanitary accommodation, where odour is the main pollutant. Other types of automatic controls might be suitable. Where present, automatic controls should operate according to the need for ventilation in the space.
Vents should be at least 1700mm (to reduce draughts) from floor level and should be controllable. The occupants should be able to reach ventilators.
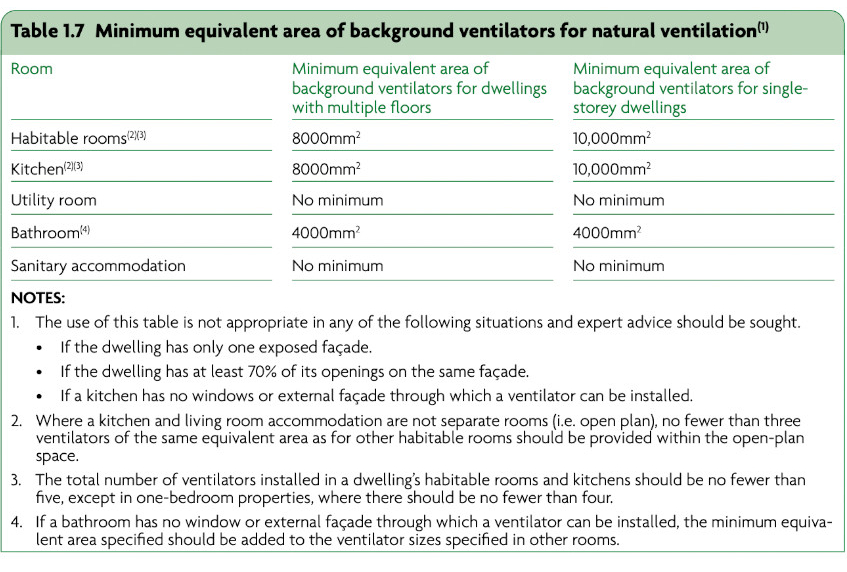
Ventilation should be controllable. Controls may be either manual (i.e. operated by the occupant) or automatic. Background ventilators should be at least 1700mm above floor level, to reduce cold draughts, but still be easy for the occupant to reach. Background ventilators with automatic controls should also have manual override. Where a combustion appliance is installed, any automatic controls must also ensure that the ventilation provided meets the requirements of Part J of the Building Regulations. If ventilators are installed on a funded scheme, then they should meet equivalent area to current PAS.
Background ventilators are intended to be left open during normal circumstances.
Table 1.7
U-Value Regulations at a glance.
U-values for existing dwellings.
Roofs: 0.16 W/m²K
Walls: 0.30 W/m²K
Floors: 0.25 W/m²K
U-values for windows and doors.
Doors with over 60% glazing: 1.2 W/m²K
Other doors: 1.0 W/m²K, with a limiting value of 1.6 W/m²K
Replacement windows: 1.4 W/m²K or a B for its window energy rating (WER)
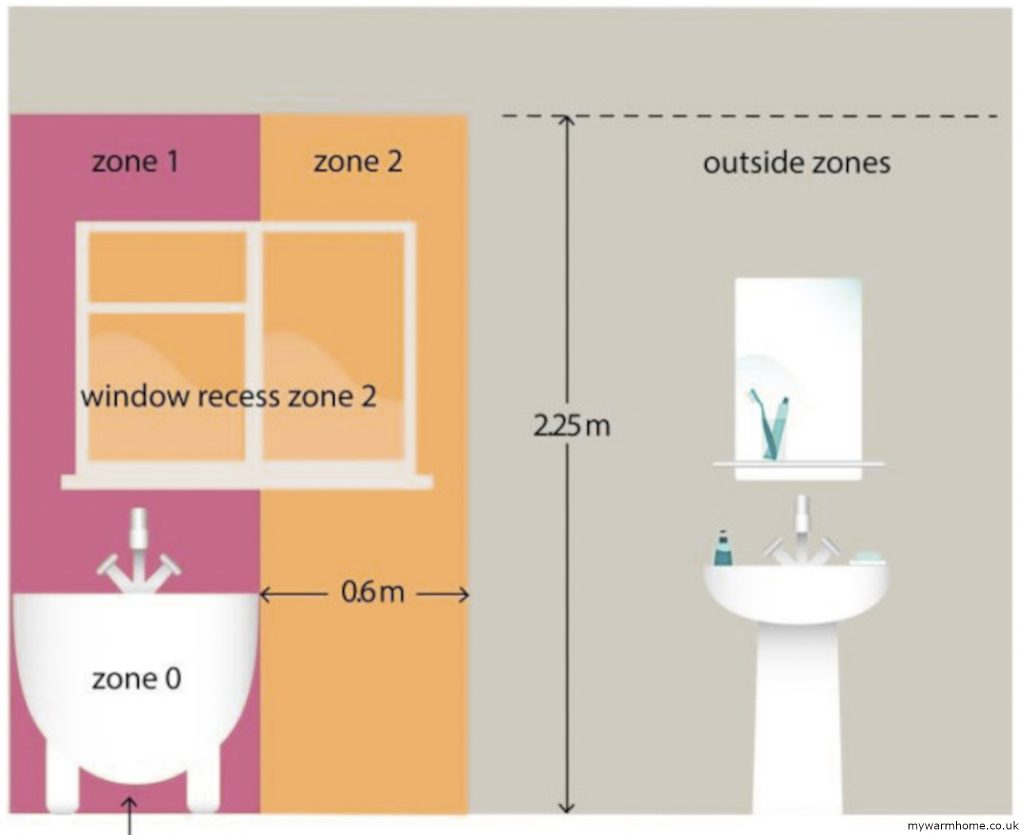
Bathroom Zones.
For electrical installations in bathrooms certain electrical regulations exist. Zones are divided to allow appliances with electrical connections to be installed in each zone. link here.
Zones
Boiler Flues.
All boiler flues have to be installed with clearances set out by building regulations (Part J) and manufacturer instructions. Some minimum basics are.
300mm from an opening window
300mm from ground level (boiler may be in basement)
600mm from facing wall
List of BS EN standards.
BS EN 13162 to BS EN 13171: Thermal Insulation Products for Buildings. These standards specify the requirements for factory-made thermal insulation products used in buildings. They cover a range of materials, including mineral wool (BS EN 13162), expanded polystyrene (BS EN 13163), extruded polystyrene (BS EN 13164), and cellular glass (BS EN 13167). Each standard details the material properties, performance criteria, and testing methods to ensure the insulation meets the required specifications.
BS EN 13164: Extruded Polystyrene (XPS) Products This standard applies to extruded polystyrene (XPS) products, which are known for their high compressive strength and low water absorption. BS EN 13164 outlines the necessary thermal and mechanical properties, making XPS suitable for applications like perimeter insulation and inverted roofs.
BS EN 13165: Rigid Polyurethane (PUR) and Polyisocyanurate (PIR) Foam Products. This standard applies to rigid polyurethane (PUR) and polyisocyanurate (PIR) foam products. It sets out requirements for thermal performance, dimensional stability, and fire resistance. Due to their excellent thermal properties, these materials are commonly used in wall, floor, and roof insulation.
BS EN 13166: Phenolic Foam Products. This standard covers phenolic foam products, which are known for their high thermal performance and fire resistance. BS EN 13166 specifies the necessary properties to ensure that phenolic foam provides effective insulation in various applications.
BS EN 13167: Cellular Glass Products. This standard applies to cellular glass products with exceptional moisture resistance and compressive strength. This standard ensures that cellular glass meets the required thermal and mechanical performance criteria for insulation applications.
BS EN 13168: Wood Wool Products. Specifies requirements for wood wool products used for thermal insulation. It covers properties like thermal resistance, density, and moisture absorption, ensuring that wood wool provides effective insulation and acoustic performance.
BS EN 13169: Expanded Perlite Products. This standard is for expanded perlite products, which are lightweight and have good thermal and acoustic insulation properties. Outlines the necessary performance characteristics for these products to ensure their effectiveness in building applications.
BS EN 13170: Expanded Cork Products. This standard covers expanded cork products, which are known for their natural insulation properties and sustainability. It ensures that the expanded cork meets the required thermal and mechanical performance criteria for building use.
PAS 2035: Retrofitting Dwellings for Improved Energy Efficiency.
PAS 2035 is a specification for retrofitting domestic buildings to improve energy efficiency. It covers the assessment, design, and installation of retrofit measures, including insulation. The standard aims to ensure a holistic approach to retrofitting, addressing potential issues such as ventilation, moisture control, and thermal bridging.
Reputable installers are often accredited by recognised trade bodies or professional organisations.
Selecting a trustworthy installer for your heating, insulation, or renewable energy project requires careful research and due diligence. Hiring the right professional ensures your home is safe, efficient, and compliant with regulations, and helps protect warranties, insurance, and grant eligibility.
Reputable installers are often accredited by recognised trade bodies or professional organisations. Accreditation confirms that the installer:
Meets industry standards
Has undergone proper training
Is legally authorised to perform specific types of work
NAPIT – Covers electrical and heating installations.
NICEIC – Approved contractor scheme for electrical work.
MCS – Microgeneration Certification Scheme – Required for heat pumps, solar PV, and renewable energy installations. Using accredited installers is essential for compliance, safety, and accessing grants or incentives, such as the UK Boiler Upgrade Scheme (BUS) or Warmhomes funding.
Being registered with the above does not always mean the work is checked by the certification company, It usually shows competence within the field of current health & safety practices and current regulations. Remember that if you have any work carried out at your property either on a funded scheme or self financed you should be covered by consumer rights. The citizen’s advice is always a good place for information.
Some of the below will help with your journey in finding trades.
If you feel you are vulnerable.
Try to get a family member or neighbour to sit in with you when getting quote visits, also maybe designate someone else to deal with the process.
Ask for Recommendations.
Seek recommendations from friends, family, or colleagues who have recently had similar work done. Personal recommendations can be invaluable in finding trustworthy installers.
Read Reviews and Testimonials.
Check online reviews and testimonials on platforms like Trustpilot, Checkatrade, or Which? Trusted traders and google reviews. These platforms often provide insights into the quality of work and customer satisfaction, But please be aware that not all reviews can be genuine!
Obtain Multiple Quotes.
Don’t settle for the first installation company you find. Obtain quotes from multiple companies for comparison. Be wary of quotes that are significantly lower than others, as they may indicate subpar workmanship or the use of inferior materials. If you are applying for funding, then be weary of being promised the earth or pushed into signing up. Any decent installation company should keep you at ease and answer all your questions honestly.
Verify Insurance and Guarantees.
Ensure that the installation company/individual has adequate insurance coverage, including public liability insurance, to protect you and your property in case of accidents or damage. Also, inquire about any guarantees or warranties offered for the work they perform.
Check for Compliance with Regulations.
Certain types of work, such as electrical or gas installations, require compliance with specific regulations and safety standards. Verify that the installers you choose are appropriately qualified and registered to carry out such work.
Communicate Clearly.
Communicate your expectations clearly, including timelines, budget constraints, and any specific requirements you may have. Reputable installers will be transparent and be responsive to your needs.
Trust Your Instincts.
If something feels off during your interactions with installers or if they seem unwilling to provide necessary information or documentation, trust your instincts and consider looking elsewhere.
Get Everything in Writing.
Once you’ve decided on an installation company, make sure to get all agreements, including costs, timelines, replacement of fixings (window sills, skirting etc) redecorating and scope of work, in writing. This helps protect both parties and ensures clarity and accountability throughout the project.
Below are some questions you need to be asking.
External Wall Insulation.
Preparation and Property Impact.
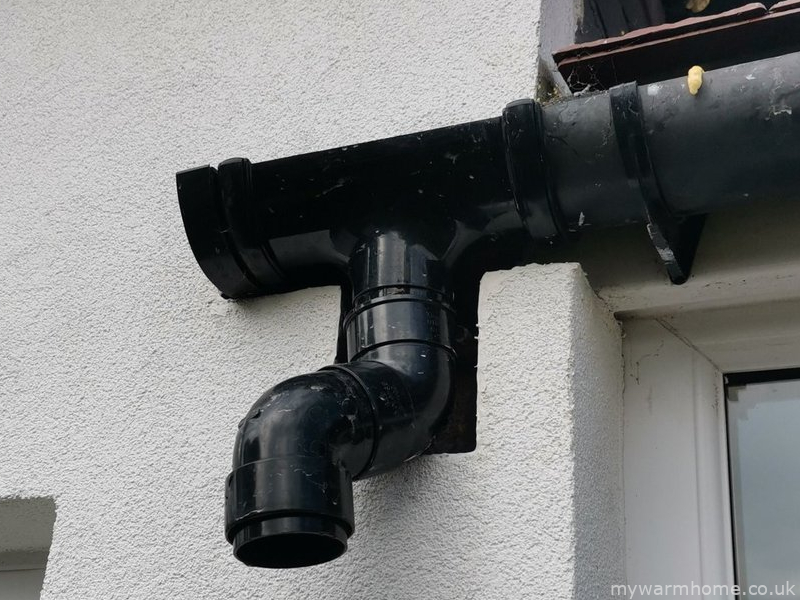
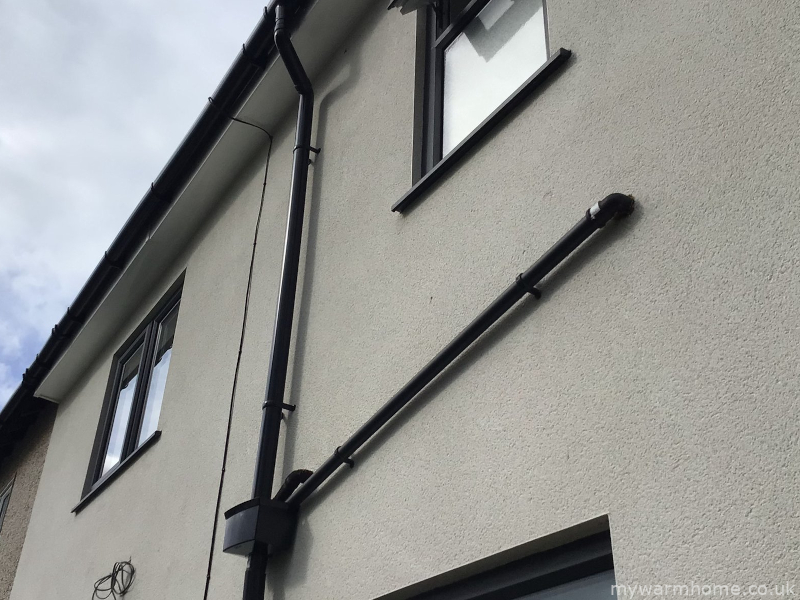
External Wall Insulation can significantly change the look and function of your property, so it’s important to understand the process in detail before work begins. Confirm what insulation system will be used, its thickness, and the finish type (e.g. render, brick-slip, or cladding). Ask how the installers will deal with fixtures and features such as satellite dishes, alarm systems, lights, air vents, overflow pipes, and external taps—these should all be properly removed, extended, and reinstated, not simply covered over or worked around.
Work around detailingGas pipe renderedPoor Fixings
Openings and Details.
Discuss how the system will accommodate windows, doors, and sills, as these may need to be extended or replaced to ensure proper sealing and to prevent water ingress. Check that drip beads, stop beads, and corner trims will be installed neatly and to specification for a high-quality, durable finish.
Ventilation and Airflow.
Make sure that ventilation and airbricks are not blocked or removed. Ask how they will be extended through the insulation system to maintain airflow and prevent damp or condensation. Obtain a clear ventilation specification, and ensure the finish matches or complements your property’s appearance. For homes with fireplaces or open flues, ask about spillage testing and combustion ventilation to ensure safety and compliance.
Groundworks and Damp-Proof Course.
Confirm that the insulation will finish above the damp-proof course (DPC) and that appropriate base trims and drainage channels will be installed. The system should not bridge the DPC unless designed to do so, as this can lead to moisture problems. Ensure that any existing damp or drainage issues—including blocked gutters or damaged downpipes—are addressed before insulation begins.
Aesthetics and Boundaries.
If your home is part of a terrace, semi-detached, or adjoins another property, ask how the system will terminate at party walls, fences, or neighbouring structures. Ensure that detailing will be neat and watertight. For listed buildings or properties in conservation areas, confirm that planning permission or building consent is in place. Regulations change so what may of been permitted last year may not be now, and visa versa!.
Safety and Compliance.
For homes with chimneys, fireplaces, or combustion appliances, ask about spillage tests and combustion ventilation to ensure safety after the installation.
Documentation and Clean-Up.
Request written details of all materials, fixings, and finishes, including manufacturer names and warranty information. Confirm that all waste and debris will be removed and agree on a timeline for completion and clean-up.
Finally, ensure you have full contact information for everyone involved in the project, including the installation team, project or site manager, and—if installed through a UK grant scheme, the Retrofit Coordinator responsible for oversight and compliance.
Internal Wall Insulation and Room-in-Roof Considerations.
Disruption and Reinstatement.
Internal Wall Insulation can be highly disruptive, often requiring the removal of features such as skirting boards, window sills, coving, door frames, electrical sockets, light fittings, and radiators. Confirm that your installer will reinstate all removed items and specify whether they will be restored or replaced. Ensure that qualified tradespeople—such as joiners for woodwork and plumbers for wet work—will carry out these tasks, and get this commitment in writing.
System and Detailing.
Ask which insulation system will be used and how the installer plans to treat complex areas such as coving, cupboards, or meter locations. For room-in-roof spaces, confirm that any loft or eaves hatches will be properly insulated and professionally fitted, not simply boarded over. If you use roof storage, ensure this area remains accessible and structurally suitable for use once insulated.
Check that all electrical, alarm, TV, satellite, and internet cables will be correctly routed through the insulation and fully reinstated afterwards.
Ventilation and Safety.
A ventilation system should be installed as part of the works. Obtain a detailed specification to confirm it meets high standards of performance and finish. For homes with fireplaces or open flues, ask about spillage testing and combustion ventilation to ensure safety and compliance.
Pre-Installation Checks and Documentation.
Before work begins, inspect the external walls, damp-proof course, gutters, and downpipes. Any existing issues must be identified and either rectified by the installer or formally agreed with you in writing, as they can compromise insulation performance and cause long-term problems.
Finally, confirm that all debris will be cleared and agree on a timeline for completion and cleanup. Request full contact details for everyone involved, including the office manager, installation team (noting if subcontractors are used), and—if the work is part of a UK grant scheme—the Retrofit Coordinator overseeing the project.
Cavity Wall Insulation considerations.
Scope and Drilling.
Confirm that all suitable wall areas will be insulated, which may involve internal drilling. Discuss in advance where drilling will occur and what materials will be used to fill and finish the holes afterwards to ensure a neat appearance.
Garages and External Finishes.
For attached but unheated garages, talk through insulation options—particularly if shelving, cupboards, or other fixtures will need to be removed or adjusted. When drilling into external walls, ask what colour of mortar will be used to fill the holes, especially on rendered or painted surfaces. Confirm whether installers will repaint or touch up the finish to match the existing façade.
Material and Clean-Up.
Find out exactly which insulation material is being used and take the time to research its properties and suitability for your home. Clarify whether the installation team will be responsible for cleaning up spills, dust, or debris, and have this commitment documented in writing. If you have outdoor features such as ponds or livestock areas, inform the installers so they can take precautions against overspill.
Ventilation and Safety.
If new ventilation is required, request a clear specification and ensure all installations are completed to a high standard of finish. For homes with fireplaces or open flues, ask about spillage tests and combustion ventilation to maintain safety and compliance.
Pre-Installation Checks and Aftercare.
Inspect external walls, damp-proof courses, gutters, and downpipes before work begins. Any existing damp or drainage issues must be resolved first, as they can undermine the effectiveness of the insulation and lead to long-term problems. Finally, confirm that all debris will be removed and agree on a clear timeline for completion and cleanup—especially important for removal and refill projects.
Underfloor Insulation considerations.
Materials and Installation.
It can be challenging to assess conditions beneath the floor unless you have a basement. Confirm the type, thickness, and support method of insulation being installed, and ensure all accessible areas will be covered. If floorboards need to be lifted, be aware this can cause damage—ask whether replacements will match the original boards to maintain appearance and consistency. Take pre-installation photographs for reference.
Cross Ventilation.
Adequate underfloor ventilation is essential. Make sure any existing vents or decorative grilles are retained or replaced with alternatives that are both functional and visually appropriate. Request written confirmation of how cross-flow ventilation will be maintained or improved, including details of the units being installed. The system should allow sufficient airflow to prevent moisture buildup and stop water ingress.
Basement Insulation.
If a basement is being insulated, ask about fire safety compliance and verify that all work adheres to current building regulations. It’s worth doing your own research for added assurance.
Ventilation and Safety.
If a ventilation system is included, obtain a detailed specification and confirm it will be installed to a high standard. For properties with fireplaces, request information on spillage tests and combustion ventilation to ensure safety and compliance.
Pre-Installation Checks and Cleanup.
Inspect external walls, damp-proof courses, subfloor ventilation, and rainwater systems (gutters, downpipes, etc.) before work begins. Any existing damp or drainage issues must be resolved first, as they could compromise the insulation and cause long-term damage. Finally, confirm that all debris and waste materials will be removed and agree on a clear timeline for completion and cleanup.
Loft Insulation considerations.
Materials and Impact.
Ask which insulation materials will be used, such as spray foam, mineral wool, or PIR boards—and make sure you understand their limitations and how they may affect your property’s insurance or mortgage eligibility.
Access and Storage.
Discuss how the installation will impact access to essential services in the loft, such as boilers or solar inverters, and whether storage areas will still be usable or need adjustment.
Electrical Safety.
If you have recessed down lights, these must be properly protected to prevent air leakage and potential overheating. Suitable covers or fire-rated caps should be used. For electric showers or other circuits with cables running through the loft, ensure proof is provided that the cables are not buried within insulation, as this can cause overheating.
Pipework and Loft Hatches.
All exposed water pipes should be fully insulated. The loft hatch should also be insulated and drought-proofed to a professional standard avoid makeshift solutions like loosely stapled insulation.
Ventilation and Timber Protection.
Adequate airflow in the loft is essential to prevent condensation and protect the roof timbers. Confirm that ventilation will be maintained or improved as part of the work.
Whole-Home Ventilation and Safety.
If a new ventilation system is being installed, request a clear specification to ensure it meets high-quality standards and finishes. For homes with open fireplaces, ask about spillage tests and combustion ventilation to ensure safety and compliance.
Gas Boiler considerations.
Gas Supply.
Most combination boilers need a larger gas supply pipe than older systems, often requiring an upgrade from the meter. Before installation, confirm the planned gas pipe route to avoid unnecessary external runs if an internal route is possible. If the pipe must run outside, ensure it’s properly clipped and installed in line with regulations.
Heating Controls.
Discuss your heating controls and where the thermostat will be located. It should be positioned in a room without a thermostatic radiator valve (TRV) or any secondary heat source such as a fire or cooker, to ensure accurate temperature readings.
Condensate Drainage.
All condensing boilers produce condensate that must be drained safely. Ideally, this drainage point should be located indoors. If the condensate pipe must run externally, it needs to be insulated with Class 0 lagging. Confirm the type of insulation being used and how it will be secured and supported.
System Clean and Preparation.
Ensure all debris will be removed during installation and clarify when this will happen. Most boiler manufacturers require a full system flush before fitting the new unit—this is essential. Make sure the installer carries it out, and ideally, observe the process. The correct use of cleaning and inhibitor chemicals is vital for system health, and their use should be recorded in the Benchmark log (the boiler’s installation and service record). Ask for a copy for your files.
Warranty and Guarantees.
Confirm both the manufacturer’s warranty and the installer’s guarantee, particularly regarding leaks and workmanship. Once the boiler is installed, it’s a good idea to call the manufacturer directly after a few weeks to confirm that your warranty is fully registered and active.
Solar PV Considerations.
Panel Direction.
You may already know the direction your property faces, but installers might suggest positioning the panels differently. This could be due to access issues, roof condition, or other practical constraints. However, the optimum orientation delivers the best performance, so make sure your installer prioritises efficiency over convenience.
Inverter Location.
The inverter should be installed somewhere easy to access for inspection, servicing, and maintenance, while also being protected from the elements. Some models are suitable for outdoor installation, provided they’re shielded from direct sunlight and rain. If you live near the coast, ask about corrosion resistance and whether additional protection is needed.
Monitoring Meter.
The generation meter (monitoring meter) should be positioned where it can be easily read and checked regularly. Make sure it’s visible enough to monitor energy production and detect early signs of faults (for example, if it isn’t blinking in daylight). Some installers may say it has to go in loft if inverter is also installed there, but dont allow, have it somewhere you can read and check.
Paperwork and Certification.
Confirm the expected timescales for all necessary documentation, including MCS certification, DNO approval, and any paperwork your energy supplier may require.
Warranties and Guarantees.
Clarify the warranty terms and guarantee lengths for all equipment. Make sure you know who to contact in case of faults or system failure.
Get Everything in Writing.
Once you’ve decided on a installation company, make sure to get all agreements, including costs, timelines, and scope of works, in writing. This helps protect both parties and ensures clarity and accountability throughout the project.
Air source Heat Pumps.
System Type and Design.
Ask your installer to explain which make, model of heat pump is being fitted and why it’s suitable for your property. Confirm that the system has been properly sized for your home, an undersized or oversized unit can reduce efficiency and increase running costs. Request a full design calculation (MCS or equivalent) showing heat loss per room, flow temperatures, and emitter sizing. Ask what refrigirant is used within the pump (R32, R290 etc). Ask about hybrid systems to help in the winter months.
Outdoor Unit Location.
The external unit should be positioned where airflow is unrestricted, but noise and vibration will not affect you or neighbours. It must sit on a stable, level base (often a concrete pad with anti-vibration plinth) and be clear of obstructions such as fences or foliage. If located near boundaries, confirm it meets local noise regulations and planning guidance. It should meet manufactures clearances for optimum airflow. For coastal or exposed locations, ask about corrosion-resistant finishes and protective coatings. (if within 2000m from the coast this is a must)
Internal Components.
Confirm where the indoor cylinder, buffer tank, and controls will be located. These should be easily accessible for servicing and maintenance, with pipework neatly installed and insulated. Discuss how existing systems—such as radiators or underfloor heating will be adapted or replaced, and ensure the flow and return pipe sizes are appropriate for the new system.
Condensate and Drainage.
Heat pumps produce condensate water, particularly in colder weather. This must be drained safely away from the base unit, ideally into a proper soakaway or drain. The pipework must not freeze, so confirm that suitable insulation and gradients are in place. The condensate produced is not the same a a combustion boiler so it is not acidic.
Electrical and Controls.
Ensure the electrical supply is adequate and compliant with regulations, with a dedicated isolator switch. Ask about the control system whether it will use smart thermostats, weather compensation, or load compensation and how to use these features for maximum efficiency.
Groundworks and Protection.
If installing a ground source heat pump, confirm the ground loop layout (horizontal trenches or boreholes), and request documentation of where pipes are buried for future reference. For air source units, confirm that rainwater runoff from roofs won’t drip onto the unit and that the area around the base remains well-drained and clear of standing water.
Warranties, Maintenance, and Support.
Ask for details of warranties and service agreements for both the equipment and installation. Heat pumps require annual servicing to maintain performance and warranty validity, so ensure you receive a maintenance schedule and the installer’s or manufacturer’s contact details.
Paperwork and Certification.
Ensure you receive all necessary documentation, including MCS certificates,DNO notifications, and user manuals. These are essential for warranty registration, grant schemes (such as the Boiler Upgrade Scheme), and resale value.
Cleanup and Completion.
Confirm that all debris and packaging will be removed and agree on a clear completion timeline. Obtain written contact details for the installation company, lead installer, and if installed through a UK grant scheme the Retrofit Coordinator responsible for the project.
Insulating a loft space significantly slows down the rate at which heat escapes from our homes.
Since heat naturally rises, the roof becomes the primary area where heat loss occurs. In fact, without insulation, up to 25% of the heat in a home can be lost through the roof. By installing the right amount of insulation and ensuring it is applied correctly, we can drastically reduce this heat loss, leading to better energy efficiency and lower heating costs. Regulations have drastically changed over the years and from the mid 80s when 100 mm of standard itchy insulation seemed to suit we now have up to 300 mm of a much more environmentally substance to satisfy our needs. Have a look at the installer page for some handy questions to ask.
Health and safety.
You may need specialist advice from trades people and professionals regarding things like, High amperage cables. Showers, ovens, hob’s and solar installations. Nesting. Bees, wasps, bats. Vermin. Rats, mice, squirrels Asbestos. Vermiculite, flues, fire check boards, loft hatches. Your installers should pick up most of the above items on the initial pre-installation survey.
As a general rule, high-amperage cables should always be positioned outside the insulation, rather than beneath it. Special care must be taken if there are any nesting bats, as well as bees or wasp nests. If vermin are present in your loft, installing insulation can create a warm environment that attracts them. Not only can they damage the insulation, but they also tend to gnaw on cables. Additionally, if you notice a strong ammonia (rat urine) smell, be cautious of Weil’s disease.
Consideration and advice will also need to be sought with flues in lofts in case the insulation will interfere with their performance. Some older houses may contain asbestos, which only a trained eye can recognise. Never disturb anything you’re unsure about. The health and safety section has more details.
Loft insulation.
Correct background ventilation. *All rooms with the installation of trickle vents or wall vents if required Correct door undercuts. *Undercuts to internal doors allow the free movement of air around the property.
*Testing of the background ventilation pre-installation may allow the installed measure(s) to move forward without the need for door undercuts or trickle vents installed.
Maintain or improve existing loft ventilation. Soffit vents (they run around the perimeter of the roof (behind the gutters) should not be blocked. If the insulation could potentially cause moisture buildup, then extra or modified ventilation will be required. If a musty smell is present in the loft, then good practice is to improve ventilation. Correct extract ventilation in wet rooms. Kitchens, bathrooms, WC’s, and utility rooms are all wet rooms. If extraction exists, then checks need to be carried out by referencing the manufacture’s data or performing an anemometer (testing apparatus) test to confirm extraction rates are being met. Correct sealing of down-lights with BS standard products. This is to stop air leakage, what’s the point of trying to prevent heat loss if we have gaps in the ceilings? Pipework within loft space insulated. To protect from freezing in the winter. Electrical cables checked. Identify any damage and locate high-amperage cables for showers, cookers etc. Access walkways maintained or installed. Required for maintenance of water tanks, boilers, solar inverters etc. Hatches are sealed and insulated. To prevent a weak point in the insulation. Mitigation of cold spots/thermal bridges (loft areas and joists). Cross-laying the insulation to prevent a thermal bridge on joists. Where possible, the loft should be 100% insulated and any loft boards lifted and relaid above insulation with stilts or risers post-install. If water tanks exist, then try to mitigate cold spots by insulating them underneath. Warning labels affixed to rafters. Part of health and safety and also an Ofgem declaration should be attached by the installers on funded schemes. Meeting current building regulations and best practices. Not only just the current PAS.
Cold Bridging In LoftDoor UndercutHatch Not Insulated
Insulation approach. Cold loft or warm loft?
We typically have two ways to add loft Insulation, depending on the type of roof space and its use. The process for installing is the same in most cases, and the following is a rough guide to prevent failings of loft installation. Ventilation is imperative as when we insulate our loft space as we do not want a build up of moisture.
Cold loft vs Warm Loft.
Warm Loft. Insulates directly below the roof (rafters), creating a warm loft space. Ideal for semi-living areas or roof conversions. This type of loft has less temperature fluctuations if kept warm, so less chance of condensation.
Cold Loft. Insulates the structural deck (directly above the last ceiling), keeping the heated space below warmer. Cold lofts have the advantage of being cheap and relatively easy to install. This type of loft is subject to temperature fluctuations and condensation, so ventilation may need to be improved.
The insulation should be installed according to current building regulations, current PAS standards and inline with the manufactures recommendations. The main reason we insulate our lofts is to slow down the amount of escaping heat. The building regulations set out a required U value and the insulating material will have an R value, so the thickness of insulation required should be quite easy to work out. (U-Value = 1/(Sum of all R-Values).
Roofs are designed with ventilation to protect timbers, so this has to be maintained or improved with the use of felt, soffit, eaves, and tile vents. Electrics need to be kept safe and checked for safety pre-installation. Areas of thermal loss need to be insulated or mitigated (hatches, down lights etc). Any combustion flues should be left alone, if they need moving, unclipping from brackets for any reason then a competent person is required.
Unsealed LightGood Loft LayingPoor Sprayfoam
Things to consider.
Lighting. Sealing and protecting cables and down lights with BS standard covers. Some lighting may need fire protection. High-powered cables. These need to be outside of insulation. (showers etc) Ease of access. For maintenance of solar equipment, water tanks and boilers. Uninsulated pipework. Bathroom supplies and central heating. Joist and rafter size. To determine cuts for insulation. Ventilation. If ventilation requires updating, then felt and tile vents are available. Ducting. Make sure if ducting is moved, then manufacturers recommendations are followed. Products used. See below. Insurance and mortgage. You may need to inform insurance and mortgage companies if using certain products. Weight. If boarding and storing items in loft. Ceilings are designed to support a certain amount of weight, so the Structural integrity must be maintained. Potential moisture build up. Does the space feel airy and with no smells of damp.
Warm Loft.
Insulating a warm loft is to place the insulation between the rafters, so this is directly below our roof. The method you choose will take some research and depends on how the space will be used.
Types of insulation used.
Firstly, the spray foam you have probably heard so much about either negatively or positively! What is it? Spray foam (expanding foam in the UK) is a chemical product created by two materials (isocyanate and polyol resin) which react when mixed with each other and expand many times its liquid volume after it is sprayed in place. This comes in two types.
Structure. Contains cells that are completely closed off, creating a dense, solid structure. R-Value. Typically, has a higher R-value per inch. Density. More dense and rigid. Moisture Resistance. Highly resistant to moisture and can act as a vapour barrier. Strength. Provides structural support and increases the rigidity of the building. Application. Can be suitable for exterior walls and roofs, where added strength and moisture resistance are needed.
Open-Cell Spray Foam.
Structure. Contains cells that are open and interconnected, resembling a sponge. R-Value.Typically, has a lower R-value per inch. Density. Less dense and softer. Moisture Resistance. More permeable to moisture and does not act as a vapour barrier. Sound Insulation. Provides better sound dampening qualities. Application. Ideal for interior walls, attics, and ceilings where flexibility and sound insulation are beneficial.
Poor DetailingEven SprayingHot and Cold Loft
Good to know!
Each type of spray foam insulation has its specific advantages, so the choice depends on the particular needs of the project, such as the desired insulation value, moisture resistance, and structural requirements. I do not endorse or condone the use of spray foam when installed well. (Poorly installed is a whole different ballgame!.) When carrying out research please check with insurance companies, mortgage companies etc as the use of spray foam has been highlighted in various news reports. If you already have existing joist installed insulation then please do your research if having rafter insulation installed, this could cause potentially cause condensation problems.
PIR Insulation.
PIR (Polyisocyanurate) and phenolic foam are both types of rigid insulation boards used in building construction to improve thermal efficiency. These boards are supplied by many manufacturers including Celotex, Recticel, Kingspan, Iko.
Description. PIR insulation is a type of rigid foam insulation made from polyisocyanurate, a thermoset plastic. It is produced as foam and typically sandwiched between two facings, such as aluminium foil.
Properties. High R-Value. PIR has a high thermal resistance (R-value), which makes it very effective as an insulator. Moisture Resistance. It has good moisture resistance, which helps prevent mould and mildew. Cell structure. Usually sold as closed. Lightweight and Easy to Handle. It is lightweight, making it easy to handle and install.. Applications. Roof, wall, and floor insulation.
Phenolic Foam Insulation.
Description. Phenolic foam insulation is made from phenol-formaldehyde resin, a thermosetting plastic. It is produced as a rigid foam and often faced with materials such as foil or glass tissue.
Properties. Very High R-Value.Phenolic foam has an excellent thermal performance, with an R-value typically higher than PIR. Cell Structure. Mainly sold as a closed cell but can be manufactured as open. Durability. It is durable and retains its insulating properties over time. Applications. Used in a variety of applications, including roof, wall, and floor insulation. (and submarines!)
Comparison and use cases.
Thermal Performance. Both PIR and phenolic foam have high thermal resistance, but phenolic foam generally has a slightly higher R-value Moisture Resistance. Both types offer good moisture resistance, though phenolic foam’s closed-cell structure gives it an edge in preventing water absorption. Cost. PIR is typically less expensive than phenolic foam, which can be a consideration for large projects. Applications. Ideal for high-performance insulation requirements, including in walls, between rafters, and floors.
In Summary.
Both PIR and phenolic foam are excellent choices for rigid insulation, each with its own strengths. The choice between them will depend on specific project requirements such as thermal performance, fire resistance, moisture resistance, and budget.
How to insulate. Cold loft.
Types of insulation used.
Insulating a cold loft is to place the insulation between the joists, so this is above the ceilings. The easiest way is rolled insulation, which can come precut to fit the average joist width. Now we know about r-values, U-values and thermal bridging it should be obvious that by placing the insulation between the joists only, we have a bridge and an insulation weakness at the joists themselves. This is why the best way to insulate is to cross lay over the joist also. This not only adds better air tightness but also mitigates the thermal bridging. Different types of insulation for loft can be chosen by cost, requirements and also access.
Mineral wool.
Made from raw materials like stone or silica that are heated until molten, then spun into a fibrous matt. Properties. Mineral wool is known for its thermal, fire, and acoustic properties. It’s a poor conductor of heat, which helps maintain a consistent temperature in buildings. It’s also resistant to fire and doesn’t release toxic gases when heated.
The primary and most widely used are.
Mineral wool. Sheep’s wool. Glass wool. PIR (Polyisocyanurate) and phenolic foam.
Excellent thermal and acoustic insulation.
Easy to install.
Relatively cheap.
Breathable (can prevent dampness from damaging wooden timbers).
Can sometimes irritate bare skin.
Will compress if you put weight on it.
Sheep’s wool.
Sheep wool insulation is a natural, sustainable, and versatile material that can be used for thermal and sound insulation in buildings. Sheep wool is a natural insulator that can be used in walls, floors, lofts, roofs, and underlays. It’s crimped, which traps air in millions of tiny air pockets.
Excellent thermal and acoustic insulation.
Easy to install.
Safe to touch.
Eco-friendly.
Breathable (can prevent dampness from damaging wooden timbers).
Expensive.
Glass wool.
Glass wool insulation, also known as fibreglass insulation, is a common material used to insulate homes and commercial buildings. It’s made from glass fibres that are bonded together to create a wool-like texture. The glass fibres trap air pockets, which act as barriers to prevent heat loss.
Fire-resistant.
Insect repent.
Eco-friendly (mostly made from recycled glass).
Most glass wool irritates the skin (protective clothing must be worn when handled).
Becomes less effective when wet.
PIR (Polyisocyanurate) and phenolic foam.
Polyisocyanurate (PIR) and phenolic foam are both types of plastic-based foam insulation boards used in construction: PIR. A rigid foam board made from a thermoset plastic that’s known for its high thermal resistance, low water absorption, and structural strength. PIR is often used for flat roofs because of its durability and compatibility with waterproofing methods. Phenolic foam. A popular choice for domestic floors that combines thermal efficiency with an economical price point. Phenolic foam may have slightly better thermal performance than PIR, but PIR is more economical.
Fire-resistant Can be cut to fit snugly between joists. Higher R-value, so can be thinner to achieve building regulations.
Takes longer to fit than rolled insulation.
Comes in large sheets.
How to insulate. Cold loft.
So we know a cold loft is when the loft area is insulated in a way that prevents heat from travelling into the loft space (majority of our lofts are done this way). Heat naturally rises and is replaced with cooler air (convection), so the warm air in our house will move upwards until it meets resistance. We have explained R values and U values on our insulation page.
Depending on this resistance (R-value of plasterboard, plaster, other coverings), our heat will disappear into the loft space at a certain rate. We need to improve the resistance, and we do this by adding insulation at the joists directly above the ceiling, thus increasing the (R) value. Remember R1+R2, etc.
Multiple materials now exist that will give us a (U) value. When we reach a value that shows heat will pass through at a much slower rate (as set out by building regulations) we can then say it has been satisfied. The roof space is classed as cold due to the temperature difference between the dwelling below and the space above. The current recommended insulation value for loft insulation in the UK is a U-value, listed on our regulations page. This corresponds to a minimum insulation thickness of “X” amount of insulation. These values are something you need to consider while insulating your loft to ensure energy-efficient loft spaces. Knauf has a free calculator that can help when determining insulation values and thickness
A new access hatch may be needed, as it may not be physically possible to access with the insulation product. Once access issues are resolved, the area to insulate needs to be looked at. The area should be clear, and as much debris as possible removed from between joists. This debris can accumulate over the years as the under roofs of older houses begin to break down, this can cause problems with dust and also add weight. If you are thinking of a roof replacement, I highly recommend waiting and clearing all the debris from the loft post-roof replacement. Whichever insulation is chosen, then this need to be fitted snugly between the joists and then crossways to prevent repeated thermal bridges.
You could mix and match with a board insulation between joists and blanket laid crossways over top, the main thing is to mitigate the thermal bridge and achieve the U-value required. All areas of leakage i.e. downlights need to be sealed and protected. Loft hatches need to be sealed and insulated Video from Knauf
Good to know.
When insulating a loft at joist level, it’s important to consider both storage options and access control. Various hatches and ladder systems are available, and while some may look stylish, you should prioritize practicality and ease of use, especially as we age. If you want to create a storage space, avoid compressing the insulation, as this reduces its effectiveness. There are products available that raise the loft floor to provide storage space and create access walkways to essential items like boilers, water tanks, and solar inverters. Pay special attention to the hatch area, which needs to be draught-proofed and insulated. This is one of the weakest points in the insulation system because hot air rises and can escape quickly through a poorly insulated hatch, defeating the purpose of insulating in the first place.
Boarded Service AreaLoft Hatch PIRLoft Legs
Gas and open flued appliances.
If the fabric of the property is being improved and open-flued gas appliances exist, then a gas spillage test should be carried out on each appliance by a suitably competent operative. Rules exist that give an average unimproved property a certain amount of leakiness (adventitious air) to allow open-flued appliances to operate safely. This all depends on how much fuel burns over a period of time, for example: 7.5kw/hr, 9kw/hr, 6.9kw/hr. You will see this on the data badge of the appliance (gas rating of an appliance here.). The more fuel used, the more leakiness is needed. Multifuel appliances are treated in roughly the same way but do not come under gas safe legislations. HETAS and building regulations govern multifuel installations and ventilation.
This is the reason combustion ventilation is sometimes needed. This allows the air to be replenished (with an open flued appliance we are burning the oxygen in the room that we use to breathe)
Data BadgeFlueless FireOpen Flue Fire
With the introduction of insulation, extraction ventilation should be installed as part of the process, we now have a different factor to add in with gas safety. Extraction fans either pulling or pushing air (PIV) can now effect the performance of the appliance.
Open flued gas appliances should be checked to prove they are not spilling products of combustion into the property. This is verified by performing a spillage test.
Part J states. “Extract fans lower the pressure in a building, which can cause the spillage of combustion products from open-flued appliances. This can occur even if the appliance and the fan are in different rooms”. Any funded insulation work now includes ventilation upgrades as part of the current PAS, so extract ventilation will be installed. This should have been factored in as part of any ventilation work carried out. A competent person is required to perform spillage tests.
Part B, 8(1) of the Gas Safety (Installation and Use) Regulations 1998 states that no person can make any changes to a premises that contains a gas fitting or storage vessel if the changes would compromise the safety of the fitting or vessel. This basically means if the fabric of the building (walls, floors, roofs) are being insulated then appliances need to be checked by a suitably competent and qualified person.
Below you will find links to UK regulations and other useful information. These links are to third party websites, and we cannot guarantee the validity or safety of the following sites. If you find any broken links or issues, we would love to know. Please read our disclaimer.