
Internal wall insulation basics.
Insulating our walls internally can be disruptive during install and cause a reduction in the living area depending on insulation thickness and type installed. With IWI, ventilation needs to be carefully planned and certain types of ventilation like PIV may actually be problematic if any failings in system design arise. IWI can be applied to most wall types, but it’s important to consider the specific requirements for each, and to carefully follow best practices and design standards.
It’s typically not a DIY project (depending on your skill set), so you’ll likely need professionals to handle the installation.
IWI installation is not affected by weather as all the work is carried out internally, storage in a dry area is required.
Your trades should be fully trained in the system being installed, and warranties should be provided.
Have a look at the installer page for some handy questions to ask. Best practice document here.

Health and safety.
You may need specialist advice from tradespeople and professionals regarding things like,
High amperage cables. Showers, ovens, hob’s and solar installations.
Nesting. Bees, wasps, bats.
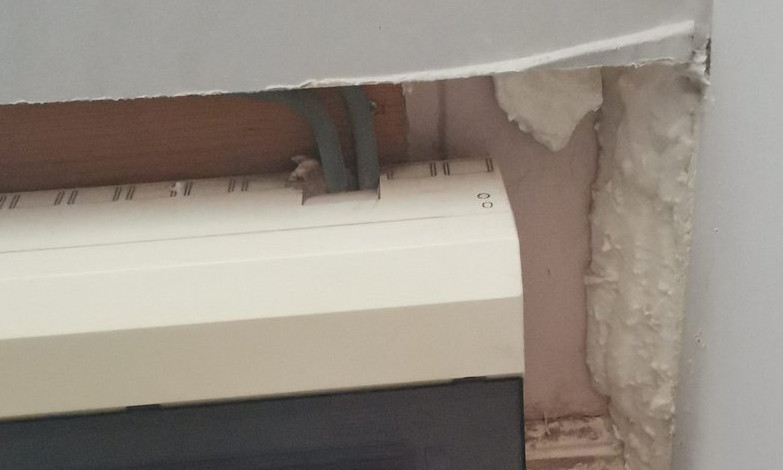
Vermin. Rats, mice, squirrels
Asbestos. Flues, fire check boards, flooring, etc.
Fire escape routes. Reducing the size of halls, landings, and passageways can impact escape routes.
As a general rule, high-amperage cables should always be positioned outside the insulation, rather than beneath it.
If vermin are present, installing insulation can create a warm environment that attracts them. Not only can they damage the insulation, but they also tend to gnaw on cables.
Some older houses may contain asbestos, which only a trained eye can recognise. Never disturb anything you’re unsure about. The health and safety section has more details.
Pre-installation building inspection requirements Prior to commencing the physical installation of the cavity wall insulation at the location, the Retrofit Installer shall undertake a pre-installation building inspection in accordance with the requirements set out in the current PAS B1-l2 of Table B.1
Installation project.
For any insulation or heating project funded through a UK grant scheme, the current PAS (Publicly Available Specification), best practices, and relevant building regulations should be strictly adhered to. The works should be guaranteed and warranted as part of the current PAS standards, MCS or protected by consumer law which can be a little bit daunting in this area, especially for the privately funded installations. A good guide is here.
Privately funded projects will decide on how to install and what guidelines to follow to suit budget and personal achievements.
A Pre-installation building inspection should be performed on either privately funded or grant funded installations. This should highlight any potential areas of concern and the property’s suitability for the proposed installation.
The current PAS requires Installers to undertake a pre-installation building inspection by the requirements set out in B1-l2 of Table B.1
IWI insulation.
Best practice document here.
Correct background ventilation. *All rooms with the installation of trickle vents or wall vents if required
Correct door undercuts. *Undercuts to internal doors allow the free movement of air around the property to allow airflow around the property.
*Testing of the background ventilation pre-installation may allow the installed measure(s) to move forward without the need for door undercuts or trickle vents installed.
Correct extract ventilation in wet rooms. Kitchens, bathroom, WC, and utility rooms are all wet rooms.
If extraction exists, then checks need to be carried out by referencing manufacture’s data or performing an anemometer (testing apparatus) test to confirm extraction rates are being met.
Positive Input Ventilation (PIV). Should not be installed with internal wall insulation, due to the risk of interstitial condensation between the wall and the IWI is increased when using a ventilation system such as PIV.
Background ventilation. Needs to be sufficient for property size.
Meeting current building regulations and best practices. Not only just the current PAS.
Electrical cables. High-powered cables from consumer units, etc, need to be address within the insulation and possibly derated or moved to a different location.
Awkward areas and how they will be treated. Retrofit pattern book, a resource to guide you through detailing.
Chimneys. If in use then do not insulate, if redundant and can be proven to be capped and vented then they will need to follow the latest best practices and guidelines which may allow to be insulated with non-flammable materials in case of commissioning in the future.
Asbestos materials. Around boilers, pipe lagging, around fuse boxes, the H&S section has more information.
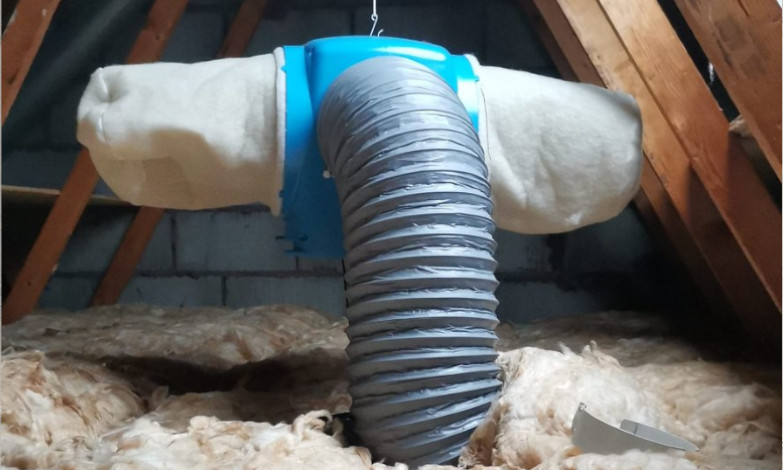
Ventilation. Re-routed, introduced or extended as required.
Flueing. On combustion, alliances seek the expertise of a gas safe engineer.
Lighting and socket fixings. How will they be extended, reinstated and fixed. Good idea to take plenty of photographs pre-install.
Heating and hot water. Pipework and radiator position considerations.
Cable, satellite and telephone services. Service boxes may need extending and suppliers may need to be contacted (Sky, Virgin, etc)
Uninsulated areas. Maybe wet rooms cannot be insulated unless being refurbished. Address ventilation requirements like dMEV if required and also make notes of system used for future reference.
Insurance. You may need to inform the insurance company if derating of electrical appliances is required.
Fire regulations. IWI reduces the internal dimensions of the property. Escape routes and access routes may need to be addressed.
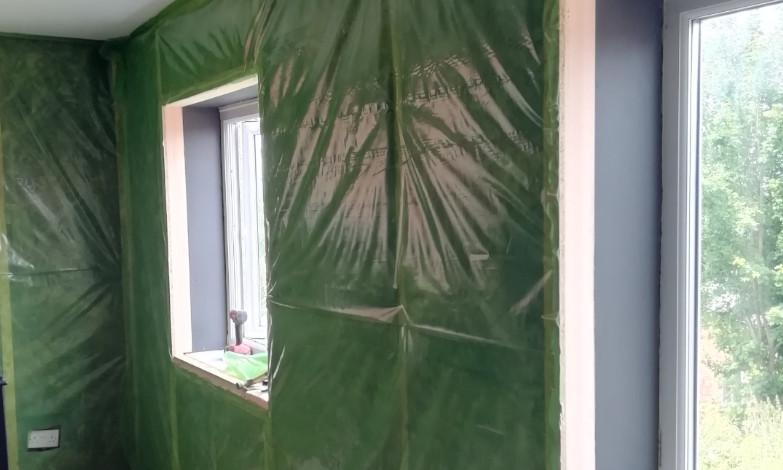
Storage. Safe and dry storage of insulating materials during work.
Damp. Confirming damp course has not been breached.
Neighbours. In some situations, the party walls may need to be insulated if neighbouring walls are also insulated.


Insulation approach. Internal wall insulation.
There are two main methods (and several products) that are used for adding Internal Wall Insulation (IWI), depending on the property’s characteristics. Some buildings are designed to allow moisture to pass between the interior and exterior, while others are not. These differences require tailored approaches, as wall compositions vary significantly and must be evaluated for their impact on moisture management and ventilation.
The primary goal is to minimize heat loss through external walls. This is achieved by either using pre-insulated boards or installing a batten framework and filling the gaps with insulation materials. This is similar to insulating between loft joists, but applied vertically. While this may seem straightforward, understanding the principles of building physics and insulation properties, as outlined in the insulation section, will provide deeper insights into understanding the process.


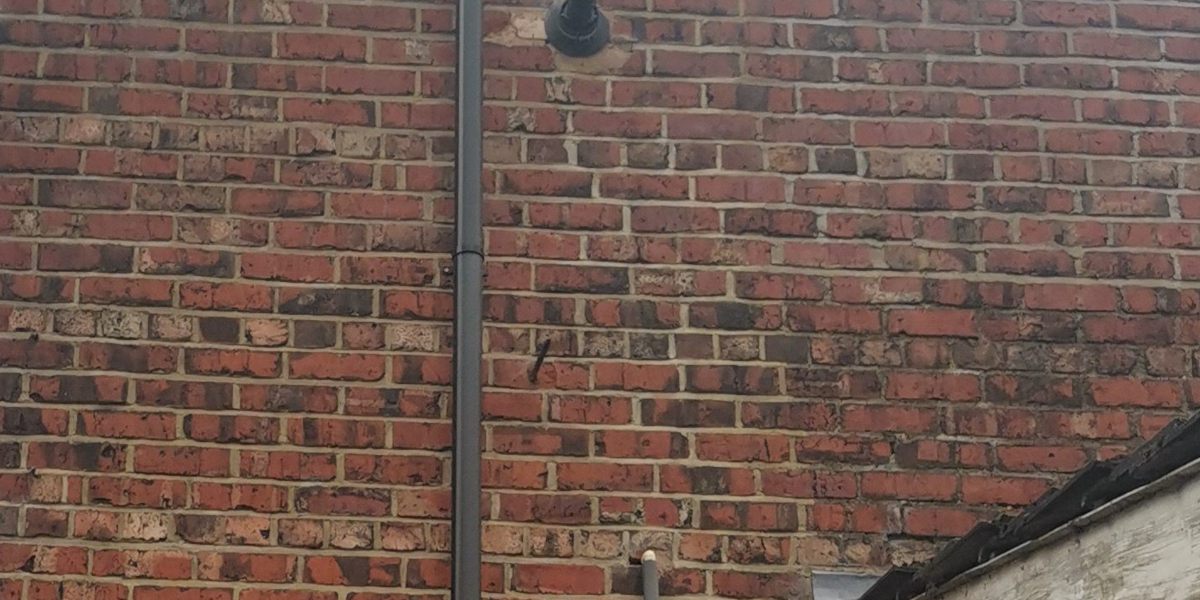
Before any work begins, ensure a functioning damp course is in place, positioned 150mm above ground level and visible from the exterior (or sometimes interior if floor removed), as required by the system design. No work should proceed if a damp course is missing or if there are signs of damp on the walls. External walls must also be inspected for signs of water penetration caused by issues such as deteriorating soil, waste pipes, or guttering.
All electrical and water services should be identified, adjusted, extended or removed to accommodate the system.
In some cases, original fixtures and fittings may need to be repositioned or fully removed. With older buildings that may have interior period features like coving and ornate window surrounds, a specialist intervention may be needed if features are to be reinstated. Some plaster work may need to be remoulded, and ornate framing may need a craft specialist to reinstate. With internal wall insulation the aim is to insulate as much as possible with no air gaps or failings at junctions, so it is inevitable that the system will need to go floor to ceiling, corner to corner and to all meeting points at frames.
It’s important to note that penetrating the insulation after installation (hanging pictures, installing radiators, or mounting TV brackets) can cause significant problems. To mitigate this, consider taking photographs during the mid-installation stage to document the position of battens and fixing areas for future reference. Installers can work with occupants to address areas of fixings.
The system (the insulation product and design) should be installed onto a clean and robust surface free from coatings that prevent moisture movement if system design deems it necessary. Correct fixings to system design should be used at all times, as using inferior or alternative methods can warranty the system invalid in case of failure.
All sockets, light fitting, skirting boards, window sills, radiators, carpets and floor coverings should be removed.
The system should be installed in the correct order stated by the system design, SWIP etc.
Areas that cannot be fully insulated due to constraints will need to be mitigated by using alternative thinner insulation products and trying to get as close to the same R value as system products used. The likes of Aerogel can be used if the system design, PAS or regulation allows.
Party walls should only be insulated to mitigate thermal bridging if proof that the neighbouring wall has also been insulated.
Rigid Insulation Boards.
Products, Celotex, Kingspan
Materials. Commonly made from PIR (polyisocyanurate), phenolic foam, or expanded polystyrene (EPS).
Installation. These boards are fixed to the internal surface of the wall, either using adhesive or mechanical fixings. The joints between the boards are sealed to prevent thermal bridging.
Advantages. High thermal resistance (R-value), relatively thin profile, moisture-resistant (especially PIR and phenolic).
Applications. Suitable for solid walls where space is limited, and a high level of insulation is required.
Insulated Plasterboard.
Materials. A combination of rigid insulation board (such as PIR or phenolic foam) bonded to a layer of plasterboard.
Installation. Directly fixed to the internal wall, often using adhesive or screws. The plasterboard side is finished with plaster or paint.
Advantages. Combines insulation and a finished surface in one product, saving time on installation. Provides good thermal performance.
Applications. Ideal for retrofitting in older properties, where space-saving is important, and a finished surface is desired.
Fibrous Insulation.
Materials. Mineral wool (rock wool or glass wool) or fibreglass.
Installation. Installed within a stud frame, usually with a vapour barrier on the warm side to prevent moisture ingress.
The stud frame is then covered with plasterboard.
Advantages. Excellent sound insulation, fire-resistant, non-combustible, good thermal performance.
Applications. Suitable for walls where a stud frame can be installed. Commonly used in timber-framed buildings, solid wall and cavity walled buildings.
Spray Foam Insulation.
Materials. Polyurethane foam.
Installation. Applied directly to the wall in a liquid form, expanding into a foam that fills gaps and cavities.
Advantages. Excellent air sealing properties, fills irregular spaces well, high R-value per inch.
Applications. Suitable for walls with complex shapes or hard-to-reach areas. Also used where airtightness is critical.
Multi-Foil Insulation.
Products. YBS super quilt.
Materials. Multiple layers of reflective foil, wadding, and foam.
Installation. Fixed to the wall using battens, with the joints taped to create an airtight layer. It usually requires a small air gap on either side.
Advantages. Thin and lightweight, reflects radiant heat, easy to handle.
Applications. Often used in combination with other insulation types, suitable for areas where space is limited.
Sheep’s Wool Insulation.
Materials. Natural sheep’s wool.
Installation. Installed within a stud frame, like fibrous insulation.
Advantages. Eco-friendly, renewable, good thermal and acoustic properties, regulates moisture by absorbing and releasing it.
Applications. Suitable for eco-friendly building projects, timber-framed buildings, and where sustainable materials are preferred.
Wood Fibre Insulation.
Materials. Wood fibres.
Installation. Typically installed within a stud frame or as boards fixed directly to the wall.
Advantages. Natural, breathable, good thermal and acoustic performance, regulates humidity.
Applications. Suitable for use in sustainable and breathable wall constructions.
Cork insulation.
Materials. Cork.
Installation. Directly fixed to the internal wall, often using adhesive and screws.
Advantages. Can Combine insulation and a finished surface in one product. Provides good thermal performance. Breathable.
Applications. Ideal for retrofitting in older properties, where space-saving is important, and a finished surface is desired.
Aerogel insulation.
Materials. Aerogel is a synthetic, ultralight, porous solid material with a very low density and thermal conductivity
Installation. Can be used to insulate hard to treat areas like window reveals.
Advantages. Fantastic thermal properties, so much thinner than other materials.
Applications. Can be purchased fixed to boards and on rolls
Interstitial condensation.
The risk of interstitial condensation when using internal wall insulation (IWI) is significant, especially with a poor or failed installation. This occurs when warm internal air penetrates or bypasses the insulation and airtight layers, condensing on the cold wall surface, or when external moisture enters through the masonry. Traditionally, a vapour barrier was considered essential inside internal insulation on solid walls, largely due to outdated moisture risk assessment methods (Glaser method). However, it is now widely recognized that, in many cases, this approach can be more harmful than beneficial. Therefore, a moisture-open internal wall insulation system is recommended for insulating solid walls. Alternatively, a moisture-closed system with a ventilated cavity of at least 25mm on the cold side may be used. Moisture sensors (Digital Hygrometer) are handy gadgets to have at home and don’t cost the earth.

Types of Wall Construction.
UK homes are typically classified into three different types of wall construction:
Solid Wall
Cavity Wall * see best practice for condition and filling.
Non-Standard Construction (System-Built)
Identifying the type of construction is essential for determining the best approach to installing IWI insulation and controlling moisture. Internal wall insulation can be installed to most wall types including cavity, but best practices and adhering to system design is a must to prevent potential failure.


1. IWI on a Solid Wall (traditional)
Characteristics of a solid wall.
Usually found in homes built before the 1920s.
No cavity between the walls.
Construction pattern (Flemish, English, common)
Can vary in thickness from single brick at 150mm to stone up to 500mm or more!
2. IWI on a Cavity Wall
Characteristics.
Common in homes built from the 1920s onwards.
Consists of two parallel walls (inner and outer leaves) with a gap (cavity) in between.
Originally, the cavity was designed to prevent moisture penetration, not for insulation.
Insulation Approach.
Internal wall insulation is a crucial part of improving the energy efficiency of a building. It helps in reducing heat loss through walls and can significantly lower energy bills. There are several types of internal wall insulation, each with its own characteristics and suitable applications:
The insulation products, procedures for IWI on a cavity wall can be found above in the traditional built section as the only difference is that a cavity exists, which should be in a condition to best practice. Best practice document here, page 16.


Gas and open flued appliances.
If the fabric of the property is being improved and open-flued gas appliances exist, then a gas spillage test should be carried out on each appliance by a suitably competent operative.
Rules exist that give an average unimproved property a certain amount of leakiness (adventitious air) to allow open-flued appliances to operate safely.
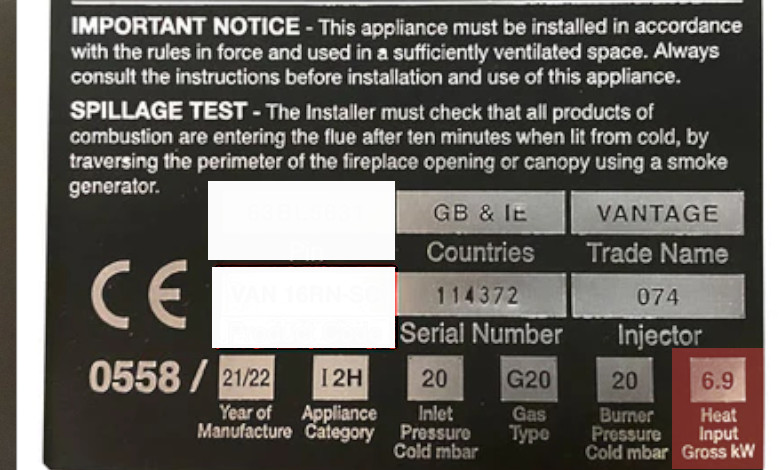
This all depends on how much fuel burns over a period of time, for example: 7.5kw/hr, 9kw/hr, 6.9kw/hr. You will see this on the data badge of the appliance (gas rating of an appliance here.). The more fuel used, the more leakiness is needed. Multifuel appliances are treated in roughly the same way but do not come under gas safe legislations. HETAS and building regulations govern multifuel installations and ventilation.
This is the reason combustion ventilation is sometimes needed. This allows the air to be replenished (with an open flued appliance we are burning the oxygen in the room that we use to breathe)
With the introduction of insulation, extraction ventilation should be installed as part of the process, we now have a different factor to add in with gas safety. Extraction fans either pulling or pushing air (PIV) can now effect the performance of the appliance.
Open flued gas appliances should be checked to prove they are not spilling products of combustion into the property. This is verified by performing a spillage test.
Part J states. “Extract fans lower the pressure in a building, which can cause the spillage of combustion products from open-flued appliances. This can occur even if the appliance and the fan are in different rooms”.
Any funded insulation work now includes ventilation upgrades as part of the current PAS, so extract ventilation will be installed. This should have been factored in as part of any ventilation work carried out. A competent person is required to perform spillage tests.
Part B, 8(1) of the Gas Safety (Installation and Use) Regulations 1998 states that no person can make any changes to a premises that contains a gas fitting or storage vessel if the changes would compromise the safety of the fitting or vessel.
This basically means if the fabric of the building (walls, floors, roofs) are being insulated then appliances need to be checked by a suitably competent and qualified person.


Installation guidance.
Most background vents can be installed at a DIY level, with some easier than others. The main objective is to provide the adequate equivalent area if the IWI requires upgrades. Good quality vents have equivalent areas printed on to them, and some newer types like air box will have data sheets so you can work out how many will be needed. If in doubt, always get a qualified trades person who can guide and help you meet the requirements needed.,
Free area and equivalent area are both measurements of a ventilator’s airflow performance, but they differ in how they’re calculated and how accurate they are:
Also known as open area, this is the physical size of a ventilator’s aperture. It’s an older measurement that may not accurately reflect a ventilator’s airflow performance because modern ventilators have different shapes and internal mechanisms that limit airflow.
Fire regulations need to be adhered to regarding materials and electrics.
PAS needs to be adhered to if funded on UK scheme.
Conservation of fuel and power regulations need to be adhered to regarding pipework insulation and building fabric.
Electrical regulations need to be adhered to regarding high-powered cables and lighting.
Other regulations regarding gas appliances, solar inverters and stored water within the loft space are also to be referenced when required.
Below you will find links to UK regulations and other useful information. These links are to third party websites, and we cannot guarantee the validity or safety of the following sites. If you find any broken links or issues, we would love to know. Please read our disclaimer. Contact us here for issues.
Energy saving trust guide.
Pas 2035
Pas 2030
Part A – Structure
Part B – Fire safety
Part C – Site preparation and resistance to contaminants and moisture
Part D – Toxic substances
Part E – Resistance to sound
Part F – Ventilation
Part G – Sanitation, hot water safety and water efficiency
Part H – Drainage and waste disposal
Part J – Combustion appliances and fuel storage systems
Part K – Protection from falling, collision and impact
Part L – Conservation of fuel and power
Part M – Access to and use of buildings
Part O – Overheating
Part P – Electrical safety
Part Q – Security in dwellings
Part R – Infrastructure for electronic communications
Part S – Infrastructure for charging electric vehicles
Part T – Toilet accommodation
Regulation 7 – Materials and workmanship
The Gas Safety (Installation and Use) Regulations, 1998
MCS (microgeneration certification scheme)
Electrical standards